QLogic_Windows.book Page i Thursday, March 10, 2005 10:31 AM EMC Fibre Channel with QLogic Host Bus Adapters in the Windows Environment P/N 300-001-164 REV A07 EMC Corporation Corporate Headquarters: Hopkinton, MA 01748 -9103 1-508 -435 -1000 www.emc.
QLogic_Windows.book Page ii Thursday, March 10, 2005 10:31 AM Copyright © 2001–2005 EMC Corporation. All rights reserved. Updated March 2005 EMC believes the information in this publication is accurate as of its publication date. The information is subject to change without notice. THE INFORMATION IN THIS PUBLICATION IS PROVIDED "AS IS.
QLogic_Windows.book Page iii Thursday, March 10, 2005 10:31 AM Contents Preface........................................................................................................................... vii Chapter 1 Introduction Understanding Persistent Binding in a Fabric Environment .... 1-2 Chapter 2 Installing and Configuring the HBA Driver Introduction ...................................................................................... 2-2 Downloading QLogic Drivers and Firmware ...............
QLogic_Windows.book Page iv Thursday, March 10, 2005 10:31 AM Contents Installation Procedure for Windows 2000 and Windows 2003 Hosts.............................................................. 2-16 Updating the HBA Driver in a Windows 2000 or Windows 2003 Host....................................................................... 2-18 Upgrading to Windows 2003 from Windows 2000 or Windows NT 4.0 ............................................................................ 2-20 Replacing an HBA .........
QLogic_Windows.book Page v Thursday, March 10, 2005 10:31 AM Contents Starting a Fresh Installation.................................................. Boot Time and LUN Availability ................................................ Replacing a Boot HBA .................................................................. EMC Symmetrix ..................................................................... EMC CLARiiON.....................................................................
QLogic_Windows.book Page vi Thursday, March 10, 2005 10:31 AM Contents Problem 5 .................................................................................. Problem 6 .................................................................................. Problem 7 .................................................................................. Problem 8 .................................................................................. B-3 B-3 B-4 B-4 Index ...........................................
QLogic_Windows.book Page vii Thursday, March 10, 2005 10:31 AM Preface Conventions Used in This Guide EMC uses the following conventions for notes, cautions, and warnings. A note presents information that is important, but not hazard-related. ! CAUTION A caution contains information essential to avoid data loss or damage to the system or equipment. The caution may apply to hardware or software.
QLogic_Windows.
QLogic_Windows.book Page 1 Thursday, March 10, 2005 10:31 AM 1 Invisible Body Tag Introduction This document describes the procedures for installing an EMC-approved QLogic host bus adapter (HBA) into a Windows NT, Windows 2000, or Windows 2003 host environment and configuring the Windows host for connection to an EMC storage array over Fibre Channel. Review the EMC Support Matrix for the latest information on approved HBAs and drivers. ◆ Understanding Persistent Binding in a Fabric Environment ......
QLogic_Windows.book Page 2 Thursday, March 10, 2005 10:31 AM Introduction 1 Understanding Persistent Binding in a Fabric Environment Persistent binding is the mechanism to create a continuous logical route from a storage device object in the Windows host to a volume in the EMC® storage array across the fabric. Without a persistent binding mechanism, the host cannot maintain persistent logical routing of the communication from a storage device object across the fabric to an EMC storage array volume.
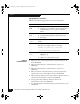
QLogic_Windows.book Page 3 Thursday, March 10, 2005 10:31 AM Introduction \\PHYSICALDRIVE0, \\PHYSICALDRIVE1, and \\PHYSICALDRIVE2. The number is assigned during the disk discovery part of the Windows boot process. During boot-up, the Windows OS loads the driver for the storage HBAs. After loaded, the OS performs a SCSI Inquiry command to get information about all of the attached storage devices.
QLogic_Windows.book Page 4 Thursday, March 10, 2005 10:31 AM Introduction 1 PHYSICALDRIVE0 HBA 0 Windows Host PHYSICALDRIVE4 HBA 1 HBA 2 PHYSICALDRIVE8 The next figure shows the same host after the cable attached to HBA0 has been removed and the host rebooted. Because Windows was not able to do a discovery on HBA0, it assigned \\PHYSICALDRIVE0 to the first device it discovered. In this case, that first device is connected to HBA1.
QLogic_Windows.book Page 1 Thursday, March 10, 2005 10:31 AM 2 Invisible Body Tag Installing and Configuring the HBA Driver This chapter describes the procedures for installing an EMC-approved QLogic host bus adapter (HBA) into a Windows NT, Windows 2000, or Windows 2003 host environment and configuring the Windows host for connection to an EMC storage array over Fibre Channel. ◆ ◆ ◆ ◆ ◆ ◆ ◆ Introduction ........................................................................................
QLogic_Windows.book Page 2 Thursday, March 10, 2005 10:31 AM Installing and Configuring the HBA Driver 2 Introduction The procedure described here was written specifically for the QLA22xx and QLA23xx families of Fibre Channel HBAs; however, the procedures for installing the adapter BIOS and Windows drivers are identical for QLA21xx, QLA22xx, and QLA23xx. When installing or upgrading the BIOS and drivers, be sure to use the latest versions supported by EMC.
QLogic_Windows.book Page 3 Thursday, March 10, 2005 10:31 AM Installing and Configuring the HBA Driver Installing an HBA Follow the instructions included with your HBA. The HBA installs into a single slot, and has no user-configurable jumpers or switches. Follow these steps to connect the cable to the HBA: 1. (Optical cable only) Remove the protective covers on each fiber-optic cable. 2. Plug one end of the cable into the connector on the HBA as shown in the appropriate figure.
QLogic_Windows.book Page 4 Thursday, March 10, 2005 10:31 AM Installing and Configuring the HBA Driver 2 4. Label each cable to identify the HBA and the storage/switch/hub port to which it connects. 5. After connecting all HBAs in the server, power up the server. Special Installation Sequence for Stratus ftServers and EMC CLARiiON Arrays A specific installation sequence is required when installing QLogic HBAs with the Stratus ftServers and EMC CLARiiON® storage.
QLogic_Windows.book Page 5 Thursday, March 10, 2005 10:31 AM Installing and Configuring the HBA Driver fields to select the correct CX200-Series direct-connect dual-host cluster-compatible files. Reconfigure the HBA Jumper ! For CLARiiON CX200-Series direct-connect dual-host cluster configurations with only QLA234x HBAs, you must change the default HBA optic jumper position: CAUTION Modifying the jumper setting without using the recommended firmware/drivers can cause the HBA to lose connectivity. 1.
QLogic_Windows.book Page 6 Thursday, March 10, 2005 10:31 AM Installing and Configuring the HBA Driver 2 If later you wish to return the jumper(s) to the default factory position, repeat step 2, returning the jumper to pins 2–3. Set the HBA FC-AL Loop ID While configuring a QLA234x HBA for Windows NT or Windows 2000 and connection to EMC CLARiiON CX200-Series for direct-connect cluster configurations, you must manually set the HBA FC-AL Loop ID.
QLogic_Windows.book Page 7 Thursday, March 10, 2005 10:31 AM Installing and Configuring the HBA Driver 7. Enter a value for the loop ID and press ENTER. 8. Press ESC to return to the Configuration Settings menu. 9. Press ESC to return to the Fast!UTIL Options menu. 10. When prompted to save changes made to the current adapter, select Save Changes and press ENTER. 11. If there are more adapters to configure, choose Select Host Adapter, and repeat steps 3 through 11 for each adapter. 12.
QLogic_Windows.book Page 8 Thursday, March 10, 2005 10:31 AM Installing and Configuring the HBA Driver 2 EMC HBA Settings EMC requires configuring the QLogic BIOS settings with the EMC-approved NVRAM settings file. This file contains all of the BIOS settings for the QLogic adapters that have been tested and approved for connection to the EMC storage array. The QLogic CD-ROM contains the latest EMC-approved BIOS and NVRAM settings files at the time of creation of the CD-ROM.
QLogic_Windows.book Page 9 Thursday, March 10, 2005 10:31 AM Installing and Configuring the HBA Driver Configuring NVRAM for Stratus ftServers If you have not received QLogic HBAs with the EMC configurations pre-loaded, you may have to perform the following procedure. If your HBAs have been pre-configured, proceed to Installing the HBA Driver on page 2-14. During POST, Stratus ftServers present only one HBA for configuration in a multiple-HBA system. This is the way the ftServer manages HBA failover.
QLogic_Windows.book Page 10 Thursday, March 10, 2005 10:31 AM Installing and Configuring the HBA Driver 2 Ignore any steps that pertain to multiple adapters. 4. Shut down the server. 5. Before powering up the server, restore power to the PCI Chassis: • For Stratus ftServer 3200 systems, tighten the Phillips-head screw that you loosened on the top right of the chassis. • For Stratus ftServer 5200 systems, power up the chassis. 6. Power up the server and proceed to Installing the HBA Driver on page 2-14.
QLogic_Windows.book Page 11 Thursday, March 10, 2005 10:31 AM Installing and Configuring the HBA Driver Updating While Running Windows To update while running Windows, refer to QLogic SANSurfer SANBlade Manager on page A-2. Stratus ftServers are not supported using the qLogic SANSurfer SANBlade Manager Software or Agents, and should only be updated using the DOS boot diskette. Refer to Updating Using a DOS Boot Diskette.
QLogic_Windows.book Page 12 Thursday, March 10, 2005 10:31 AM Installing and Configuring the HBA Driver 2 file name, note that some BIOS versions might require the /N parameter (which allows an alternate NVRAM filename to be specified) to load the NVRAM file correctly Example: FLASUTIL /L /F /N NVRAM2xx.DAT where NVRAN2xx.DAT is the non-standard NVRAM file name. 5. When the procedure has finished, remove the diskette and reboot the host.
QLogic_Windows.book Page 13 Thursday, March 10, 2005 10:31 AM Installing and Configuring the HBA Driver Setting the Topology for QLA22xx/23xx and Windows While using a QLA22xx or QLA23xx HBA for Windows NT, Windows 2000, or Windows 2003, the default EMC configured topology is set for “loop preferred, otherwise point to point.” If you want to change this value, you can manually set the adapter topology.
QLogic_Windows.book Page 14 Thursday, March 10, 2005 10:31 AM Installing and Configuring the HBA Driver 2 Installing the HBA Driver To use EMC storage array disks with a Windows host, you need an EMC-qualified Fibre Channel HBA driver. The HBA kit includes an EMC-approved driver, which must be installed and configured prior to partitioning the storage array disks. You should also check the QLogic website for the latest EMC-approved version. (Refer to Downloading QLogic Drivers and Firmware on page 2-2.
QLogic_Windows.book Page 15 Thursday, March 10, 2005 10:31 AM Installing and Configuring the HBA Driver Windows 2003 STORPort Updates Currently the shipping version of Windows 2003 requires post-RTM hotfixes to resolve some known issues. For all Windows 2003 STORPort installations, you should obtain the current Microsoft QFE hotfix listed in the EMC Support Matrix with the HBA driver revisions. Install this patch before installing the HBA driver.
QLogic_Windows.book Page 16 Thursday, March 10, 2005 10:31 AM Installing and Configuring the HBA Driver 2 7. Select QLogic QLA2300 (or QLA2200) PCI Fibre Channel Adapter, and click OK to install it. 8. Reboot the host. It should recognize all new host adapter cards. 9.
QLogic_Windows.book Page 17 Thursday, March 10, 2005 10:31 AM Installing and Configuring the HBA Driver 10. Enter the path to the diskette containing the driver (for example, A:\), then click OK. 11. Select the appropriate QLogic HBA from the list of drivers that appears; then click Next. 12. Click Next in the next window. 13. Click YES to continue the installation. 14. Click Finish to complete the driver installation. 15. The system requests that you reboot the system. Select NO and click Close. 16.
QLogic_Windows.book Page 18 Thursday, March 10, 2005 10:31 AM Installing and Configuring the HBA Driver 2 Updating the HBA Driver in a Windows 2000 or Windows 2003 Host On Windows 2000 and Windows 2003 systems where the QLogic HBA has been detected automatically or a driver is already installed, it might be necessary to update the current driver to the latest EMC-qualified driver, as described in this section.
QLogic_Windows.book Page 19 Thursday, March 10, 2005 10:31 AM Installing and Configuring the HBA Driver 12. If prompted, click Yes to continue the installation. 13. Click Finish to complete the installation. 14. If the system requests that you reboot the system and you have other adapters to update, select NO; then click Close. 15. If the system again requests that you reboot the system and you have other adapters to update, select NO; then click Close. 16.
QLogic_Windows.book Page 20 Thursday, March 10, 2005 10:31 AM Installing and Configuring the HBA Driver 2 Upgrading to Windows 2003 from Windows 2000 or Windows NT 4.0 Note the following if upgrading to Windows 2003: ◆ Upgrading from Windows NT 4.0 — The Windows NT4 drivers will not be preserved while upgrading to Windows 2003. You should obtain the correct Windows 2003 drivers (refer to Downloading QLogic Drivers and Firmware on page 2-2) and reinstall the drivers after the upgrade is complete.
QLogic_Windows.book Page 21 Thursday, March 10, 2005 10:31 AM Installing and Configuring the HBA Driver Replacing an HBA Procedure for Replacing a QLogic HBA in Stratus ftServers without Rebooting EMC CLARiiON Storage arrays Use of this procedure requires NAVICLI installed on the host system. 1. Remove the IO slice that contains the defective QLogic HBA. 2. Replace the defective HBA with a new HBA of same Stratus part number (that is, U525 or U526).
QLogic_Windows.book Page 22 Thursday, March 10, 2005 10:31 AM Installing and Configuring the HBA Driver 2 10. Execute the following commands from a command window: powermt restore powermt display At this point, two HBA’s should be present in the display and the FC HBA’s should be duplexed in the ftSMC. It may be necessary to repeat steps 9 and 10. EMC Symmetrix Arrays with Device Masking Enabled1 Use of this procedure requires SYMCLI installed on the host system.
QLogic_Windows.book Page 23 Thursday, March 10, 2005 10:31 AM Installing and Configuring the HBA Driver 10. Run symmask refresh to update the director profile tables (in cache) from the database. 11. Scan for hardware changes from the Windows device manager. 12. Execute the following commands from a command window: powermt restore powermt display At this point, two HBA’s should be present in the display and the FC HBA’s should be duplexed in the ftSMC. It may be necessary to repeat steps 9 and 10.
QLogic_Windows.
QLogic_Windows.book Page 1 Thursday, March 10, 2005 10:31 AM 3 Invisible Body Tag Configuring an EMC Boot Device Windows hosts have been qualified for booting from EMC storage array devices interfaced through Fibre Channel as described in the EMC Support Matrix. This chapter describes the process to configure a storage array device as a boot device. ◆ ◆ ◆ ◆ ◆ ◆ ◆ Introduction ........................................................................................
QLogic_Windows.book Page 2 Thursday, March 10, 2005 10:31 AM Configuring an EMC Boot Device 3 Introduction Windows hosts have been qualified for booting from EMC array devices interfaced through Fibre Channel as described under Boot Device Support in the EMC Support Matrix. Boot-from-SAN Configuration Restrictions Refer to the EMC Support Matrix for any specific boot-from-SAN restrictions.
QLogic_Windows.book Page 3 Thursday, March 10, 2005 10:31 AM Configuring an EMC Boot Device ◆ Storage Area Network service/upgrade procedures, such as firmware upgrades or hardware replacements EMC recommends moving the Windows virtual memory paging file to a local disk when booting from the storage array. Consult your Windows manual for instructions on how to move the paging file.
QLogic_Windows.book Page 4 Thursday, March 10, 2005 10:31 AM Configuring an EMC Boot Device 3 Boot Crashdump Save to Disk Behavior If you system is configured to write crashdumps after system failures, and the host is configured to boot from the array, you will be able to successfully save the crashdump only on the original available boot device path on which the system started. This is a Windows limitation, and installing PowerPath will not affect this behavior.
QLogic_Windows.book Page 5 Thursday, March 10, 2005 10:31 AM Configuring an EMC Boot Device Configuring a Symmetrix Boot Device This section describes how to install the Windows NT or Windows 2000 operating system onto an EMC Symmetrix® storage system connected to an Intel-based x86 class server. You can then boot Windows from the storage system. Configuring the Boot BIOS The procedure below describes how to configure the boot BIOS.
QLogic_Windows.book Page 6 Thursday, March 10, 2005 10:31 AM Configuring an EMC Boot Device 3 5. From the Configuration Settings menu, select Host Adapter Settings and press ENTER. 6. From the Host Adapter Settings menu, select Host Adapter BIOS and press ENTER to enable it if it is not already enabled. Refer to EMC HBA Settings on page 2-8 for a table of EMC-approved NVRAM settings. 7. Press ESC to exit the Configuration Settings menu. 8.
QLogic_Windows.book Page 7 Thursday, March 10, 2005 10:31 AM Configuring an EMC Boot Device Installing the Windows OS onto the Boot Device Follow the appropriate steps below to install the Windows operating system onto the EMC boot device. Windows NT Microsoft does not provide a driver for the QLogic controllers on the Windows NT installation CD-ROM.
QLogic_Windows.book Page 8 Thursday, March 10, 2005 10:31 AM Configuring an EMC Boot Device 3 7. Some servers use SCSI CD-ROM drives. If your server has a SCSI CD-ROM, repeat steps 5 and 6 to select the driver for the SCSI controller. If your controller is not on the list, obtain the driver on diskette from the vendor. 8. If you want to specify drivers for other devices installed in your system, do so; otherwise press ENTER at the Additional Devices dialog to continue with Windows installation. 9.
QLogic_Windows.book Page 9 Thursday, March 10, 2005 10:31 AM Configuring an EMC Boot Device If a system contains of mixture of detected and undetected adapters, any existing EFI drivers loaded by EFI should be unloaded using the EFI Shell drivers, and unload commands. If you have not previously installed EFI boot code to your QLogic HBA, skip this section. 1. Type drivers at the EFI shell prompt to display the list of loaded EFI drivers.
QLogic_Windows.book Page 10 Thursday, March 10, 2005 10:31 AM Configuring an EMC Boot Device 3 1. To load the EFI driver onto the HBA, type ew and press ENTER. The driver image binary filename, by default, is ql2312ef.bin. The EFIUTIL program will prompt for the filename, and pressing ENTER selects the default. Confirm that the version being installed is correct by typing Y and pressing ENTER. The driver will begin flashing to the HBA. The efiutil> prompt will reappear when the load is complete. 2.
QLogic_Windows.book Page 11 Thursday, March 10, 2005 10:31 AM Configuring an EMC Boot Device 2. At the shell> prompt, type drivers and press ENTER. The list of currently loaded drivers will be displayed. The QLogic EFI driver should appear on a line that is similar to that shown below: 5D 0000011E B X X 5D 00000140 D X X 1 HP 2 Gb Fibre Channel Driver PciRom Seg=00000000 1 - Qlogic Fibre Channel Driver PciRom Seg=00000000 3. The first two hex digits are the driver handle.
QLogic_Windows.book Page 12 Thursday, March 10, 2005 10:31 AM Configuring an EMC Boot Device 3 2. Hard Loop Id (hex) = 255 (Note: Only direct-connect configurations also.) 3. Reset Delay (dec) = 5 (default) 4. Enable FC Tape = Y (default) 5. Frame Size = 2048 (default) 6. Select the topology for your configuration. In most cases, the default setting will work for all configurations. 7. Data Rate = 2 (default) Type 0 at the selection prompt to return to the main menu. 13.
QLogic_Windows.book Page 13 Thursday, March 10, 2005 10:31 AM Configuring an EMC Boot Device there, you can configure your zone(s) on the fabric to allow the HBA to connect to the array properly. Procedure to Install Windows Server 2003 on a Fibre Channel Disk (Only for system with floppy disk drive). 1. Boot with Windows Server 2003 Setup Media (See Microsoft Documentation for details). 2. Monitor the white bar on the bottom of the screen. 3.
QLogic_Windows.book Page 14 Thursday, March 10, 2005 10:31 AM Configuring an EMC Boot Device 3 Configuring a CLARiiON Boot Device This section describes how to install a boot device onto an EMC CLARiiON® storage system connected to an Intel-based x86 class server. You can then boot Windows from the storage system. This section assumes that EMC did not prepare the server or the storage system to boot Windows from the storage system.
QLogic_Windows.
QLogic_Windows.book Page 16 Thursday, March 10, 2005 10:31 AM Configuring an EMC Boot Device 3 Requirements Topologies, Configurations, and Revisions Hardware and Software Requirements This section lists supported configurations, hardware and software requirements, and related documentation. Refer to the EMC Support Matrix. Refer to the EMC Support Matrix for specific support information.
QLogic_Windows.book Page 17 Thursday, March 10, 2005 10:31 AM Configuring an EMC Boot Device Media Requirements Required media includes the following: Refer to Downloading QLogic Drivers and Firmware on page 2-2. ◆ Latest EMC-approved Fibre Channel PCI HBA Driver Kit for Windows ◆ Latest EMC-approved Fibre Channel PCI HBA firmware ◆ MS-DOS boot diskette. Preparing the Storage System Boot device support requires a Navisphere Management station with Navisphere Manager or CLI.
QLogic_Windows.book Page 18 Thursday, March 10, 2005 10:31 AM Configuring an EMC Boot Device 3 Setting Up the HBA BIOS After the HBA is installed in the host and the EMC array is connected to the fabric (FC-SW) or directly connected to the HBA (FC-AL), you can configure an EMC-qualified QLogic HBA for boot support using Fast!UTIL, as described below: 1. Boot the server, and press CTRL-Q when you see the QLogic banner: Different HBA models may display different banners.
QLogic_Windows.book Page 19 Thursday, March 10, 2005 10:31 AM Configuring an EMC Boot Device 9. Press ESC to exit the Fast!UTIL Options menu. 10. Reboot the host. What Next? The next step depends on the topology: ◆ FC-AL: Proceed to Preparing the Server on page 3-22. ◆ FC-SW: Proceed to Preparing the Fabric on page 3-19. Preparing the Fabric You can configure a switched fabric to support multiple hosts and multiple storage systems.
QLogic_Windows.book Page 20 Thursday, March 10, 2005 10:31 AM Configuring an EMC Boot Device 3 Soft Zoning These instructions let you configure the soft zoning as this setup requires. They are not a complete explanation of zoning. Refer to the documentation that is available for your switches for a complete guide. 1. Ensure that the server and storage system are cabled properly and powered on. For the HBA’s WWPN to appear in the Name Server database, the server must be in the boot BIOS menu.
QLogic_Windows.book Page 21 Thursday, March 10, 2005 10:31 AM Configuring an EMC Boot Device 3. Create a member alias for the boot HBA WWPN. Make sure it is a member alias and that you use the 21... Port Name, not the 20... Node Name. 4. Create a member alias for one storage system SP port that you connected earlier and to which you bound the boot LUN. You can choose either Port 0 or Port 1 of the SP if both ports are connected to the switch. EMC recommends using Port 0 for consistency. 5.
QLogic_Windows.book Page 22 Thursday, March 10, 2005 10:31 AM Configuring an EMC Boot Device 3 Physical Connection of Only One SP Port to the Fabric If the SP that owns the boot LUN has only one port connected to the switch, and no other target devices are on the fabric, then zoning for the boot configuration is not necessary. You should make sure any existing zones still allow the HBA-to-SP connection. Refer to the switch documentation for possible restrictions.
QLogic_Windows.book Page 23 Thursday, March 10, 2005 10:31 AM Configuring an EMC Boot Device 3. To disconnect all SCSI hard disk drives, unplug the power and SCSI bus cables connected to a SCSI adapter or controller. For details, see the installation and operation manual for your server. 4.
QLogic_Windows.book Page 24 Thursday, March 10, 2005 10:31 AM Configuring an EMC Boot Device 3 Different HBA models may display different banners. Be sure to select CTRL-Q for the HBA you wish to configure. QLogic Corporation QLA2300 PCI Fibre Channel ROM BIOS Version 1.17 Copyright © Qlogic Corporation 1993-1999 All rights reserved Press for Fast!UTIL www.qlogic.com 2.
QLogic_Windows.book Page 25 Thursday, March 10, 2005 10:31 AM Configuring an EMC Boot Device When the QLogic BIOS banner (shown in step 1) appears, press CTRL–Q. Different HBA models may display different banners. Be sure to select CTRL-Q for the HBA you wish to configure. 8. After Fast!UTIL loads, the display depends on whether there are multiple QLogic HBAs installed: • If there is only one QLogic HBA, the Fast!UTIL Options menu appears.
QLogic_Windows.book Page 26 Thursday, March 10, 2005 10:31 AM Configuring an EMC Boot Device 3 1. Insert a bootable Windows CD-ROM in the drive and reboot the system. If your system has a bootable disk already configured from a previous installation, the software will prompt you to press any key to boot from CD-ROM. If the bootable disk is not the storage array disk on which you want to install Windows, then you should disable that disk’s SCSI BIOS as described under Preparing the Server on page 3-22. 2.
QLogic_Windows.book Page 27 Thursday, March 10, 2005 10:31 AM Configuring an EMC Boot Device The Windows Server Setup dialog displays disk partition information (if your system already contains partitions), or lets you create a new hard disk partition. The Windows 2000 boot LUN can be larger than 8 GB (Refer to Microsoft Knowledge Base article Q240672.) Windows NT 4.0 is bound by a Boot BIOS 8 GB limit. (Refer to Microsoft Knowledge Base article Q224526.) 9.
QLogic_Windows.book Page 28 Thursday, March 10, 2005 10:31 AM Configuring an EMC Boot Device 3 If your system prompts you to press any key to boot from CD-ROM, do not press a key; allow the system to boot from the HBA adapter. After booting, the system continues installation, displays the Windows banner, and begins autodetection of mass-storage devices and adapters. 12. Follow the on-screen instructions to complete the installation.
QLogic_Windows.book Page 29 Thursday, March 10, 2005 10:31 AM Configuring an EMC Boot Device What Next? From here: ◆ If you need to install multipath and failover software, refer to Installing Multipath and Failover Software. ◆ If you need to start the installation again, refer to Starting a Fresh Installation. ◆ Otherwise, installation and setup are complete. Assigning a Permanent Boot Drive Letter for Windows NT If you have installed failover software into a Windows NT 4.
QLogic_Windows.book Page 30 Thursday, March 10, 2005 10:31 AM Configuring an EMC Boot Device 3 2. Create and enable a zone for each additional HBA and SP port that will be supported by the multipath and failover software. Refer to Known Issues on page 3-38 for any additional information. Installing Additional Navisphere Host Agent Software The EMC ControlCenter Navisphere Host Agent should be used to automatically register host connections with the array.
QLogic_Windows.book Page 31 Thursday, March 10, 2005 10:31 AM Configuring an EMC Boot Device Connect host to storage group (y/n)?" Enter Y to proceed. 8. Perform a device rescan on your host, and verify the additional device paths are present. ◆ With brief disruption of Host Connectivity (simpler procedure using Navisphere GUI): RR:1.Shut down the host. 9. Remove the host from the storage group. 10. Apply the change. 11. Add the host back into the storage group. 12.
QLogic_Windows.book Page 32 Thursday, March 10, 2005 10:31 AM Configuring an EMC Boot Device 3 • If there are multiple QLogic HBAs, a list of addresses occupies by those HBAs appears. Use the arrow keys to select the desired HBA; then press ENTER. The Fast!UTIL Options menu appears. 3. Select Configuration Settings from the menu. 4. Select Selectable Boot Settings from the Configuration Settings menu.
QLogic_Windows.book Page 33 Thursday, March 10, 2005 10:31 AM Configuring an EMC Boot Device – With FC-series array core code 8.44.x and earlier, you will use the atf_trespass command to trespass the boot LUN. To do this, follow the steps under Trespassing the Boot LUN Using atf_trespass on page 3-33. Each HBA can support multiple entries; you should configure Boot Port Name entries connecting to multiple ports on both SPs for maximum redundancy in booting after a boot LUN trespass or other link failures.
QLogic_Windows.book Page 34 Thursday, March 10, 2005 10:31 AM Configuring an EMC Boot Device 3 e. Find this Device Type line and note the LUN value. In this example, the LUN value is 0. This is the Host LUN ID you will need in the next step. 3. Open a command window and direct the multipath and failover software to trespass the LUN.
QLogic_Windows.book Page 35 Thursday, March 10, 2005 10:31 AM Configuring an EMC Boot Device before the storage system is ready to respond. If this occurs, the server will not be able to find the boot LUN or Windows operating system. To avoid this problem, either power up the storage system and fabric before the server, or if the server is so equipped, set it to delay the scan until the storage system is ready.
QLogic_Windows.book Page 36 Thursday, March 10, 2005 10:31 AM Configuring an EMC Boot Device 3 Replacing a Boot HBA If a boot HBA fails, you can replace it with a new one as described in this section. 3-36 EMC Symmetrix Follow the procedure under Configuring a Symmetrix Boot Device. EMC CLARiiON ◆ Shut down and power off the server. ◆ Replace the HBA in the identical location and reconnect cabling.
QLogic_Windows.book Page 37 Thursday, March 10, 2005 10:31 AM Configuring an EMC Boot Device How a Server Responds to Failure in the Boot LUN Path Failure in the path to a SAN-based boot LUN can halt Windows in a fatal error condition. Depending on the failure, Windows may be able to transfer control to another path and continue. Table 3-1 shows server reactions to failures in different components.
QLogic_Windows.book Page 38 Thursday, March 10, 2005 10:31 AM Configuring an EMC Boot Device 3 Known Issues Be aware of these issues: 3-38 ◆ QLogic BIOS 1.26 and later for QLA23xx and BIOS 1.79 and later for QLA22xx HBAs allow for multiple Boot Port Name entries to be configured for high-availability booting after path failures. Previous BIOS versions do not support this functionality, will boot only from a single storage array port, and cannot provide boot capability with path failures.
QLogic_Windows.book Page 1 Thursday, March 10, 2005 10:31 AM 4 Invisible Body Tag Installing and Configuring the QLogic QLA4010 iSCSI HBA (TOE) The QLA4010/4010C is an iSCSI HBA that provides PCI connectivity to SCSI using the iSCSI protocol. iSCSI enables IP-based SANs, which are similar to Fibre Channel SANs. The QLA4010/4010C HBA implements TCP/IP protocol on the HBA and off-loads the host of any I/O protocol processing. This type of adapter also is called a TCP/IP Offload Engine (TOE) adapter.
QLogic_Windows.book Page 2 Thursday, March 10, 2005 10:31 AM Installing and Configuring the QLogic QLA4010 iSCSI HBA (TOE) 4 Installing the HBA Driver To use EMC storage array disks with a Windows host, you need an EMC-qualified HBA driver. The HBA kit includes an EMC-approved driver, which must be installed and configured prior to partitioning the storage array disks. You should also check the QLogic website for the latest EMC-approved version.
QLogic_Windows.book Page 3 Thursday, March 10, 2005 10:31 AM Installing and Configuring the QLogic QLA4010 iSCSI HBA (TOE) 6. In the next dialog, click ReInstall Driver, and then, click Next. 7. Select Display a list of the known drivers for this device so that you can choose a specific driver, and then click Next. 8. Select SCSI and RAID Controllers, and then click Next. 9. Click Have Disk. 10. Enter the path to the diskette containing the driver (for example, A:\), then click OK. 11.
QLogic_Windows.book Page 4 Thursday, March 10, 2005 10:31 AM Installing and Configuring the QLogic QLA4010 iSCSI HBA (TOE) 4 Updating the HBA Driver in a Windows 2000 or Windows 2003 Host On Windows 2000 and Windows 2003 systems where the QLogic HBA is detected automatically or a driver already is installed, it might be necessary to update the current driver to the latest EMC-qualified driver as described in this section.
QLogic_Windows.book Page 5 Thursday, March 10, 2005 10:31 AM Installing and Configuring the QLogic QLA4010 iSCSI HBA (TOE) 14. If the system requests that you reboot the system and you have other adapters to update, select NO; then click Close. 15. If the system again requests that you reboot the system and you have other adapters to update, select NO; then click Close. 16. If you have other adapters to update, select the next adapter under SCSI & RAID Controllers and repeat steps 6 through 15.
QLogic_Windows.book Page 6 Thursday, March 10, 2005 10:31 AM Installing and Configuring the QLogic QLA4010 iSCSI HBA (TOE) 4 Using the QLogic iSCSI SANSurfer Application to Configure iSCSI Devices QLogic provides a minimal version of their SANSurfer software that is used to configure settings for the QLA4010 iSCSI HBA. For configurations not using Microsoft’s iSCSI Initiator, the SANSurfer iSCSI HBA Manager should be used to configure your iSCSI HBAs.
QLogic_Windows.book Page 7 Thursday, March 10, 2005 10:31 AM Installing and Configuring the QLogic QLA4010 iSCSI HBA (TOE) which host to connect to. Assuming you are running the software on the server with the HBA(s) installed, keep the default name of “localhost” as the host name, and click Connect. On the GUI, the left pane displays discovered iSCSI HBAs. Click on the desired HBA in order to change its settings. The GUI defaults to the HBA Options dialog selected with the row of tabs at the top.
QLogic_Windows.book Page 8 Thursday, March 10, 2005 10:31 AM Installing and Configuring the QLogic QLA4010 iSCSI HBA (TOE) 4 Configuring iSNS settings for QLA4010 For iSNS support, the QLA4010 must be running the correct driver (see the EMC Support Matrix for latest version.) Targets must register with the iSNS server. To register, enable the iSNS server and enter the IP address using the SANsurfer GUI. Click Save HBA under the Network dialog box in the GUI.
QLogic_Windows.book Page 9 Thursday, March 10, 2005 10:31 AM Installing and Configuring the QLogic QLA4010 iSCSI HBA (TOE) To update firmware on your iSCSI HBA, click the Firmware tab on the HBA Options dialog. Click Select Firmware to Download. In the window that appears, type in the path to the firmware file that you wish to load to the HBA and click Save.
QLogic_Windows.book Page 10 Thursday, March 10, 2005 10:31 AM Installing and Configuring the QLogic QLA4010 iSCSI HBA (TOE) 4 The firmware will be loaded to the specified HBA. Once loaded, SANsurfer will reset the HBA so that the new firmware will take effect. Boot BIOS for the iSCSI HBA can be loaded in a similar fashion. From the SANsurfer iSCSI HBA Manager, HBA Option dialog, click the BIOS tab.
QLogic_Windows.book Page 11 Thursday, March 10, 2005 10:31 AM Installing and Configuring the QLogic QLA4010 iSCSI HBA (TOE) To configure your iSCSI targets, click the Target Settings tab from the SANsurfer iSCSI HBA Manager window. To add your target, click the green “plus sign” on the right side of the Target Settings dialog. You are prompted to enter the IP address of your target port .
QLogic_Windows.book Page 12 Thursday, March 10, 2005 10:31 AM Installing and Configuring the QLogic QLA4010 iSCSI HBA (TOE) 4 You may add as many targets as you need to here. If you need to enter CHAP security for any of the targets, click Config Authentication at the bottom of the dialog. You can set a default name and secret for all targets, or click the individual target and enter unique name and secret settings for that target.
QLogic_Windows.book Page 13 Thursday, March 10, 2005 10:31 AM Installing and Configuring the QLogic QLA4010 iSCSI HBA (TOE) rity password. The default password is “config” but may be changed. When settings have been saved, SANsurfer will reset the HBA and if target information has been discovered properly, you will see active connections under the Target Information dialog. Also, you can few active targets under the HBA in the left pane as shown in this diagram.
QLogic_Windows.book Page 14 Thursday, March 10, 2005 10:31 AM Installing and Configuring the QLogic QLA4010 iSCSI HBA (TOE) 4 Installing and Configuring the QLA4010 iSCSI HBA to boot from an EMC Storage Array The procedure below describes how to install and configure the boot BIOS. Installing Boot BIOS on the QLA4010 iSCSI HBA from DOS By default, the QLA4010 iSCSI HBA does not ship with Boot BIOS installed. Without Boot BIOS, the HBA cannot be configured to boot from an external storage array.
QLogic_Windows.book Page 15 Thursday, March 10, 2005 10:31 AM Installing and Configuring the QLogic QLA4010 iSCSI HBA (TOE) 2. After Fast!UTIL loads, the display depends on whether there are multiple QLogic HBAs installed: • If there is only one QLogic HBA, the Fast!UTIL Options menu appears. • If there are multiple QLogic HBAs, a list of addresses occupies by those HBAs appears. Use the arrow keys to select the desired HBA; then press ENTER. The Fast!UTIL Options menu appears. 3.
QLogic_Windows.book Page 16 Thursday, March 10, 2005 10:31 AM Installing and Configuring the QLogic QLA4010 iSCSI HBA (TOE) 4 17. Press ESC to return to the Configuration Settings dialog. 18. Press ESC again, and you will be prompted to save changes. Select Save changes, and press ENTER. 19. Select Configuration Settings again, and press ENTER. 20. Select iSCSI Boot Settings, and press ENTER. 21.
QLogic_Windows.book Page 17 Thursday, March 10, 2005 10:31 AM Installing and Configuring the QLogic QLA4010 iSCSI HBA (TOE) From this point, press S to specify additional devices. You will need to select Other and press ENTER. 3. Insert the diskette with the QLogic driver into the diskette drive, and press ENTER. 4. Select the driver by pressing ENTER. The driver loads and you are brought back to the Additional Devices dialog. 5.
QLogic_Windows.
QLogic_Windows.book Page 1 Thursday, March 10, 2005 10:31 AM A Invisible Body Tag Third-Party Software This appendix contains additional information about third-party software used with Windows hosts. ◆ ◆ QLogic SANSurfer SANBlade Manager........................................A-2 VERITAS Volume Manager 3.x for Windows 2000 ......................
QLogic_Windows.book Page 2 Thursday, March 10, 2005 10:31 AM Third-Party Software A QLogic SANSurfer SANBlade Manager Stratus ftServers are not supported using the qLogic SANSurfer SANBlade Manager Software or Agents. EMC has approved the use of a specialized version of the QLogic SANSurfer SANBlade Manager for use with attached EMC Symmetrix and CLARiiON storage arrays. Only the versions listed below should be used; these versions are posted in the EMC section on the QLogic website.
QLogic_Windows.book Page 3 Thursday, March 10, 2005 10:31 AM Third-Party Software A SANSurfer Version History SANSurfer versions include: ◆ 2.0.21 — Initial Release The SANSurfer software is not multipath-aware, and as such may misreport HBA targets that are configured in multipath. This does not affect the use of the tool; however, it will accurately report targets only on ports that own an active LUN0. ◆ 2.0.
QLogic_Windows.book Page 4 Thursday, March 10, 2005 10:31 AM Third-Party Software A VERITAS Volume Manager 3.x for Windows 2000 Refer to the latest EMC Support Matrix to determine which VERITAS Volume Manager 3.x configurations are supported, and what service packs may be required. ! CAUTION Configuring large numbers of device paths with VERITAS Volume Manager can cause a Windows system to boot very slowly, and in some cases overrun the NTLDR boot-time registry size and halt.
QLogic_Windows.book Page 5 Thursday, March 10, 2005 10:31 AM Third-Party Software A VERITAS Volume Manager 3.1 and VERITAS DMP If using PowerPath with VERITAS Volume Manager 3.1, you also need VERITAS Volume Manager Service Pack 1. EMC and VERITAS now provide a Dynamic Multipathing (DMP) Driver Update for VERITAS DMP to interface with CLARiiON CX series arrays, providing DMP high-availability capability.
QLogic_Windows.
QLogic_Windows.book Page 1 Thursday, March 10, 2005 10:31 AM B Invisible Body Tag Troubleshooting This appendix contains information on troubleshooting problems. ◆ Problems and Solutions....................................................................
QLogic_Windows.book Page 2 Thursday, March 10, 2005 10:31 AM Troubleshooting B Problems and Solutions Problem 1 Error Message ID: 51 in event viewer when attempting to install multiple host access (for clustering) to the same EMC CLARiiON array storage group.
QLogic_Windows.book Page 3 Thursday, March 10, 2005 10:31 AM Troubleshooting B Solution Problem 4 Upgrade to the latest HBA driver. This was corrected for Windows 2000 in 8.2.2.25 and later drivers. Windows 2003 driver 8.2.2.20 and later already contain this correction. EMC Primus case emc69308 — Direct-connect to EMC CLARiiON CX200 reports incorrect queue full error messages.
QLogic_Windows.book Page 4 Thursday, March 10, 2005 10:31 AM Troubleshooting B Problem 7 When using SANSurfer 2.0.25 to update to BIOS 1.4x, you receive the message as follows: Incorrect BIOS file selected. The selected BIOS file does not match the selected HBA type. Check your file and try again. Solution Problem 8 IBM eServer BladeCenter HS20 Fibre Channel Expansion Card 48P7061 may not update all HBA BIOS in the system when using FLASUTIL. Solution B-4 SANSurfer 2.0.
QLogic_Windows.
QLogic_Windows.book Page 2 Thursday, March 10, 2005 10:31 AM Index H T hard zoning (switch) 3-21 HBA driver 2-14 HBA, boot, replacing 3-36 HBA, installing 2-3 topology requirements 3-16 topology, HBA, setting 2-13 troubleshooting B-1 V I VERITAS Volume Manager 3.