
Instructions / Assembly


7
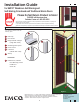
6. INSTALL SWEEP
4 - #8x1/2”
INTERIOR FLOOR
Figure 19
Tools needed:
1/8”
2
7
LEFT hINGE - INTERIOR VIEWS RIGhT hINGE - INTERIOR VIEWS
Figure 19
In this step, you will install the
bottom sweep.
Open the door and slide the
sweep onto the bottom of the
door frame. Make sure that the
screw slots on the sweep are
towards the interior.
Position the door sweep so that it
is ush with the latch-side of the
door frame (Figure 19).
Close the door.
From the interior, adjust the
sweep up or down until the
sweep ns come into contact
with the door sill.
Using the drill and 1/8” drill bit,
drill a shallow starter hole into the
door using the pre-drilled hole
slots as guides.
Fasten the sweep to the door
using four (4) #8 X 1/2 color-
matched (to sweep) screws.
1.
2.
3.
4.
5.
6.
Do not drill completely
through door. This will
create an unnecessary hole
in the door and may cause
water and air inltration.
CAUTION
7. INSTALL CLOSER AND hANDLE SET
Refer to the instructions in the hardware kit box to install the closer and the handle set. Many home improvement stores or locksmiths can make
duplicate keys.
1.
8. ADJUST ThE CLOSER
Tools needed:
In this step, you will adjust the door
closer.
Locate the adjustment screw at the
end of the closer that attaches to the
door frame (Figure 20).
Open the door and then let it close
to note the speed at which the door
closes.
Using a Phillips head screwdriver
to adjust the closer to the desired
speed.
For a faster closing speed, turn
the adjustment screw to the left
(counterclockwise).
For a slower closing speed, turn
the adjustment screw to the right
(clockwise).
Test the speed at which the door
closes after each adjustment.
Adjust the screw more, if needed,
to achieve the desired door closing
speed.
1.
2.
3.
4.
•
•
INTERIOR FLOOR
2
7
SLOWER
FASTER
Figure 20
Figure 20
SLOWER
FASTER
LEFT hINGE - INTERIOR VIEWS
RIGhT hINGE - INTERIOR VIEWS