
Instructions / Assembly


8
INSTALL
HINGED
STORM DOOR
IN OPENING
(Right Hand)
8
1/8”
!
!
1/2”
1/2”
1/2”
1”
1 1/2”
2”
1 1/2”
5/8”
5/8”
Tools needed:
I
A
!
!
1/2”
1/2”
1/2”
1”
1 1/2”
2”
1 1/2”
5/8”
5/8”
d
H
A
A
A
X
VIEW
X
VIEW
X
VIEW
1”
1”
x 8
x 11
I
#8
#10
#12
#6
3/4” Machine Pan Painted
1/2” SMS Pan
1/2” SMS Pan Painted
1/2” SMS Flathead
1/2” Self-Drill Pan
1/2” Self-Drill Pan Painted
3/4” Machine Flathead
7/8” Machine Pan Painted
1” SMS Pan
1” SMS Pan Painted
1” Machine Pan Painted
1-1/2” Machine Flathead
1-1/2” Machine Flathead
2” SMS Pan Painted
5/8” SMS Pan Painted
1-1/4” SMS Pan
1. Open the storm door.
2. Place the rain cap (A) in the opening so that
it rests on top of the hinge rail, aligning the
end of the the rain cap with the edge of the
hinge rail.
3. Close the storm door.
4. Adjust the rain cap to achieve an even gap
between the top of the door fame.
1. Look at the center hole of the rain cap.
2. If mounting surface cannot be seen in
entire hole, or if there is space above
rain cap, you will need to install rain cap
extender (H) by completing step 8e.
3. If the mounting surface can be seen in the
entire hole, install the rain cap at this time.
4. Using the drill bit and 1” painted screws
from the installation kit, fasten the rain cap
to the mounting surface.
If rain cap extender is necessary:
1. Using the drill bit and 1” painted screws from
the installation kit, fasten the rain cap to the
mounting surface.
2. Now place the rain cap extender over the
rain cap as shown, with both ends being
ush.
3. Using the drill bit and 1” painted screws
from the installation kit, fasten the rain cap
extender to the mounting surface.
1. Open the storm door.
2. Using the drill bit and 1” unpainted screws
from the installation kit, fasten the hinge
rail to the door jamb.
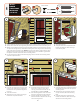
1. Set door frame on entry sill so hinge rail is tight against mounting surface and sitting on door sill.
2. Tip top of door frame into opening, making sure that bottom of door frame is still resting on sill.
3. With the top and bottom of the hinge rail pressed rmly against the mounting surface, pre-drill
1/8” pilot holes through the top and bottom mounting holes of the hinge rail into the mounting
surface and install 1” painted screws. NOTE: At this point, there will be a slight resistance when
swinging the door open and closed due to the sweep n. Also, there should be a gap between
the opposite side of the door frame and the mounting surface.
4. Pre-drill 1/8” pilot holes through the remaining hinge rail holes and into the mounting surface
and install 1” painted screws.
X
VIEW
a
b
e
c
i
VIEW