
Installation Guide
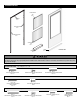
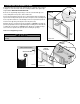

A. Position the rain cap against the top brickmold
(with fuzzy edge of weatherstripping facing outward),
centered between door jambs.
B. Holding rain cap in place, drill a 1/8" pilot hole
through rain cap mounting hole into the brickmold on
the side you will hinge the door.
C. Secure rain cap with one painted #8 x 1" screw.
Do not install remaining screws yet.
2. INSTALL RAIN CAP:
4
EXTERIOR VIEW
RAIN CAP
TOP
BRICKMOLD
SCREW
WEATHERSTRIPPING
WEATHERSTRIPPING
SPACE EVENLY
TOP BRICKMOLD
RAIN CAP
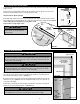
INSTALL ONE SCREW ON THE HINGE SIDE ONLY
RAIN CAP PROFILE
INSTALL ONE SCREW ON THE HINGE SIDE ONLY
RAIN CAP PROFILE
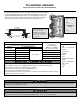
RIGHT HINGED DOOR
HANDLE
SIDE
HINGE
SIDE
LEFT HINGED DOOR
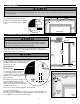
1. DETERMINE HINGE SIDE:
A. The storm door has been designed for either left or right hinged installation. Position
the door frame in the door opening with the top of the door at the top of the entry. The
top of the door is where the screen pull and screen cover plate are located. The hinge
side will be the side that is the door pivot point. Be sure that the window latches are
to the inside of the door.
Looking from the outside of a home:
• A right hinged door will have the handle on the left,
• A left hinged door will have the handle on the right.
B. While door frame is in door opening, hold inside handle (from handle set parts box) in
place to make sure it will not interfere with the handle of your front door. If your handles
interfere, hinge on opposite side.
C. You may wish to mark the hinge side of the door with a piece of tape for reference.
EXTERIOR VIEW
INTERIOR VIEW
HANDLE
SIDE
SCREEN
PULL
SCREEN COVER
PLATE
TOP OF DOOR
STEP 1A
STEP 1B
Steel will corrode when used with ACQ Pressure Treated Lumber. Obtain and use the appropriate size stainless steel fastener as called out in the installa-
tion guide to fasten unit to any rough opening made from ACQ Pressure Treated Lumber. Failure to use stainless steel fasteners may result in injury, prop-
erty, or product damage.
WWAARRNNIINNGG
CAUTION
!