
Installation Guide

5
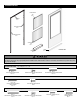
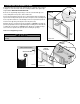
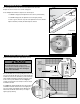
3. ATTACH HINGE Z-BAR ASSEMBLY TO DOOR:
A. To determine which end of Z-bar is top, hold Z-bar up to door opening to side you desire to
be hinged. The screw track will be on left side for left hinge installation and to right for right
hinge installation. MARK TOP OF Z-BAR WITH TAPE.
B. Set door on edge with hinge edge facing up. Locate the second and third edge cover
screw (counting down from top of door). Remove both screws.
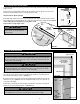
C. Place the Z-bar against the edge of the door, as shown in graphic 3C/D, and position the
top of the Z-bar 1/4" beyond the top of the door frame. The top hole of the second hinge from
the door top and the bottom hole of the third hinge from the door top should line up with the
holes in the door edge left by removing the screws in the previous step.
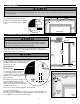
D. Replace the two (2) screws previously removed with #8 x 1" unpainted screws. Drill 1/8"
pilot holes perpendicular to the door edge and through the remaining holes in the middle two
(2) hinges and secure with #8 x 1" unpainted screws. With the two (2) middle two hinges
secure to the door, repeat the same procedure for the remaining two (2) hinges.
Note: Do not overtighten hinge screws
STEP 3C/D
1/4"
WEATHERSTRIPPING
TOP OF
DOOR
INSIDE OF
DOOR FRAME
HANDLE SIDE OF
DOOR
STEP 3B
BOTTOM
BUSHING
THIRD EDGE
COVER SCREW
SECOND
EDGE COVER
SCREW
TOP OF
DOOR
#8x1" SCREW
(2 PER HINGE)
HINGE
DOOR
WEATHERSTRIPPING
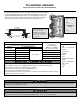
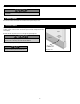
CORRECT HINGE PLACEMENT:
PROFILE
THIRD EDGE
COVER SCREW
DOOR
INTERIOR VIEW
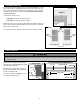
IIMMPPOORRTTAANNTT
For proper performance, make sure that all four hinges contact the bottom
bushings.
INTERIOR VIEW