
Installation Guide
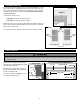

A. To determine which end of the handle side Z-bar is top, hold handle side Z-bar up to door
opening opposite hinge side Z-bar. The weatherstripping will face the door opening. Mark top of
handle side Z-bar with tape for future reference.
.
B. The handle side Z-bar will need to be cut to the handle side
opening door height. To do so, measure the door open-
ing height on the handle side from the underside of
rain cap to top of door sill.
C. Using this measurement, measure down
from top of handle side Z-bar and mark a
cutting line. Note: If your entryway sill has an
angled slope, you may wish to cut Z-bar at a
slight angle to match.
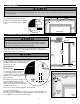
D. Set handle side Z-bar in door opening so the
top is pushed against underside of rain cap.
Maintain a consistent 1/4" gap (shimming may be
required) between handle side Z-bar (adjust Z-bar as
needed) and side edge of door.
E. Drill a 1/8" pilot hole through top mounting hole and into brickmold.
F. Secure top of the handle side
Z-bar with one (1) #8 x 1" painted screw. Re-check to make sure you have maintained the 1/4"
gap and drill 1/8" pilot holes through the remaining mounting holes. Install the remaining six (6)
#8 x 1" painted screws to secure the Z-bar in the opening.
7
DOOR
EQUAL SPACE
EXTERIOR VIEW
MOUNTING HOLES
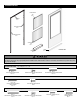
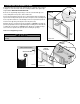
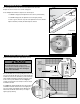
6. SECURE RAIN CAP:
TOP BRICKMOLD
HINGE
RAIN CAP
SCREW
STEP 6A/B
7. CUT AND INSTALL HANDLE SIDE Z-BAR:
RAIN CAP
SILL
HANDLE
SIDE
OPENING
DOOR
HEIGHT
TOP OF
HANDLE
SIDE
Z-BAR
CUT HERE
DISCARD
STEP 7B/C
Mark top of handle side Z-bar with tape to help identify later in the installation. Cut to length
at bottom.
IIMMPPOORRTTAANNTT
DOOR
WEATHERPILE
BRICKMOLD
HANDLE
SIDE
Z-BAR
Handle Side Door
Opening Height
1/4"
GAP
ENTRY
DOOR
MOUNTING
HOLE FOR
#8 X 1"
SCREW
HANDLE
SIDE Z-BAR
RAIN CAP
EXTERIOR
VIEW
STEP 7D
A. Adjust the rain cap so there is an equal space between
the rain cap and along the top edge of the door.
B. Drill two (2) 1/8" pilot holes through the remaining
mounting holes and install two (2) #8 x 1" painted
screws.
Steel will corrode when used with ACQ Pressure Treated Lumber. Obtain and use the appropriate size stainless steel fastener as called out in the installa-
tion guide to fasten unit to any rough opening made from ACQ Pressure Treated Lumber. Failure to use stainless steel fasteners may result in injury, prop-
erty, or product damage.
WWAARRNNIINNGG
CAUTION
!
Steel will corrode when used with ACQ Pressure Treated Lumber. Obtain and use the
appropriate size stainless steel fastener as called out in the installation guide to fasten unit
to any rough opening made from ACQ Pressure Treated Lumber. Failure to use stainless
steel fasteners may result in injury, property, or product damage.
WWAARRNNIINNGG
CAUTION
!