
Installation Guide


2
Improper use of hand
or power tools could
result in injury and/or
product damage.
Follow equipment
manufacturer’s
instructions for safe
operation. Always
wear safety glasses.
Windows and doors
can be heavy. Use safe
lifting techniques and
a reasonable number
of people with enough
strength to lift, carry, and
install window and door
products to avoid injury
and/or property damage.
The insect screen is
intended for reasonable
insect control and not the
retention of objects or
persons within the interior.
The insect screen material
will not stop a person from
falling through the door.
Metal fasteners and other hardware components may
corrode when exposed to preservative treated and
re-retardant treated lumber. Obtain and use the
appropriate size stainless steel fasteners and hardware
as called out by the installation guide to fasten unit
to any rough opening made from pressure treated
and re-retardant treated lumber. Failure to use the
appropriate materials for the installation may cause a
failure resulting in injury, property or product damage.
Entry door
hardware
and handle
may
become
hot when
exposed to
sunlight.
WARNING WARNING WARNING WARNING WARNING
1. VERIFY MOUNTING REQUIREMENTS
RECOMMENDED TOOLS
• Drill
• Level
• Hacksaw
• Tape Measure
• Screwdrivers
• Hammer
• Center Punch
• Square
• Safety Glasses
• Drill Bits
• 3/32”
• 1/8”
• 5/32”
• 5/16”
• Pencil
H
W1
W2
W3
1”
2 1/2”
3/4”
Figure 3
Figure 2
37 3/4”
TO TOP OF DOOR
Figure 4
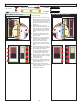
To install the storm door, you must verify that there is the necessary opening width and height and a
sufcient mounting surface.
Measure the width at the top, middle, and bottom of the opening (Figure 2). Measure from the
inside of the brick mold or exterior trim.
Measure the height at the center of the opening. Measure from the inside of the brick mold or
exterior trim, down to the top of the bottom sill.
Make sure that the brick mold or exterior trim meets the mounting surface requirements to install
the rain cap, hinge rail and latch rail (Figure 3). You must have a minimum of:
Most homeowners prefer to have the storm door handle on the same side as the entry door
handle. In shallow door openings, this can cause the two handles to interfere. Check for
potential interference using the rough measurements (Figure 4). If you anticipate that there will
be interference, hinge your storm door on opposite side of your entry door.
1.
2.
3.
4.
Use the this table to determine if your storm door will t into the opening:
1” mounting surface depth.
3/4” mounting surface front.
2 1/2” space between the existing door and the mounting
surface for the handle set installation.
•
•
•
*
*
For opening widths up to 1” wider or for mounting surface depth between 5/8” - 3/4”, please
call our Solution Center at 1-800-933-3626 to purchase a special kit to accommodate your
situation.
SAFETY FIRST - PLEASE READ AND FOLLOW ALL WARNINGS AND CAUTIONS IN ThIS GUIDE.
Nominal Storm Opening Sizes
Door Sizes W 1 - 3 (width) H (height)
36” x 80” 35 3/4” TO 36 3/8”
34” x 80” 33 3/4” TO 34 3/8”
33” x 80” 32 3/4” TO 33 3/8” 80” TO 80 7/8”
32” x 80” 31 3/4” TO 32 3/8”
30” x 80” 29 3/4” TO 30 3/8”
36” x 78” 35 3/4” TO 36 3/8”
32” x 78” 31 3/4” TO 32 3/8” 78” TO 78 7/8”
30” x 78” 29 3/4” TO 30 3/8”
*
2 1/2”