
Installation Guide


4
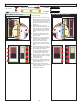
LEFT hINGE - ExTERIOR VIEW (FIGURE 7) RIGhT hINGE - ExTERIOR VIEW (FIGURE 7)
3. PREPARE STORM DOOR FOR hANGING
Tools needed:
In this step, you will hang the rain cap
against the top mounting surface (Figure
7).
Center the rain cap in the door
opening.
Using a pencil, mark the hinge side
hole on the mounting surface. Set
rain cap aside.
Using the drill and 1/8” drill bit, drill a
hole in the mounting surface.
Place the rain cap back on the door
opening.
Screw a #8 x 1” color-matched screw
in the hole as indicated by the red
arrow, fastening the rain cap to the
mounting surface.
Do not install the remaining screws at
this time.
Place latch side edge of door frame
on the ground.
TIP: Lay on door carton.
Remove the two (2) middle screws
from hinge side edge of door frame
(Figure 8).
Using a 1/8” drill bit, drill 1” minimum
deep holes into the door frame
where you removed the screws in the
previous step.
Locate the top of the hinge rail (Figure
9).
Position the hinge rail along the
hinge-side edge of the door frame,
extending the top of the hinge rail
1/4” beyond the top of the door frame
(Figure 10).
The top hole of the second hinge and
the bottom hole of the third hinge
should line up with the holes drilled in
Step 9.
Use #8 x 1” unpainted screws to
fasten the second and third hinge. Do
not overtighten screws.
Using a 1/8” drill bit, drill 1” minimum
deep holes into the door frame
through the remaining holes in the
hinges.
Attach hinges to the door frame using
unpainted #8 x 1” screws. Do not
overtighten screws.
Measure the height of the door
opening on the hinge side, measuring
from the underside of the rain cap
to the door sill. You will use this
measurement to cut the hinge rail to
its proper length.
Measure the hinge rail, starting at the
top and then marking the bottom with
the measurement that you took of the
door opening (Figure 11).
Using the hacksaw, cut the hinge rail
to its proper length.
1.
2.
3.
4.
5.
6.
7.
8.
9.
10.
11.
12.
13.
14.
15.
16.
17.
18.
1 - #8x1”
1/8”
Figure 7
Figure 11
BOTTOM
INTERIOR
In this step, you will attach the hinge rail
to the door frame.
In this step, you will cut the bottom of the
hinge rail to its proper length.
11
Figure 7
3
2
HINGE
SIDE
MIDDLE
SCREWS
TOP
Figure 9
3
Figure 10
2
3
TOP
INTERIOR
1/4”
x 4
Figure 8
2
Figure 11
TOP
Figure 9
3
2
TOP
INTERIOR
Figure 8
1/4”
x 4
3
Figure 10
BOTTOM
INTERIOR
3
2
HINGE
SIDE
MIDDLE
SCREWS
2
8 - #8x1”