
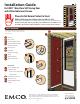
Installation Guide

10
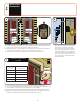
ADJUST
SWEEP &
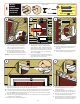
INSTALL LATCH
RAIL
(Right Hand)
12
F
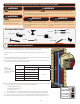
1/8”
!
!
1/2”
1/2”
1/2”
1”
1 1/2”
2”
1 1/2”
5/8”
5/8”
Tools needed:
!
!
1/2”
1/2”
1/2”
1”
1 1/2”
2”
1 1/2”
5/8”
5/8”
1”
x 3
x 6
Pad
YELLOW BAG / BOLSA AMARILLA / SAC JAUNE
K
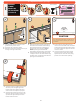
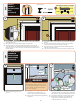
ATTACH INSECT
SCREEN TO
VENTILATING
GLASS PANEL
(Right Hand)
13
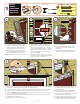
1. Find the three 1/2” square adhesive backed spacer pads in the yellow bag
in the installation kit.
2. Swing door open and wipe o any residue on edge of door.
3. Peel the paper backer o each pad and attach them to the latch side
door edge. Position one approximately 6” down from the top of the door,
another close to the center of the door, and the third approximately 6” up
from the bottom.
1. Place latch rail (F) in the opening with top end pushed up against
rain cap.
2. Close storm door and slide latch rail towards door frame until it
contacts all three spacer pads, creating a 3/16” gap.
3. Using drill bit and 1” painted screws from the yellow bag, fasten
latch rail to mounting surface.
4. Open storm door and remove spacer pads, then properly discard.
F
PAD
ALMOHADILLA
TAMPON
a b
X
X
XX
VIEW
X
X
XX
VIEW
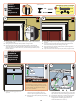
1.
Lower insect screen by pulling down on
orange insect screen helper tab. Once
screen is exposed, grab and hold in hand.
2. Remove helper tab by twisting and pushing
it outwards.
1. When you reach top of ventilating glass panel, a
slight pull towards you will allow insect screen pull
lip to maneuver around ventilating glass panel rail.
2. A slight push away from you will align lip and rail.
3. Raise insect screen lightly. Screen will be fully
engaged when ventilating glass panel rail is
interlocked with insect screen lip.
b
c
1
2-3
i
i
i
i
VIEW
i
i
i
VIEW
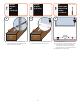
1. Raise the ventilating glass panel to
eye level.
a
i
i
i
i
i
i
i
i
i
VIEW
The retractable insect screen is stored inside the door
with a highly tightened spring. If released, insect screen
may release suddenly causing injury or improper product
operation. Maintain a rm grasp when attaching the
insect screen to the window.
WARNING
#8
#10
#12
#6
3/4” Machine Pan Painted
1/2” SMS Pan
1/2” SMS Pan Painted
1/2” SMS Flathead
1/2” Self-Drill Pan
1/2” Self-Drill Pan Painted
3/4” Machine Flathead
7/8” Machine Pan Painted
1” SMS Pan
1” SMS Pan Painted
1” Machine Pan Painted
1-1/2” Machine Flathead
1-1/2” Machine Flathead
2” SMS Pan Painted
5/8” SMS Pan Painted
1-1/4” SMS Pan
TAB
PESTAÑA
LANGUETTE
CUTAWAY VIEW
VISTA TRANSVERSAL
VUE EN COUPE FRONTALE