
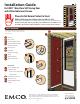
Installation Guide

5
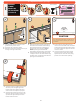
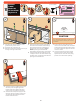
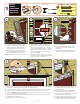
1. The door frame is properly seated in the
opening when the hinge rail and latch side
spacer clip (L) are ush against the mounting
surface and the mounting surface completely
lls the hole in the latch side spacer clip. If the
latch side spacer clip hole is not completely
lled, review step 2c.
2. Using the drill bit and 1” painted screws from
the yellow bag in the installation kit, fasten the
hinge rail to the mounting surface.
1. Open the storm door.
2. Pre-drill and fasten the hinge rail to the door
jamb using 1” unpainted screws from the
yellow bag.
3. Remove both orange clips from the bottom
of the door frame and properly discard.
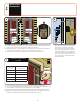
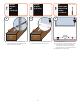
1. Set the door frame on the entry sill so the
hinge rail is tight against the mounting
surface (or hinge rail shim) and the sill
spacer clip (M) is sitting on the door sill.
2. Tip the top of the door frame into the
opening, making sure that the sill spacer
clip is still attached and resting on the sill.
NOTE: Door may be out of square at this time.
INSTALL
HINGED
STORM DOOR
IN OPENING
(Left Hand)
4
1/8”
!
!
1/2”
1/2”
1/2”
1”
1 1/2”
2”
1 1/2”
5/8”
5/8”
A
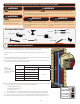
Tools needed:
1/8”
I
L
!
!
1/2”
1/2”
1/2”
1”
1 1/2”
2”
1 1/2”
5/8”
5/8”
a
b
c
1”
x 8
YELLOW BAG / BOLSA AMARILLA / SAC JAUNE
3/16” Plug
x 1
x 11
1”
X
X
X
X
X
X
X
X
XX
VIEW
X
X
X
X
X
X
X
X
X
X
X
X
X
X
X
XX
VIEW
X
X
X
X
X
X
X
X
XX
VIEW
M
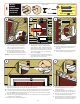
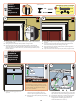
1. Open the storm door. Place the rain cap (A) in the opening so that it rests on top of the hinge rail,
aligning the end of the the rain cap with the edge of the hinge rail.
2. Close the storm door. Adjust rain cap to achieve an even gap between the top of the door frame.
3. Look at the center hole of the rain cap. If the mounting surface can be seen in the entire hole,
proceed to step 4e. If the mounting surface cannot be seen in the entire hole, or if there is space
above the rain cap, then remove the rain cap.
4. From the mounting surface (back) side of the rain cap, completely insert a 3/16” plug from the
yellow bag into the middle hole.
5. Re-install the rain cap as described above.
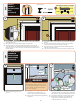
1. Using the drill bit and 1” painted screws from
the yellow bag, fasten the rain cap to the
mounting surface.
2. If a plug was installed in the middle hole, you
will need to install the rain cap extender (I).
3. Place the rain cap extender over the rain cap
as shown, with both ends being ush.
4. Using the drill bit and 1” painted screws from
the yellow bag in the installation kit, fasten the
rain cap extender to the mounting surface.
3/16” PLUG
TAPÒN DE 0.31 CM
BOUCHON PEINT 4,8 MM
A
I
A
A
d e
X
X
X
X
X
X
X
XX
VIEW
X
X
X
X
XX
VIEW
K
#8
#10
#12
#6
3/4” Machine Pan Painted
1/2” SMS Pan
1/2” SMS Pan Painted
1/2” SMS Flathead
1/2” Self-Drill Pan
1/2” Self-Drill Pan Painted
3/4” Machine Flathead
7/8” Machine Pan Painted
1” SMS Pan
1” SMS Pan Painted
1” Machine Pan Painted
1-1/2” Machine Flathead
1-1/2” Machine Flathead
2” SMS Pan Painted
5/8” SMS Pan Painted
1-1/4” SMS Pan