
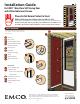
Installation Guide

8
TOP
PARTE SUPERIOR
HAUT
PREPARE
STORM
DOOR FOR
INSTALLATION
(Right Hand)
10
For a Left Hand Installation, go to Page 4.
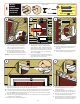
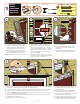
1.
Place latch side edge of door frame on the
ground. TIP: Lay on door carton.
2. Identify the top of the hinge rail.
3. Remove the 2nd and 3rd screw from the top on
the hinge side edge of door frame.
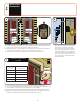
1. Install the sill spacer clip (M) under the latch
side sweep screw and tight against the
bottom of the sweep. Tighten the sweep
screw to retain the sill spacer clip in place.
2. Install the latch side spacer clip (L) over the
latch side of the door frame as shown. This
clip should be approximately 6” from the
bottom of the door frame.
L
M
M
D
G
L
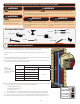
Tools needed:
!
!
1/2”
1/2”
1/2”
1”
1 1/2”
2”
1 1/2”
5/8”
5/8”
!
!
1/2”
1/2”
1/2”
1”
1 1/2”
2”
1 1/2”
5/8”
5/8”
!
!
1/2”
1/2”
1/2”
1”
1 1/2”
2”
1 1/2”
5/8”
5/8”
a
d
G
1”
x 8
x 4
1/2”
Painted
PINK BAG / BOLSA ROSA / SAC ROSE
K
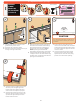
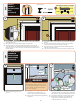
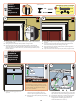
1. Position hinge rail along hinge-side edge of
door frame so bottom hole of the 2nd hinge
up from the bottom lines up with bottom
hole from the screws removed in step 9a.
NOTE: Top of hinge rail should extend
approximately 3/16” beyond top of door frame.
2. Using the drill bit from the pink bag, pre-drill
1” deep pilot holes in door frame at each hinge
and fasten using 1” unpainted screws from the
pink bag in the installation kit.
b
i
i
VIEW
i
i
VIEW
D
BOTTOM
PARTE INFERIOR
BAS
i
i
VIEW
#8
#10
#12
#6
3/4” Machine Pan Painted
1/2” SMS Pan
1/2” SMS Pan Painted
1/2” SMS Flathead
1/2” Self-Drill Pan
1/2” Self-Drill Pan Painted
3/4” Machine Flathead
7/8” Machine Pan Painted
1” SMS Pan
1” SMS Pan Painted
1” Machine Pan Painted
1-1/2” Machine Flathead
1-1/2” Machine Flathead
2” SMS Pan Painted
5/8” SMS Pan Painted
1-1/4” SMS Pan
1/8”
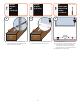
1. Position the door sweep (G) so that it is
centered across the width of the door frame
and pressed tight against the bottom of the
door frame. Sweep was shipped on the side
of the door frame.
2. Center punch and then predrill 1/8” pilot
holes at the bottom of the slot for future
adjustment, then attach the sweep using
painted 1/2” screws from the pink bag.
G
BOTTOM
PARTE INFERIOR
BAS
c
i
i
VIEW
Do not drill completely through door. This will create an
unnecessary hole in the door and may cause water and
air inltration.
CAUTION
PROFILE
PERFIL
PROFIL