Linux SmartFusion2 Emcraft Systems M2S-FG484 SOM Starter Kit Guide Release 1.12.
Emcraft Systems Table of Contents 1. OVERVIEW ......................................................................................................................................... 3 2. PRODUCT CONTENTS ...................................................................................................................... 3 2.1. 2.2. 2.3. 2.4. 3. SHIPPABLE HARDWARE ITEMS ............................................................................................................
Emcraft Systems 1. Overview This document is the Emcraft Systems M2S-FG484 SOM Starter Kit Guide, Release 1.12.0. The BSP provides a software development environment for evaluation and development of Linux on the Cortex-M3 processor core of the Microsemi SmartFusion2 microcontroller using the Emcraft Systems M2S-FG484 SOM board in harness with the Emcraft Systems SOM-BSBEXT baseboard as a hardware platform.
Emcraft Systems Note: Refer to the Microsemi web site for the Libero v11.1 minimum system requirements. To increase the virtual address space that is available to the applications on Windows 32-bit OS refer to Known Issue SL5583. 5. networking.uImage - prebuilt Linux image ready to be loaded to the M2S-FG484 SOM board; 6. linux-M2S-1.12.0.tar.
Emcraft Systems • • • Linux: o uClinux kernel v2.6.33; o Boot from compressed and uncompressed images; o Ability to run critical kernel code from integrated Flash of SmartFusion2; o Serial device driver and Linux console; o Ethernet device driver and networking (ping, NFS, Telnet, FTP, ntpd, etc.); o busybox v1.
Emcraft Systems 3.3. Known Problems & Limitations This section lists known problems and limitations of this release: 1. USB is not supported by this release on the M2S050-FG484 SOM since the USB ULPI interface is not supported on the M2S050-FG484 ES and PP (pre-production) devices. 2. CONFIG_KERNEL_IN_ENVM requires disabling CONFIG_ARM_UNWIND and CONFIG_EARLY_PRINTK. ID: RT 74683. Workaround: When enabling CONFIG_KERNEL_IN_ENVM in the kernel, disable CONFIG_ARM_UNWIND and CONFIG_EARLY_PRINTK. 3.
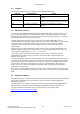
Emcraft Systems 4.2. Jumpers The following jumpers must be configured on the SOM-BSB-EXT board: Jumper Configuration Notes JP1 1-2 closed, 3-4 open Enable power on the M2S-FG484 SOM (VCC3) JP2 1-2 open, 3-4 closed Select appropriate JTAG mode and enable power to the SmartFusion2 JTAG controller JP3 1-3 open, 2-4 closed Use the mini-USB port as the power source 4.3.
Emcraft Systems 5. M2S-FG484 SOM Board Linux Software Set-up 5.1. U-Boot Environment When the M2S-FG484 SOM board is reset, the Linux bootstrap will proceed to boot the UBoot firmware from the on-chip eNVM . Unless interrupted, U-Boot proceeds to load the Linux bootable image from the SPI Flash into the LPDDR and passes control to the Linux kernel entry point in LPDDR.
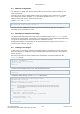
Emcraft Systems 5.3. Network Configuration You will have to update the network configuration of your board to match settings of your local environment. Typically, all you have to allow loading images over network from a TFTP server is update the U-Boot environment variables ipaddr (the board IP address) and serverip (the IP address of the TFTP server). Here is how it is done. Update ipaddr and serverip: M2S-FG484-SOM> setenv ipaddr 192.168.0.2 M2S-FG484-SOM> setenv serverip 192.168.0.
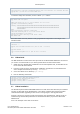
Emcraft Systems Linux version 2.6.33-arm1 (vlad@ocean.emcraft.com) (gcc version 4.4.1 (Sourcery G++ Lite 2010q1-189) ) #1 Fri Dec 06 15:43:44 MSK 2013 ... To load the image into the Flash, use the U-Boot update macro: M2S-FG484-SOM> setenv image vlad/networking.uImage M2S-FG484-SOM> run update ... TFTP from server 172.17.0.1; our IP address is 172.17.5.100 Filename 'vlad/networking.uImage'. ...
Emcraft Systems 1. Start FlashPro on a Windows host; 2. From the FlashPro IDE, create a new project with an arbitrary name; 3. From the main FlashPro window, push Configure Device; 4. Push Browse next to load existing programming file. Browse to the Linux SmartFusion2 project .stp file for the M2S-FG484 SOM board and choose it. 5. Push Program at the top of the main window to program the project onto the SmartFusion2 device and wait for the programming procedure to complete.