
Install Instructions

www.emersonclimate.com/flowcontrols
ASC, ASC2, AM, AH, DM, EB, EM, MM, RM Coils
ASC, ASC2, AM, AH, DM, EB, EM, MM, RM Coils
Instruction Sheet
PA-00211
August 2007
11911 Adie Road P.O. Box 411400 St. Louis MO 63141 USA CUSTOMER SERVICE (314) 569-4666
GENERAL INSTALLATION
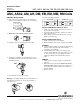
1. Verify selection of proper coil type, coil voltage and
frequency. This information appears on coil nametag.
Emerson Climate
Technologies
COIL TYPE AM
VOLTS 24
WATTS 7 HZ 50-60
2. Always disconnect electrical power source.
3. Install the coil on the enclosing tube of the valve.
4. Coil may be rotated 360° for easy wiring. It is recom-
mended that coil lead connections be soldered on D.C.
and 24V/50-60 HZ.
360°
5. Press firmly to ensure coil is secured.
Warning: To avoid any damage to the enclosing tube, use
your hands to secure the coil, do not use a hammer or
other kind of tool.
CLICK
6. Dual Voltage Wiring Diagram
BLACK
BLACK
YELLOW
YELLOW
RED
RED
BLUE
BLUE
240V.
240V.
120V.
120V.
COIL
COIL
120-240 V. COIL
BLACK
YELLOW
240V.
240V.
BLUE
COIL
BLUE
COIL
RED
RED
YELLOW
BLACK
480V.
480V.
240-480 V. COIL
INSTALLATION OF ASC OR ASC2 COILS
1. Install coil so that electrical connections are closer to
the top of the enclosing tube.
2. Use metal snap cap X-13740-1 and press on until you
hear it click into place.
3. Attach electric connector (DIN PLUG) onto coil and
tighten screw until snug.
INSTALLATION OF RM COILS
1. Install coil on top of the enclosing tube.
2. Attach lockwasher and screw to top and secure tightly.
WARNING
A. Caution: Failure to attach ground wire to grounding lug
violates certain electrical codes and creates the
possibility of shock hazard.
B. Caution: Omission of conduit cover locking screw
violates certain electrical codes and could cause cover
to come off exposing "live" (energized) wires with
resulting possibility of fire hazard and/or personal
injury.
REMOVE
1. Verify selection of proper coil type, coil voltage and
frequency.
2. Before removing coil from valve, always disconnect
electrical power source. Failure to do so will cause a
good coil to burn out and possible personal injury or
property damage.
3. Remove old coil.