
Instruction manual


Instruction Manual
D100320X012
1051 and 1052 H & J Actuators
October 2012
26
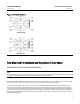
The adjustable up travel stop (figure 16) limits the actuator stroke in the upward direction. To make adjustments, first
relieve actuator loading pressure before removing the closing cap (key 187) as it is a pressure retaining part. Also, for
size 70 actuators, the hex nut (key 137) must be loosened.
Turning the stem (key 133) clockwise into the diaphragm case moves the actuator stem downward or
counterclockwise to allow the spring to move the actuator stem upward. If the action is push-down-to-close, full
opening c an be restricted; or if the action is push-down-to-open, full closing can be restricted by the position of the
adjustable travel stop.
The adjustable down travel stop (figure 17) limits the actuator stroke in the downward direction. To make
adjustments, first relieve actuator loading pressure before removing the closing cap (key 187) as it is a pressure
retaining part. After removing the closing cap, loosen the hex jam nut (key 189) and either turn the hex nut (key 63 for
size 40, and 70 actuators; or key 54 for size 60 actuators) down on the stem (key 133) to limit travel, or up on the stem
to allow more travel. Lock the jam nut against the hex nut and replace the closing cap after the adjustment has been
made. For size 70, tighten the hex nut and replace the closing cap after adjustment.
Handwheel and Travel Stop Maintenance
WARNING
Avoid personal injury or property damage from sudden release of process pressure or uncontrolled movement of parts.
Before performing any maintenance operations:
D Do not remove the actuator from the valve while the valve is still pressurized.
D Always wear protective gloves, clothing, and eyewear when performing any maintenance operations to avoid personal
injury.
D Disconnect any operating lines providing air pressure, electric power, or a control signal to the actuator. Be sure the
actuator cannot suddenly open or c lose the valve.
D Use bypass valves or completely shut off the process to isolate the valve from process pressure. Relieve process pressure
from both sides of the valve. Drain the process media from both sides of the valve.
D Vent the power actuator loading pressure and relieve any actuator spring precompression.
D Use lock-out procedures to be sure that the above measures stay in effect while you work on the equipment.
D The valve packing box may contain process fluids that are pressurized, even when the valve has been removed from the
pipeline. Process fluids may spray out under pressure when removing the packing hardware or packing rings, or when
loosening the packing box pipe plug.
D Check with your process or safety engineer for any additional measures that must be taken to protect against process
media.
If loading pressure seems to be leaking from either the handwheel or adjustable up stop, the O-rings (key 138 and 139,
figures 15 and 16) may need replacement. If the adjustable down stop leaks, the O-ring (key 139, figure 17) may need
replacement or possibly the closing cap (key 187, figure 17) is not tight. To tighten the closing cap, apply a good grade
of thread sealant to the closing cap threads.
For ease of operation, the stem (key 133, figures 15, 16, and 17) threads may need an occasional application of lithium
grease. A grease fitting (key 169, figures 15 and 16) is provided for this purpose in the size 70. The size 70 may also
need to have the thrust bearing (key 175, figures 15 and 16) packed with lithium grease. Travel stops for the smaller
casings can be lubricated between the stem and pusher (key 135, figures 15 and 16) with lithium grease.
1. Bypass the control valve, reduce loading pressure to atmospheric, and remove the tubing or pipe from the body
(key 142, figures 15, 16, and 17).