
Specifications
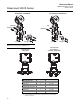

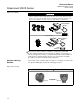
Table Of Contents
- Rosemount 3051S Series Scalable Pressure, Flow, and Level Solution with HART® Protocol
- Title Page
- Table of Contents
- Section 1 Introduction
- Section 2 Installation
- Section 3 Configuration
- Section 4 Operation and Maintenance
- Section 5 Troubleshooting
- Section 6 Safety Instrumented Systems
- Section 7 Advanced HART Diagnostic Suite
- Appendix A Specifications and Reference Data
- Appendix B Product Certifications
- Index
Reference Manual
00809-0100-4801, Rev FA
October 2010
2-15
Rosemount 3051S Series
Field Communicator
1. Enter the fast key sequence “Local Keys Control” to bring up the “Field
device info” screen.
2. Scroll down to Local Keys on the menu and use the right arrow key to
configure Enable or Disable.
AMS
Right click on the device and select “Configure” from the menu.
1. In the “Device” tab, use the “Local keys” drop down menu to select
Enable or Disable and click Apply.
2. After carefully reading the warning provided, select yes.
Configure Alarm Direction
The transmitter alarm direction is set by repositioning the PlantWeb housing
switch or Junction Box housing jumper. Position the switch/ jumper in the HI
position for fail high and in the LO position for fail low. See “Failure Mode
Alarm and Saturation” on page 3-12 for more information.
Field Communicator
Usage Note
The Field Communicator can be used to configure the alarm direction to
High (HI) or Low (LO). Otherwise, if the transmitter contains the D1 option,
the switch/jumper on the transmitter will override the Field Communicator.
AMS
Right click on the device and select “Device Configuration,” then
“Alarm/Saturation Levels,” then “Alarm Direction” from the menu.
1. Enter desired alarm direction, click Next.
2. Click Next to acknowledge setting has changed. If hardware adjustments
are activated, click Next to acknowledge the “Switch option detected,
function disabled, alarm direction unchanged” screen. If the hardware
adjustments are activated, the write protect will not configure.
3. Click Finish to acknowledge the method is complete.
Fast Keys
1, 4, 4, 1
Device Dashboard
Fast Keys
2, 2, 7
Fast Keys
1, 4, 2, 7, 6
Device Dashboard
Fast Keys
2, 2, 1, 7, 1