
User`s guide


SECTION 1 INSTALLATION
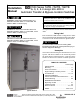
ASCO G, Q, S, U 7ATB, 7ACTB, 7ADTB Installation Manual
p a g e 1 --- 1381333–415 A ASCO Power Technologies
The ASCO 7000 Series Automatic Transfer & Bypass–
Isolation Switch (ATB) consists of an upper bypass–isola-
tion switch, a lower transfer switch, a monitoring and
transfer controller, and door–mounted controls. The
AT B is factory wired and tested. Installation requires
removal of the shipping skid then securing the enclosure
to the supporting foundation.
Remove the Shipping Skid
Open the front lower door and remove the two front lag
screws securing the enclosure to the wood skid. Next
remove the rear lower panel and remove the two rear lag
screws securing the enclosure to the wood skid.
Supporting foundation and mounting
The supporting foundation for the enclosure must be
level and straight. Allow at least 35 inches in front of the
enclosure for draw out of the Transfer Switch. Refer to
the enclosure outline drawing i ncluded with the 7000
Series ATB for all mounting details including door
opening space.
If bottom cable entry i s used, the foundation must be
prepared so that the conduit stubs are located correctly.
Refer to the appropriate enclosure outline drawing for
specified cable entrance area and location. Provide cable
bending space and clearance to live metal parts. When a
concrete floor is poured, use interlocking conduit spacer
caps or a wood or metal template t o maintain proper
conduit alignment.
Mounting
Refer to the enclosure outline drawing furnished with
this switch and mount the 7000 Series ATB according to
the details and i nstructions shown on the drawing.
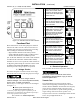
Remove Shipping Brackets / Angles
from the Transfer Switch
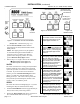
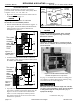
Open the lower front door(s). The Transf er S witch
carriage is secured to the frame for shipment. Remove
the three or four shipping brackets or L–angles:
(1 upper lef t, 1 upper right, a nd 2 lower ).
NOTICE
To prevent serious damage, remove three or four
shipping brackets or L–angles from the Transfer
Switch carriage. Do not turn the Isolation Handle
until they are removed!
remove 3 or 4 shipping brackets ( L–angles)
Figure 1-1. 600–3000 A remove shipping brackets.
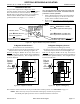
remove 2 lower
shipping brackets
remove 2 upper shipping brackets
Figure 1-2. 4000 A remove four shipping brackets.