
User Guide


2. Click Yes to delete the wall.
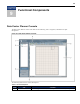
Interior walls
This option allows you to add, delete and move interior walls on a floor plan. The wall information can be
edited in wall properties.
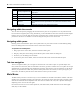
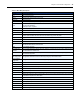
Field Description
Wall Thickness
Thickness Thickness of the interior wall in units. The unit of measure chosen in Preferences.
Closed Enable a line with 3 or more points to be closed.
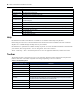
Vertices
Dimensions Units of measure.
Points The vertices on a wall.
x - y Points The x and y points on a wall.
Table 9.5: Interior Wall Properties
To add an interior wall to a floor plan:
1. In plan view, click Walls on the toolbar.
2. Click on the floor in the desired start position and drag the line to the end position. The Add/Edit operation
remains in effect to enable multiple walls to be added.
3. Click the Selection button to exit Add/Edit Walls.
To update an interior wall:
1. In plan view, click on the interior wall to be moved. The end-points become visible.
2. Click an end-point and drag it to a new location. The line remains selected with the end-points and new
dimensions shown.
To delete an interior wall:
1. Select the wall, right-click, and select Delete. A confirmation message appears asking if you want to delete
the selected item.
2. Click Delete to delete the wall.
NOTE: If the wall to be deleted has doors or windows, the doors and windows must be deleted also. They do not delete automatically.
Closed Walls
If one or more points are added to a wall, the wall can be closed. Doors and windows can also be placed on
closed walls.
To close a wall:
1. Place a wall on the floor and select Add Points from the toolbar. A section point is added to the line.
2. Click on the section between the new points and drag the line to a new position.
3. In the properties pane, enable the Closed checkbox, and click Save. The line closes.
50 Data Center Planner Installer/User Guide