B-View TM Digital Photo Frame with Remote Control OWNER'S MANUAL BAR598 Barbie and associated trademarks and trade dress are owned by, and used under license from, Mattel, Inc. ©2007 Mattel, Inc. All Rights Reserved.
SAFETY PRECAUTIONS CAUTION RISK OF ELECTRIC SHOCK DO NOT OPEN CAUTION: TO REDUCE THE RISK OF ELECTRIC SHOCK, DO NOT REMOVE COVER (OR BACK). NO USER-SERVICEABLE PARTS INSIDE. REFER SERVICING TO QUALIFIED SERVICE PERSONNEL.
9. 10. 11. 12. 13. 14. 15. 16. 17. SAFETY PRECAUTIONS Slots and openings in the cabinet and in the back or bottom are provided for ventilation and to ensure reliable operation of this product and to protect it from overheating. These openings must not be blocked or covered. The openings should never be blocked by placing this product on a bed, sofa, rug or other similar surface. This product should never be placed near or over a radiator or heat source.
SAFETY PRECAUTIONS FCC INFORMATION: This equipment has been tested and found to comply with the limits for a Class B digital device, pursuant to Part 15 of the FCC Rules. These limits are designed to provide reasonable protection against harmful interference in a residential installation. This equipment generates, uses and can radiate radio frequency energy and, if not installed and used in accordance with the instructions, may cause harmful interference to radio communications.
WELCOME Emerson Radio Corp. has produced this product under license from Mattel. We have taken great care to make sure your unit was in perfect working order when it left our factory. It has been designed to give you many years of enjoyment and trouble-free operation. Read this manual before operating this unit to become familiar with its features. In the event you require technical assistance, please contact the Emerson Radio Customer Service hotline at 1-800-898-9020.
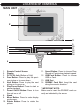
MAIN UNIT LOCATION OF CONTROLS 1 2 3 9 10 11 12 13 14 4 5 6 7 8 Remote Control Sensor Display DC 5V IN Jack (Bottom of Unit) Prev Button: Press to play the previous picture or to move down. 5. Next Button: Press to play the next picture or to move up. 6. Play/Pause Button: Press to start or pause playback. 7. Power On/Off Button: Press to turn this unit on or off. 8. Stand 9. Menu Button: Press to enter display mode menu. 10. Rotate Button: Press to rotate the picture. 11.
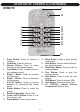
LOCATION OF CONTROLS (CONTINUED) REMOTE 9 10 11 12 13 14 15 16 17 18 1 2 3 4 5 6 7 8 TM 19 Enter Button: Press to confirm a selection. 2. Up Button: Press to move up. 3. Normal Button: Press to select Normal picture playback speed. 4. Fast Button: Press to select Fast picture playback speed. 5. Bright + Button: Press to increase the brightness. 6. Bright - Button: Press to decrease the brightness. 7. 4:3/16:9 Button: Press to choose between 4:3 (standard)/16:9 (wide) mode. 8.
PREPARATION FOR USE UNPACKING: When unpacking, make sure the following are included: • Digital Photo Frame • Remote Control • AC Adapter If any of these items are missing or damaged, contact customer service. BATTERY INSTALLATION 1. 2. 3. Insert a pencil, or other pointy object, into the groove on the Battery Compartment to help slide the compartment out. Install a CR2025 battery, paying attention to the polarity diagram in the Battery Compartment (positive side up). Replace the Battery Compartment.
PREPARATION FOR USE (CONTINUED) AC CONNECTION Insert the small end of the AC adapter into the DC 5V IN jack on the bottom of the unit. Insert the other end (with the 2 blades) into a conveniently located AC outlet having 120V AC, 60Hz. AC ADAPTER SPECIFICATIONS: DC 5V Z NOTES: • To disconnect the AC adapter, remove it from the DC 5V IN jack on the bottom of the unit as well as from the AC outlet. • Use the enclosed AC adapter for this product only.
OPERATION Make sure that your digital frame is correctly connected using the AC adapter, as shown on the previous page, before turning the frame on. 1 2 1 Press the Power On/Off button to turn the unit on. Insert an SD/MMC card, up to 2 GB, into the SD/MMC Card slot 1, making sure to insert the SD/MMC card correctly as indicated by the arrow. AND/OR Insert a flash drive into the USB port 2. TM 1 2 The unit will read the SD/MMC card and/or flash drive contents and show the pictures in the display.
OPERATION (Continued) 6 3 5 1 4 2 Press the MENU button to access the main menu again. Equipment Select: Use the Up 1 and/or Down 2 button to select Equipment Select and then press the ENTER button 3 to confirm. Use the Up 1 and/or Down 2 button to select between USB and SD/MMC and then press the ENTER button 3 to confirm. Then press the MENU button 4 to exit the menus.
OPERATION (Continued) 10 3 9 1 4 2 System Setup, Picture Play Speed: Use the Up 1 and/or Down 2 button to select System Setup and then press the ENTER button 3 to confirm. Use the Up 1 and/or Down 2 button to select Picture Play Speed and then press the ENTER button 3 to confirm. Use the Up 1 and/or Down 2 button to select between Slow, Normal and Fast and then press the ENTER button 3 to confirm. Then press the MENU button 4 to exit the menus.
OPERATION (Continued) PAUSE SKIP FEATURE 1 1 1 2 TM During picture playback, press the Play/Pause button on the remote (shown) or on the main unit to pause playback. Press again to resume playback. During picture playback, press the Prev 1 or Next 2 button on the remote (shown) or on the main unit to skip to the previous or next picture. TM ROTATING THE PICTURE 1 Normally, pictures are displayed as shown in the first illustration above.
TROUBLESHOOTING GUIDE PROBLEM POSSIBLE SOLUTION No power. Make sure that the AC adapter is connected correctly as shown on page 8. Disconnect the AC adapter and reconnect as shown on page 8. Ensure that the power is on and that a flash drive and/or SD/MMC card are inserted. Press the Power On/Off button to turn the unit off and then back on. If that does not work, with the unit off, disconnect the AC adapter and reconnect as shown on page 8. The picture may be distorted while using the Prev/Next buttons.
EMERSON RADIO CORP. LIMITED WARRANTY (Valid in the United States) Emerson Radio Corp. warrants manufacturing defects in original material, including original parts and workmanship, under normal use and conditions, for a period of ninety (90) days from the date of original purchase in the U.S. With your dated proof of purchase, we will provide repair service at no charge for labor and parts at an authorized Depot Repair Facility, or replace the product in our discretion.
® EMERSON WARRANTY (Valid in Canada) Consumer Electronics, Home Appliances and Home Office Products ® Thank you for choosing EMERSON ! SYNNEX Canada Limited gives the following express warranty to the original consumer purchaser or gift recipient for this EMERSON product, when shipped in its original container and sold or distributed in Canada by SYNNEX Canada Limited or by an Authorized EMERSON Dealer: SYNNEX Canada Limited warrants that this product is free, under normal use and maintenance, from any de
® BAR598-081207-02A Printed in China