BP7384 Camden, CF3600 3/12/09 12:37 PM Page 1 READ AND SAVE THESE INSTRUCTIONS CAMDEN™ 52” Damp Location Ceiling Fan Owner's Manual Model Numbers CF3600AP CF3600ORH Antique Pewter Oil Rubbed Bronze with Highlights Net Weight: Part No. F40BP73840000 15.9 Lbs. Form No. BP7384 Model No.
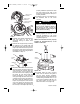
BP7384 Camden, CF3600 3/12/09 12:37 PM ! Page 2 WARNING WARNING: To avoid fire, shock, and serious personal injury, follow these instructions. Safety Instructions 1. Read your owner’s manual carefully and keep it for future reference. 2. Before servicing or cleaning unit, switch power off at service panel and lock service panel disconnecting means to prevent power from being switched on accidentally.
BP7384 Camden, CF3600 3/12/09 12:37 PM Page 3 THIS FAN IS SUITABLE FOR DAMP LOCATIONS SUCH AS COVERED PORCHES, COVERED PATIOS, AND COVERED DECKS...ANYWHERE THERE IS A ROOF OVERHEAD. This Manual is Designed to Make it as Easy as Possible for You to Assemble, Install, Operate and Maintain Your Ceiling Fan Tools Needed for Assembly Installed Wire Length Up to 50 ft. 50-100 ft.
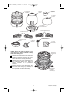
BP7384 Camden, CF3600 3/12/09 12:37 PM Page 4 C. COUPLING COVER B. MOTOR COVER A. FAN MOTOR ASSEMBLY D. CEILING COVER E. SWITCH ADAPTER PLATE G. BLADE MEDALLION (4) F. BLADE FLANGE (4) H. SWITCH COVER PLATE J. HANGER BALL/ DOWNROD ASSEMBLY I. HANGER BRACKET K. LOOSE PARTS BAG NOTE: Place the parts from the loose parts bags in a small container to keep them from being lost. PROTECTIVE PLASTIC BAG 2.
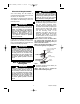
BP7384 Camden, CF3600 3/12/09 12:37 PM Page 5 Electrical Requirements ! Your new ceiling fan will require a grounded electrical supply line of 120 volts AC, 60 Hz, 15 amp circuit. The outlet box must be securely anchored and capable of withstanding a load of at least 50 pounds. ! 1. Position the blade medallion on top of the blade by aligning the raised bosses into the blade mounting holes. Carefully position the blade flange onto the bottom of the blade by aligning the bosses with the blade holes.
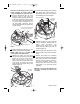
BP7384 Camden, CF3600 3/12/09 12:37 PM Page 6 6. Turn the switch adapter plate clockwise and tighten both screws (Figure 4). Reinstall the other pan head screw in the remaining hole in the adapter. Note: Be sure the flange screws on the blade assembly are facing down for correct installation into the motor hub. 3. Insert the blade flange into one of the mounting holes in the motor hub (Figure 2). Align the flange with the slot in the motor assembly.
BP7384 Camden, CF3600 3/12/09 12:37 PM Page 7 properly installed to prevent the clevis pin from working loose. Pull on the downrod to make sure the clevis pin is properly installed. 13. Install the 5/16-18 x 1/4” setscrew into the threaded hole on the motor coupling. SWITCH COVER ASSEMBLY SWITCH CHAIN BUSHING SWITCH COVER CONNECTOR ! MOTOR ASSEMBLY CONNECTOR WARNING It is critical that the clevis pin in the motor coupling is properly installed and the setscrew securely tightened.
BP7384 Camden, CF3600 3/12/09 12:37 PM Page 8 17. Reinstall the hanger ball (Figure 10) on the downrod as follows. Route the motor leads through the downrod. Position the pin through the two holes in the downrod and align the ball so the pin is captured in the groove in the top of the hanger ball. Pull the hanger ball up tight against the pin and securely tighten the setscrew in the hanger ball. A loose setscrew could create fan wobble.
BP7384 Camden, CF3600 3/12/09 12:37 PM Page 9 How to Hang Your Ceiling Fan ! ! WARNING Hanger bracket must seat firmly against outlet box. If the outlet box is recessed, remove wall board until bracket contacts box. If bracket and/or outlet box are not securely attached, the fan could wobble or fall. WARNING The fan must be hung with at least 7' of clearance from floor to blades (Figure 11). CEILING OUTLET BOX TWO SCREWS SUPPLIED WITH OUTLET BOX AT LEAST 7' HANGER BRACKET TAB Figure 12 2.
BP7384 Camden, CF3600 3/12/09 12:37 PM How to Wire Your Ceiling Fan WARNING LISTED WIRE CONNECTOR (3) WHITE SUPPLY (NEUTRAL) GREEN WIRE (GROUND) FROM HANGER BRACKET WHITE FAN WIRE GREEN WIRE (GROUND) FROM HANGER BALL Turning off wall switch is not sufficient. To avoid possible electrical shock, be sure electricity is turned off at the main fuse box before wiring.
BP7384 Camden, CF3600 3/12/09 12:37 PM Page 11 Maintenance IMPORTANT CARE INSTRUCTIONS for your Ceiling Fan Periodic cleaning of your new ceiling fan is the only maintenance that is needed. When cleaning, use only a soft brush or lint free cloth to avoid scratching the finish. 1-1/4" THREADED STUD (2) #8 EXTERNAL TOOTH LOCKWASHER (2) Abrasive cleaning agents are not required and should be avoided to prevent damage to finish.
BP7384 Camden, CF3600 3/12/09 12:37 PM Page 12 Repair Parts 2 1 4 7 3 17 18 5 6 19 16 20 8 15 9 10 21 22 BLADE SETS SOLD SEPARATELY 26 23 27 11 25 24 14 12 13 Before discarding packaging material, be certain all parts have been removed. HOW TO ORDER REPAIR PARTS WHEN ORDERING REPAIR PARTS, ALWAYS GIVE THE FOLLOWING INFORMATION: • PART NUMBER • PART DESCRIPTION • NAME OF ITEM • MODEL NUMBER The model number of your Fan will be found on a label attached to the top housing.
BP7384 Camden, CF3600 3/12/09 12:37 PM Page 13 Repair Parts Listing Part Numbers Key Model No. Model No. No. Description CF3600AP00 CF3600ORH00 * Hanger Pack, Consisting of: 761655-80 761655-65 1 Hanger Bracket Assembly (1) — — 2 Hanger Ball (1) — — 3 Downrod (1) — — * Parts Bag, Containing: 763862 763862 4 Stud, Threaded, — — — — #8-32 x 1-1/4” (2) 5 Lockwasher, External Tooth #8-32 (2) 6 Knob, Knurled #8-32 (2) — — 7 Connector, Wire, 12 Ga.
BP7384 Camden, CF3600 3/12/09 12:37 PM Page 14 WARNING: FOR YOUR OWN SAFETY TURN OFF POWER AT FUSE BOX ! OR CIRCUIT BREAKER BEFORE TROUBLE SHOOTING YOUR FAN. Trouble Shooting TROUBLE 1. Fan will not start. PROBABLE CAUSE 1. Fuse or circuit breaker blown. 2. Loose power line connections to the fan. 3. Fan/Light Wall Control is OFF. 2. Fan sounds noisy. 1. Blades not attached to fan. 3. Fan wobbles excessively. 1. Setscrew in the hanger ball/ downrod assembly is loose. 2.
BP7384 Camden, CF3600 3/12/09 12:37 PM Page 15 LIMITED WARRANTY What The Warranty Covers: This warranty covers the motor and the other components and accessories of your Emerson ceiling fan against all defects in workmanship and materials. You must be the original purchaser or user of the product to be covered. What The Period Of Coverage Is: As it applies to the motor, this warranty will last for the lifetime of your ceiling fan.
BP7384 Camden, CF3600 3/12/09 12:37 PM Page 16 Air Comfort Products DIVISION OF EMERSON ELECTRIC CO. 8100 W. Florissant • St. Louis, MO 63136 Part No. F40BP73840000 Printed in China 03/09 Form No. BP7384 Model No.