READ AND SAVE THESE INSTRUCTIONS SEA BREEZE 52” Ceiling Fan Owner's Manual Model No. CF654AW00 CF654ORB00 CF654WB00 CF654WW00 Net Weight: 18.7 Lbs. ENERGY STAR Part No. F40BP73360000 Form No. BP7336 U.L. Model No.
! WARNING WARNING: To avoid fire, shock, and serious personal injury, follow these instructions. Safety Instructions 1. Read your owner’s manual carefully and keep it for future reference. 2. Before servicing or cleaning unit, switch power off at service panel and lock service panel disconnecting means to prevent power from being switched on accidentally. When the service disconnecting means cannot be locked, securely fasten a warning device, such as a tag, to the service panel. 3.
THIS FAN IS SUITABLE FOR WET LOCATIONS SUCH AS PORCHES, PATIOS, AND DECKS. This Manual is Designed to Make it as Easy as Possible for You to Assemble, Install, Operate and Maintain Your Ceiling Fan Tools Needed for Assembly Installed Wire Length Up to 50 ft. 50 - 100 ft. One Phillips head screwdriver One stepladder One wire stripper Three wire connectors (supplied). ! MATERIALS Wire Size A.W.G.
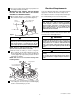
How to Put Your Ceiling Fan Together 1. Remove the hanger ball by loosening the setscrew in the hanger ball until the ball falls freely down the downrod (Figure 1). Remove the pin from the downrod, then remove the hanger ball. Retain the pin and hanger ball for reinstallation in step 5. 3. Tighten the two upper setscrews (Figure 2) securely while pulling up on the downrod. NOTE: The setscrews must be properly installed as described above, or fan wobble could result. 4.
6. Turn fan assembly upside down in preparation for mounting fan blade assemblies. Electrical Requirements IMPORTANT: THE SIDE OF THE FAN BLADE HAVING THE RIB LINE MUST BE FACING UPWARDS AS SHOWN IN FIGURE 5. Your new ceiling fan will require a grounded electrical supply line of 120 volts AC, 60 Hz, 15 amp circuit. The outlet box must be securely anchored and capable of withstanding a load of at least 50 pounds. 7.
How to Hang Your Ceiling Fan ! WARNING ! WARNING Hanger bracket must seat firmly against outlet box. If the outlet box is recessed, remove wall board until bracket contacts box. If bracket and/or outlet box are not securely attached, the fan could wobble or fall. The fan must be hung with at least 7' of clearance from floor to blades (Figure 7). CEILING 2.
How to Wire Your Ceiling Fan If you feel that you do not have enough electrical wiring knowledge or experience, have your fan installed by a licensed electrician. ! ! Check to see that all connections are tight, including ground, and that no bare wire is visible at the wire connectors, except for the ground wire. Do not operate fan until blades are in place. Noise and fan damage could result.
Using Your Ceiling Fan ! Energy Efficient Use of Ceiling Fans WARNING Ceiling fan performance and energy savings rely heavily on the proper installation and use of the ceiling fan. Here are a few tips to ensure quality and product performance. To reduce the risk of fire or electrical shock, do not use this fan with any solid-state speed control device. 1. Restore electrical power to the outlet box by turning the electricity on at the main fuse box. 2.
Maintenance Accessories 1. Ceiling Fan Light Kits (see store or catalog). 2. Ceiling Fan/Light Controls (see store or catalog). 3. Downrod Extension Kits (see store or catalog). IMPORTANT CARE INSTRUCTIONS for your Ceiling Fan Periodic cleaning of your new ceiling fan is the only maintenance that is needed. When cleaning, use only a soft brush or lint free cloth to avoid scratching the finish. Abrasive cleaning agents are not required and should be avoided to prevent damage to finish.
Repair Parts 1 1 9 2 9 9 9 9 9 9 3 9 4 8 7 9 6 5 9 Before discarding packaging material, be certain all parts have been removed. HOW TO ORDER REPAIR PARTS WHEN ORDERING REPAIR PARTS, ALWAYS GIVE THE FOLLOWING INFORMATION: • PART NUMBER • PART DESCRIPTION • NAME OF ITEM • MODEL NUMBER The model number of your Fan will be found on a label attached to the top housing. For repair parts, phone 1-800-654-3545. U.L. Model No.
Repair Parts Listing Key No. Service Part No.
LIMITED WARRANTY What The Warranty Covers: This warranty covers the motor and the other components and accessories of your Emerson ceiling fan against all defects in workmanship and materials. You must be the original purchaser or user of the product to be covered. What The Period Of Coverage Is: As it applies to the motor, this warranty will last for thirty years from the date you purchased your ceiling fan.