Under Cabinet CD Radio OWNER'S fI/IAA/UAL CKD| 612 Visitourwebsiteat www.emersonradio.
T O P B E V E N TF I R E O R S H O C KH A Z A R D ,D O N O T U S E T H I S P L U G W I T HA N E X T E N . S I O N C O R D , R E C E P T A C L EO R O T H E R O U T L E T U N L E S S T H E B L A D E S C A N B E F U L L YI N S E R T E DT O P R E V E N TB L A D EE X P O S U R ET, O P R E V E N TF I R EO R S H O C K HAZARD, DO NOT EXPOSE THIS APPLIANCE TO RAIN OR MOISTURE.
d h e nt h e 1 3 . )B e f e ra l l s e r v i c i ntgo q u a l i f i esde r v i c ep e r s o n n eSl .e r v i c i nigs r e q u i r e w cordor plugis apparatushas beendamagedin any way,suchas power-supply the damaged,liquidhas beenspilledor objectshavefallenintothe apparatus, doesnotoperatenormally, or apparatushas beenexposedto rainor moisture, hasbeendropped. w a t e rand no object 1 4 .
WE BEGIN BEFORE this Emersonaudioproduct,The Emersonbrand Thankyou for purchasing of quality,performance andvalue. is yourassurance featuresin this haveincludedmanyusefuland convenient Our engineers product. Pleasebe sureto readthis Owner'sManualcompletely to make sureyou aregettingthe maximumbenefitfromeachfeature. and This productwas manufactured usingthe highestqualitycomponents andfoundto lt wastestedby Emersoninspectors standardsof workmanship. be in perfectworkingorderbeforeit leftour factory.
CLASS1 LASERPRODUCT CLASS1 LASERPRODUCT APPAREIL A LASERDE CLASSE1 PRODUCTO LASERDE CLASE1 CAUTION INVISIBLE LASERRADIATION WHENOPENAND INTERLOCKS DEFEATED. AVOIDEXPOSURE TO BEAM This productcontainsa low power Laser Device. Avoidinstalling this unit in places exposedto directsunlightor closeto heat radiatingappliances suchas electricheaters, ofi topof otherstereo equipment thatradiates toomuchheat, placeslackingventilation or dusty places areas, subjectto constant vibration ancl/or humidor moistareas.
FCCINFORMATION Thisequipment hasbeentestedandfoundto complywiththe limitsfor a classB digitalDevice,pursuantto part'15of the FCC Rules.Theselimitsare designedto providereasonableprotectionagainstharmfulinterference in a residential generates, Thisequipment installation. uses,andcanradiateradiofrequency energy and,if notinstalled andusedin accordance withtheinstructions, maycauseharmful interferenceto radio communications.
Notethe SerialNumberon the bottomof yourradioandwritethisnumberin the spaceprovidedon the warrantypage of thismanual. UnwindtheAC powercordandextendit to itsfulllength. Placetheuniton a placewithineasyreachof anAC outlet,outof directsunlight, and away from sourcesof excessiveheat,dust, moistureor humidity. POWERSOURCE This systemis designedto operateon 120VAC - 60Hzhousecurrentonly. thissystemto anyotherpowersourcemaycausedamageto thesystem Connecting and suchdamageis not coveredby yourwarranty.
A. (1)-Main %oo"cto"oooto"q Template (1)-Mounting CKDl 612 MOUNTINGTEMPLATE rouxTll{o aulcx tl{aTtucTlottt [ililil0ilil00[il M. r €rdlc orl irr .12PhIFGSlddffi* . .ff b h*d& hd d hdb qtjlr' d .* nY*_'tMti4 hd 1/a' il Srt tkr ! F I . c{ d h fad*E . pro rb.rtri.n n m - W-tt-lt @ F{ t ddab n h i-gfi -..oli (ffi h dlfi hdb d.rtd l) I o' Flgm ffi tbp t ffir l dm h tftDt . onr ur,r' not- wo4h
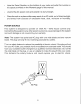
(27mm)spacers D. (4)-1.06" i"'l ''-' (14mm)spacers E. (4)-.56" i''l F . ( 4 ) - . 3 1 (" S m m )s p a c e r s :'.c) G . ( 4 ) - #M 5X70mmscrews Y il I H . ( 4 ) - #M 5 X 40mmscrews T I l . U s e rM anual J . C o l o rl nsertSheet CAUTION To reducethe riskof fire, do notplaceanyheatingor cookingproductbeneaththis unit. Ask a friendto h e l pout.An extrahandto holdthe unitmakesmounting easier andquicker. ToolsRequired . ElectricDrillwith 114"B,t . #2 Philipsor SlottedScrewdriver .
Step3 - Selectthe screwlengthwhichwillgo completely throughyourcabinetbottom,andprovideat least 3lB" of thread to screw into the main unit. puttogether (Note:lf yourcabinetis withoverhang, the providedspacersto form longerspacersto variouscabinetoverhang thickness.) accommodate - Insertthe fourselectedscrewsthrougheachhole fromthe insideof thecabinetgoingdown.Alignthe fourholesof the unitwiththe screws,pushthe unit (andspacersif yourcabinetis withoverhang) onto thescrews.
10
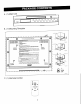
MAINUNIT 1. ONI OFFbutton 2. LCDdisplay 3. CD compartment 4. RemoteSensor 5. CookingTimer+10(min)/ CookingTimerOff button 6. CookingTirner+1 (min)button 7. Preset-button B. Preset+ button 9. M (Memory) I Set button 10.Open/ Closebutton 11.Stereo/ Mono/ Repeatbutton 12 Randombutton 13 Function(CD/ Tuner)switch 1,LStop n button 15.PlayI Pause>il buttonI Eandswitch 1A i,l>lTuning+I CD SkipForwardSearchbutton 13.XBASSbutton 19.Volume-l+ button $. PowerAC cord ,l'1.
R E M O T EC O N T R O L H11 H3 H12 H13 H14- 'h '3__ 'p ,s t'1 -Ef \ .r' b H2 H5 -H4 'Y {s-- H6 -HB H7 he H15 /r' a q- H16 f H9 H10 H17 H1B lJ1. PowerON/OFFbutton A2.Randombutton ll3. RepeatI Stereo/ Monobutton ll4. L)l Tuning+I CD SkipForward Searchbutton It5. ifi Tuning-I CD SkipReverse Searchbutton + button H6.Volurne A7.M-UP(memoryup)button iiB.Function(CD/Tuner) switch i i9.OpenI Closebutton Timer+1 (min)button H10.Cooking H11.Mutebutton / Setbutton H12.MEMO(lVlemory) H13.
USINGTHE REMOTECONTROLCORRECTLY . Pointthe RemoteControlat the REMOTESENSORlocatedon the unit. ' when thereis a strongambientlightsource,the performance of the infrared REMOTEmay be degraded, causingunreliable operation. ' The recommended effectivedistancefor remoteoperationis about13feet(4m). ATTENTION A MAGNETIS BUILTINTOTHE REMOTECONTROL SO THATIT CANBEATTACHED TO YOURREFRIGERATOR. ' Removethe batteryinsulation tab beforeoperating the remotecontrol.
TOPLIGHT COUNTER lightandits ON/OFFswitchare locatedon the bottomof the unit fhe countertop PressON/OFFswitchto turnthe LIGHTon and off. THECLOCK SETTING To settheclocktime,makesurethe unitis pluggedin andin standbymode. \/ 1.) Pressthe M / Set buttonuntil"12H"or "24H"blinks. 2.) Press K{ or }H to set yourdesiredclockformatand pressM / Setto confirm.Hourposition blinksfor setting. t\ -tallil example 3.) Pressthe ifi or >H to setthecurrenthour(for to set 2:00 PM), pressM / Set to confirm.
SETTINGA PRESETRADIOSTATION The unitcan sloretotally40 stationsin memory(20 FM, 20 AM). Presetting allowsyou to tune in to a stationdirectly. 1.) Tuneto yourdesiredradiostation(seeTuningto a stationmanually). 2.) Pressthe M/Setbuttonuntilthe "MEMORY" filrn:n| -t*rrorr'blinksand "01"appearsin the display. The _'n ,"01"is the orderof the presetstation(1-20). nHr LJ I 3.
To fast forward or fast reverseto particularpoint at highspeed,pressand holdthe >N buttonand releaseit at 1.)To scanforuvard thedesiredpoint. and releaseit at 2.) To scanbackwardat highspeed,pressand holdthe i<
c. Pressthe M/Setbuttonto storethe trackin memory. d. To add additional tracks,repeatstepsb&c (upto 20 tracks). pressthe >t PLAY/PAUSE e. To startplayback, button. ','o\/ n -u- \,/ /\ - UEHORY 2) To check the program . Aftersetting,pressthe >itPLAY/PAUSE buttonto startptaying,thenpressthe Klbuttonsto checkthe programmed tracks;or in STOPmode,pressM/Set buttonrepeatedlyto checkthe programmed tracks. 3) To add additionaltracksduring programmode: .
MUTEFUNTION pressthe MUTEbutton,MUTE To cut off the soundfrom speakertemporarily, indicatorappearson thedisplay.PressMUTEbuttonagainto cancelmutefunction and restorethe soundfrom speaker. COMPACTDISCCARE . To removea discfrom its storagecase,pressdownon the centerof the case by the edges. and liftthe discout,holdingit carefully surface wipedoffthedisc'srecorded anddustshouldbe carefully Fingerprints compactdiscshaveno grooves records, witha softcloth.
HANDLING THECD . Onlytouchthe CD on the edgeto avoidfingerprintson theunderside of the CD. . Do not stickpaperor tapeon the undersideof the CD,and do not write anything on the underside of thedisc. CD LENSCARE . WhenyourCD lensgetsdirtyit can alsocausethe unitto outputpoorsound quality.To cleanthe lensyou will needto purchasea CD lenscleaner.For instructions on cleaningthe CD lens,referto the instructions accompanying the CD lenscleaner.
partsinsidethis radio. Thereare no user serviceable pleasereferall serviceproblemsto a qualifiedservicefacility. CareOf Cabinets lf the cabinetbecomesdustythe exteriorwitha softdustclothonly. Neverusedustingspraysor polisheson thecabinet. it maybe wipedwith withfingerprints lf thecabinetbecomesdirtyor smudged witha mildsoapandwatersolution. a softcloththathasbeenslightlydampened theAC powercordfromtheAC outletbeforecleaning,and Alwaysdisconnect neverallowany liquidto get insidethecabinet.
LIVttTET}WARRAN{TY EmersonRadioCotp. warrantsmatufbcturingdefbctsin originalmaterial.inclucling originalpartsmd workmznship, undernormaluseandconditions,fbr a periodof ninety(90) daysfiorn the dateof originalpurchasein the U.S. With yolrrdated proof of purchase. rvewill providerepairserviceat no chargefbr laborandparts at an authorizedDepot RepairFacility,or replacethe productin our discretion.
@Wer,ton, c K D 1 6 1 82 0 1 - 0 2 P r i n t e di n C h i n a