
Installation Instructions


Instruction Manual
D103460X012
D3 Valve with easy-Drive Actuator
November 2013
19
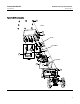
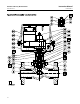
7. Break the bonnet nut (key 5) loose with a hammer. Continue turning the bonnet nut by using a hammer or a large
adjustable wrench, tightened around one ear of the bonnet nut. If the bonnet (key 7) is stuck in the valve, continue
to unscrew the bonnet nut. T he bonnet nut will contact t he spring pins (or pipe plugs) (key 6, figure 12) and jack the
bonnet out of the valve. Carefully lift the actuator assembly from the valve body.
WARNING
The spring pins/pipe plugs (key 6) must always be in place during valve operation. They provide a safeguard against injury
when the unit is being disassembled.
8. Completely remove the packing retainer (key 8) using a 1-1/8 inch wrench.
9. Remove the valve plug by driving out the pin (key 43) and unscrewing the valve plug from the stem. Do not remove
the Belleville springs (key 9) from the stem, in order to retain the Belleville stacking orientation as shown in figure
10.
10. Usea1-3/16inchsocketwrenchtoloosenandremovetheseatring(key2).
CAUTION
Inspect the seat ring and valve body interior for wear, erosion, or damage in the following steps.
11. Inspect the seat ring for wear or damage. If the seating surface has been damaged, discard the seat ring.
12. Visually inspect the valve body interior below the seat ring for erosion or damage. Replace the valve body if
necessary.
WARNING
Be careful to avoid damaging the seating surface on the valve plug or seat ring as damage in these areas will allow excessive
leakage at shutoff. Avoid damaging the highly polished valve stem surface. A damaged valve stem could cut the packing
and allow process fluid to leak to the atmosphere.
Cover the opening in the valve body to prevent foreign material from getting into the valve body cavity.
Trim Assembly
1. Ensure the threads of the valv e stem (key 16) and valve plug (key 3) are clean and free of debris.
2. Make sure the Belleville springs (key 9) are properly installed on the valve stem, as shown in figure 11.
3. Install the valve plug on the stem and insert a new pin (key 43).
4. Lubricate the threads of the packing retainer with anti-seize and install into the bonnet using a 1-1/8 inch wrench.
Make sure the Belleville springs (key 9) are completely enclosed by the packing retainer as shown in figure 11.
5. Torque the packing retainer to 81 NSm(60lbfSft). The packing retainer has been installed correctly when a
metal-to-metal contact has been made between the packing retainer end and the bonnet (key 7). The packing
retainer threads should be completely enclosed by the bonnet (see figure 11).
6. Thoroughly clean the seat ring (key 2) threads and the mating threads in the valve body (key 1).
7. Apply anti-seize lubricant to the threads of the seat ring and its mating threads in the valve body.
8. Screw the seat ring into the valve body. Use a 1-3/16 inch socket wrench to tighten the seat ring to 170 NSm(125
lbfSft). Remove all excess lubricant after tightening.
9. LubricatethebonnetO-ring(key4)withlithiumgreaseandinstallonthebonnet.