Smart Energy Programmable Thermostat + Energy Monitor EE542-1Z I User Manual
Contents 1 1.0 Welcome! 2 2.0 Get to Know Your Thermostat 3 3 4 4-5 2.1 Use the Navigation Keypad 2.2 Initiate a Temporary Hold 2.3 Away Preset 2.4 Get Messages 5 3.0 Customize Thermostat Settings 5-8 8-9 10-11 12 13 13 14 15 15-17 17-19 19 20-22 22 23 23 24-25 25 3.1 Program a Heating / Cooling Schedule 3.2 Set Thermostat Clock 3.3 Set Alerts 3.4 Set Thermostat Lock 3.5 Set Vacation Hold 3.6 Activate the Fan 3.7 Advanced Settings 4.
1.0 Welcome Congratulations on the purchase of your new Smart Energy Thermostat! The thermostat is designed to help you save money and conserve energy. When connected to a smart meter, you can use the product to get real-time access to information about energy consumption in your home so you can make more informed decisions and better manage your energy use. This thermostat may have been installed in conjunction with a plan from your utility designed to help you save money and/or to ensure grid reliability.
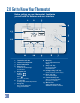
2.0 Get to Know Your Thermostat Before setting up your thermostat, familiarize yourself with its features and user interface. 1 2 3 4 1:54 PM - Mar. 12 13 Base Base Rate Rate 12 79 Set At F 5 $0.08 kWh Inbox 11 1. 2. 3. 4. Cool 10 Current time and date Current room temperature Desired temperature Message icon Lit when an unread message is in the inbox 5. Navigation pad Up/Down Left/Right Enter ( ) (see section 2.1 for details.) 6. Tri-color LED Lit during utility events and price tiers 7.
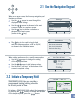
2.1 Use the Navigation Keypad When on a menu screen, the five-way navigation pad functions as follows: • Use the arrows to move through the displayed menu listings • Use the arrows to advance to the next screen or return to a previous screen. • Use the key to confirm a selection or advance to the next screen. (similar to the key.) • The key is also used to toggle back and forth between options, such as On/Off, as shown in the Schedules menu.
2.3 Set One-touch Away Preset With just one touch, the AWAY preset will instantly change your desired temperature to a set point that will save you money. This is a convenient feature when you’re leaving home unexpectedly or intend to be away from home for an extended period of time. The unit has been shipped with “Away” settings based on Energy Star recommendations of 85° in the summer and 62° in the winter, but those temperatures can easily be changed with Away Preset the touch of one key.
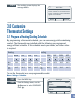
STEP 3 The resulting screen displays the message details. Air Filter It’s time to replace this item. Press “Reset” to reset the timer. Press “Snooze” to be reminded again in one week. Reset Snooze 3.0 Customize Thermostat Settings 3.1 Program a Heating/Cooling Schedule By programming a thermostat schedule, you can save energy while maintaining comfort. The thermostat was installed with the following pre-programmed, energy-efficient schedule.
STEP 3 If the SCHEDULES feature is ON, press the key to turn it OFF. Schedules Schedules Off Exit To customize the heating/cooling schedule: Menu > Settings > Schedules You can easily change the day, time period or temperature settings of the pre-programmed schedule. STEP 1 Press the MENU key. STEP 2 From the Settings menu, use the arrows to select SCHEDULES. Press . STEP 3 If the SCHEDULES feature is OFF, press .
To set a schedule: Menu > Settings > Schedules > Set Heat (or Cool) Schedule STEP 1 From the SCHEDULES menu, use the arrows to select SET HEAT SCHEDULE. Press . Schedules Schedules Set Heat Schedule Set Cool Schedule Periods Per Day On 4 Exit STEP 2 From the HEAT SCHEDULE screen, you can either: • Set one schedule for weekdays and one for the weekend. • Make edits to the schedule of any individual day. Use the arrow keys to make your selection. Press .
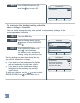
STEP 5 Repeat steps 3 and 4 until all day periods are complete. When finished, press DAYS to advance to the weekend schedule where you will repeat steps 3 and 4. Mon - Fri Period Morning Day Evening Night Starts At 6:00 AM 8:00 AM 6:00 PM 10:00 PM STEP 6 When finished, press SAVE to save both schedules. Days STEP 7 To make edits to any individual day or if you just want to view your current schedule by day, select INDIVIDUAL DAYS by pressing the arrow.
STEP 5 When finished press SAVE to save settings. Set Time & Date 12 : 00 pm 1/1/12 Friday Cancel Save To set your time zone: Menu > Settings > Clock > Set Time Zone STEP 1 From the CLOCK screen, use the arrows to scroll through the menu listings until TIME ZONE is highlighted. Press . 12:39PM - 1/1/12 Set Time & Date Time Zone Daylight Savings On Exit STEP 2 Use the arrows to select a time zone, then press .
3.3 Set Alerts Menu > Settings > Alerts The thermostat is designed to alert you to important information about your energy use. You can set the unit to notify you - with an auditory beep or with a pop-up message when a new load control or pricing event takes place, or when it’s time to perform routine maintenance such as changing the filter on your heating/cooling system.
STEP 5 Repeat steps 2-4 for any other equipment maintenance reminders of interest. Press to return to the ALERTS menu.
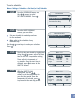
3.4 Set Thermostat Lock Menu > Settings > Thermostat Lock Thermostat lock lets you prevent unwanted users from changing thermostat settings. To lock the thermostat display: From the THERMOSTAT LOCK screen, enter a three-digit combination that will be required to unlock the thermostat. Write down the code for safekeeping, then press LOCK. Thermostat Lock 0 0 0 Cancel Lock To unlock the thermostat display: STEP 1 Press UNLOCK. 1:54 PM - Mar. 12 Base Rate $0.
3.5 Set Vacation Hold Menu > Settings > Vacation Hold Vacation Hold lets you override your thermostat’s programmed schedule while you’re away, yet ensures that you return to a comfortable home. To set vacation hold: Menu > Settings > Vacation Hold STEP 1 From the VACATION HOLD screen, select the desired vacation hold temperature and press SET. Vacation Hold Heating Set Point 55° Set STEP 2 Vacation hold can remain in effect for up to one year.
3.7 Advanced Settings Adjust Backlight: Menu > Settings > Advanced Settings > Backlight The thermostat backlight has two settings. It can be set to illuminate only when the keypad is touched (AUTO), or it can be set to illuminate continuously (ALWAYS ON). Select Fahrenheit or Celsius: Menu > Settings > Advanced Settings > °F or °C Set Point Limits: Menu > Settings > Advanced Settings > Set Point Limits This feature lets you establish low and high temperature limits that cannot be exceeded.
4.0 Monitor Whole-Home Energy Use When Connected to a Smart Meter When the thermostat is connected to a smart meter, it will help you track your entire home’s energy use - not just the electricity being used by your heating and cooling equipment. And by giving you a detailed view of usage in real time, you can take action to increase your level of energy efficiency - preserving resources and saving money.
KEEP IN MIND: The product will start measuring your energy consumption immediately upon connecting it to a smart meter or other data source. By default, the counter will reset to $0 on the first calendar day of every month. For a closer approximation of how you’re tracking against your monthly bill, you can change the start date to correspond with the first day of your billing cycle (which can usually be found on your utility bill).
If you have enabled popup message alerts, the following screen will appear on your display when your target budget has been exceeded. Cost Alert Month To Date Costs Have Exceeded $100 A message will also be sent to your INBOX. Days Left In Month 5 Exit 4.2 Track Energy Use Against A Budget Target Once you have set a budget target, the following features are designed to help you track energy use against it. To view month-to-date usage: Energy STEP 1 Press the ENERGY key.
To view current cost estimates: Energy > More > Current Cost Per Hour Want to know how much it costs to run your dryer? The CURRENT COST PER HOUR feature will allow you to figure out how much it costs to operate any electrically powered appliance or device in your home. This feature shows your whole home’s energy use in real time. First, take a look at the screen and note your energy use. Then, start the dryer and check back to see the cost difference.
5.0 Tiered Pricing Plan Exclusive Features We define a “Tiered Pricing Plan” as one where your electricity rates change based on the time of day. The following features are only pertinent to users who are enrolled in this type of utility pricing plan. Utilities are increasingly looking to “time-of-use” rates as a way to help them balance load and maintain grid reliability when capacity is scarce. By shifting your consumption to off peak hours you may significantly lower your energy costs.
5.1 Enable Price Protection The “Price Protection” feature is designed to save you money by letting you automate how your heating and cooling system responds to peak rates. First, determine how you want your thermostat to respond to each price tier. The product will always display the lowest price tier first and each tier that follows is more expensive than the one before it. You can then assign how many degrees warmer or cooler you’d like your home to be when each tier is active.
STEP 4 STEP 5 On the PRICE RESPONSE: COOLING screen, the pricing tiers offered by your utility will be listed. Indicate how you want your thermostat to respond when each tier is active. Use the arrows to select a tier, then press . Use the arrows to select the temperature adjustment you’d like to have in place when that tier price is active. In COOLING mode, for example, an adjustment of 2° will result in the room being two degrees warmer for the duration of that rate.
To disable Price Protection when active: When rates are high and Price Protection is active, you can always override the feature by either pressing the CANCEL key or by using the arrows to change the set point. STEP 1 To opt out at any time during a pricing event, press the CANCEL key. STEP 2 The system will ask you to confirm your decision to opt out. Price Protection Active Tier 4 $0.
5.3 View Costs by Rate This feature of the thermostat is designed to show you the impact of higher rates on your total monthly energy costs. To view cost by rate: Energy > More > Costs by Rate STEP 1 Press the ENERGY key. STEP 2 Press MORE at the bottom of the display. STEP 3 From the Energy Monitor menu, use the arrows to select COSTS BY RATE. Press .
6.1 View Scheduled Utility Events Utility events are most likely to happen on the hottest weekday summer afternoons when the electric grid is under pressure. Many utilities can anticipate and will schedule an event at least one day in advance. To opt out of a utility event: When a utility event is active, the words ACTIVE UTILITY EVENT will appear on the thermostat display along with the time when the event is expected to end.
KEEP IN MIND: Under the most critical circumstances - such as, a potential blackout – the key light will illuminate in RED. If at all possible, try not to Opt Out of these types of events. To view the details of any scheduled utility event: Energy > More > Scheduled Events STEP 1 Press the ENERGY key. STEP 2 Press MORE at the bottom of the display. STEP 3 From the Energy Monitor menu, select SCHEDULED EVENTS and press . STEP 4 STEP 5 To view the details of any event, select the event then press .
37-7302C 2013 Emerson, Emerson Climate Technologies are trademarks of Emerson Electric Co. or one of its affiliated companies. ©2013 Emerson Electric Co. All rights reserved.