OWNER’S MANUAL “EMERSON AND THE G-CLEF LOGO ARE REGISTERED TRADEMARKS OF EMERSON RADIO CORP., PARSIPPANY, NEW JERSEY, U.S.A.” 9-INCH COLOR TV/DVD EWC09D5 EWC09D5 B INSTRUCCIONES EN ESPAÑOL INCLUIDAS. If you need additional assistance for set-up or operating after reading owner’s manual, please call TOLL FREE : 1-800-256-2487. Or visit our WEB SITE at http://www.EmersonAudioVideo.
WARNING: TO REDUCE THE RISK OF FIRE OR ELECTRIC SHOCK, DO NOT EXPOSE THIS APPLIANCE TO RAIN OR MOISTURE. THIS SYMBOL INDICATES THAT DANGEROUS VOLTAGE CONSTITUTING A RISK OF ELECTRIC SHOCK IS PRESENT WITHIN THIS UNIT. CAUTION RISK OF ELECTRIC SHOCK DO NOT OPEN THIS SYMBOL INDICATES THAT THERE ARE IMPORTANT OPERATING AND MAINTENANCE INSTRUCTIONS IN THE LITERATURE ACCOMPANYING THE APPLIANCE. CAUTION: TO REDUCE THE RISK OF ELECTRIC SHOCK, DO NOT REMOVE COVER (OR BACK). NO USER SERVICEABLE PARTS INSIDE.
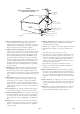
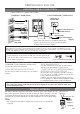
F IGURE A EXAMPLE OF ANTENNA GROUNDING AS PER NATIONAL ELECT RICAL CODE ANTE NNA L EAD I N WI RE GROUND CLAMP A NTENNA DI SCHARG E UN I T (NEC SECTION 8 10 -2 0) EL ECT RI C SE RV I CE EQ U I PM EN T G RO UNDI NG CO NDUCT ORS (NEC SECTION 8 10 -2 1) G RO UND CL AM PS NEC - NATI O NAL EL ECTRI CAL CO DE POWER SERVI C E G RO UNDI NG EL EC TR O DE SYST EM (NEC ART 2 50 , PART H) S2 8 9 8 A 12.
PRECAUTIONS IMPORTANT COPYRIGHT INFORMATION Unauthorized copying, broadcasting, public performance and lending of discs are prohibited. This product incorporates copyright protection technology that is protected by U.S. patents and other intellectual property rights. Use of this copyright protection technology must be authorized by Macrovision, and is intended for home and other limited viewing uses only unless otherwise authorized by Macrovision. Reverse engineering or disassembly is prohibited.
LOCATION WARNING For safe operation and satisfactory performance of your unit, keep the following in mind when selecting a place for its installation: • Shield it from direct sunlight and keep it away from sources of intense heat. • Avoid dusty or humid places. • Avoid places with insufficient ventilation for proper heat dissipation. Do not block the ventilation holes at the top and bottom of the unit. Do not place the unit on a carpet because this will block the ventilation holes.
TABLE OF CONTENTS STEP BY STEP PLAYBACK . . . . . . . . . . . . .20 FAST FORWARD / FAST REVERSE . . . . . . .20 SLOW FORWARD / SLOW REVERSE . . . . .20 C IMPORTANT SAFEGUARDS . . . . . . . . . . . . .2 C PRECAUTIONS . . . . . . . . . . . . . . . . . . . . . . . .4 LOCATION . . . . . . . . . . . . . . . . . . . . . . . . . . . .5 AVOID THE HAZARDS OF ELECTRICAL SHOCK AND FIRE . . . . . . . . . . . . . . . . . . . . . .5 WARNING . . . . . . . . . . . . . . . . . . . . . . . . . . . .
FEATURES ¡Screen saver/Auto power-off functions TV Mode The screen saver program starts when there is no input from the unit for 5 minutes in the stop mode. After the screen saver program is activated for 15 minutes, the power automatically turns off. • 181 channel capability PLL frequency synthesizer tuner with direct station call (A converter may be necessary to view scrambled cable channels.
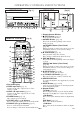
OPERATING CONTROLS AND FUNCTIONS [Fig. 1] FRONT PANEL [Fig. 3] REAR VIEW DC 13.2V ANT. VIDEO L AUDIO R POWER VOLUME CHANNEL STOP SKIP PLAY SKIP PAUSE OPEN/CLOSE HEADPHONE COAXIAL SEARCH 1 2 3 4 5 6 7 8 9 10 11 12 13 14 37 38 39 40 7. Remote Sensor Window 8. C STOP Button [page 19] Stops operation of the disc. REMOTE CONTROL [Fig. 2] 9. H SKIP Button [page 21] Plays back from the beginning of the current chapter or track.
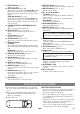
17. SLEEP Button [page 15] Sets the sleep timer. 18. REV h Button [page 20] Hit to fast reverse the Disc. Hit [PAUSE F], then hit this button to begin slow motion playback. Hit this button repeatedly to change the reverse speed of slow motion. FWD g Button [page 20] Hit to fast forward the Disc. Hit [PAUSE F], then hit this button to begin slow motion playback. Hit this button repeatedly to change the forward speed of slow motion. 19. V.
PREPARATION FOR USE ANTENNA/CABLE CONNECTION Cables used here are commercially available. [ANTENNA CONNECTION] [CATV/SATELLITE CONNECTION] CATV Box or Satellite Box * VHF/UHF 75-ohm Coaxial Cable OR DC 13.2V OUT VHF IN ANT. From Cable System or Satellite Antenna COAXIAL UHF VHF VHF or or UHF UHF VHF/UHF Combiner ANT. OR Adaptor Flat twinlead cable 75-ohm Coaxial Cable From Cable System [Fig.
CONNECTING TO EXTERNAL INPUT JACKS When you watch a program recorded on another source (VCR or video camera), use the AUDIO/VIDEO input jacks on the front of the unit. Connect the AUDIO/VIDEO output jacks of another source to the AUDIO L/R and VIDEO jacks of this unit. Then hit [SELECT] until “AUX” appears on the screen. AUX VIDEO ex. VCR or video camera, etc.
CONNECTING TO A STEREO AMPLIFIER EQUIPPED WITH DIGITAL INPUT JACKS (for DVD) Use an audio coaxial digital cable (commercially available) for the audio connections. Connect to an amplifier equipped with digital input jacks such as MD Deck or DAT Deck. ex. MD deck, DAT deck, etc. DC 13.2V To Coaxial digital Audio input jack ANT. COAXIAL COAXIAL (IN) Audio coaxial digital cable (commercially available) (OUT) To COAXIAL jack (Only DVD AUDIO OUT) [Fig. 7] NOTES: • The audio source on a disc in a 5.
CONNECTING TO A DOLBY DIGITAL DECODER (for DVD) If using this unit to play a DVD disc in a 5.1 channel Dolby Digital surround format, the unit outputs a DOLBY DIGITAL Data stream from its COAXIAL jack. By hooking the unit up to a Dolby Digital decoder, you can enjoy a more convincing, realistic ambience with powerful and high-quality surround sound as enjoyed in movie theaters. Use audio coaxial digital cables (commercially available) for the audio connections.
TV SECTION TV OPERATION AND SETTINGS SET UP FOR THE FIRST TIME WATCHING A TV PROGRAM TV TV 1 1 Plug in the unit power cord Plug the unit power cord into a standard AC outlet. NOTE: • If some digits appear in the corner of the screen, hit [POWER] without unplugging the power cord. 2 2 3 4 Turn on the unit Select the On Screen Language – SET UP – B LANGUAGE [ENGLISH] ESP 3 FRA AUTO PRESET Begin auto preset – SET UP – LANGUAGE [ENGLISH] ESP Adjust sound Press [VOL.
PICTURE CONTROL SLEEP TIMER TV The unit’s picture controls – BRIGHT, CONTRAST, COLOR, TINT and SHARPNESS – are preset to factory specifications. Although they are usually the best, you may need to make some further adjustments for a natural looking image. Make sure ... • The unit must be turned on. 1 Select “PICTURE CONTROL” Select item you want to adjust Press [K / L] until desired control is displayed.
ADDING/DELETING CHANNELS CHANNEL RESETTING The channels you no longer receive or seldom watch can be deleted from the memory. (Of course, you can add the deleted channel into the memory again.) TV Make sure ... • The unit power must be turned on. 1 RESETTING CHANNELS 1 - TV SETUP - B CHANNEL SET UP LANGUAGE [ENGLISH] Select “CHANNEL SET UP” Hit [SETUP] on the remote control. Press [K / L] to point to “CHANNEL SET UP”, then hit [ENTER]. 2 Select “CHANNEL SET UP” Hit [SETUP].
MENU LANGUAGE TV 1 Select “LANGUAGE” Hit [SETUP]. Press [K / L] to point to “LANGUAGE”, then hit [ENTER] to select “ENGLISH” or “ESPAÑOL”= Spanish or “FRANÇAIS”= French. 2 - TV SETUP - CHANNEL SET UP B LANGUAGE [ENGLISH] Exit the Language mode Hit [SETUP] to return to exit the menu. NOTE: • This function effects only the language on the screen menu and not the audio source. • If Spanish or French is selected accidentally, 1) Hit [SETUP].
DVD SECTION ABOUT THE DISCS PLAYABLE DISCS Playable discs DVD-Video Mark (logo) Region code Recorded signals Disc size Digital video (MPEG2) 12 cm or 8cm Digital audio 12 cm or 8cm Disc types or * 1,2,3,10 DVD-RW DVD-R - Example Title 1 Title 2 Chapter 1 Chapter 2 Chapter 3 Chapter 4 Chapter 1 Chapter 2 * 1,3,4,5,6 8,9 DVD+RW DVD+R - * 1,3,4,5,7,8,9 Audio CD * 3,5 CD-RW CD-R - Audio CD Example Track 1 Track 2 Track 3 Track 4 Track 5 Track 6 * 3,4,5,8,9 is a trademark of DV
PLAYING A DISC BASIC PLAYBACK DVD-V GENERAL FEATURES CD DVD-V Getting started ¡Turn on the power of amplifier and any other com- ponents, if necessary. 1 Hit [POWER]. ¡The power will turn on. 2 Hit [OPEN/CLOSE A] to open disc loading tray. 3 Place the chosen disc in the tray, with the label facing up. DVD may contain menus to navigate the disc and access special features.
FAST FORWARD / FAST REVERSE RESUME DVD-V CD DVD-V 1 During playback, hit [STOP C]. CD 1 During playback, press ¡Resume message will appear on the TV screen. [FWD g] or [REV h ]. 2 Hit [PLAY O], playback will resume from the ¡“ g 1” or “h 1” appears on the screen. point at which playback was stopped. 2 To select another speed, repeat step 1 until ¡To cancel resume, hit [STOP C] twice. ¡If the unit is turned off, resume function will be can- celled. your required speed appears on the screen.
SEARCH FUNCTION TRACK SEARCH TIME SEARCH CD DVD-V There are three ways to begin playback on an Audio CD at a specific track. CD 1 During playback, hit [SEARCH MODE] three times (CD: twice) to display the Time Search on the TV screen. Using the Number buttons 2 Within 30 seconds, enter a desired disc 1 Press the Number buttons to enter the time using the Number buttons. desired Track Number. ¡Playback will start at the selected track. ¡For single digit tracks (1-9), hit a single number (eg.
SPECIAL PLAYBACK FUNCTION REPEAT PROGRAM REPEAT is available only during playback. CD REPEAT TITLE / CHAPTER DVD-V 1 In stop mode, hit [MODE]. ¡The “PROGRAM” screen will appear. To activate the repeat function, hit [REPEAT] during playback. ¡The repeat mode changes as described below every time you hit the button. CHAPTER TITLE (current chapter repeat) (current title repeat) OFF (repeat off) NOTES: ¡Repeat Title/Chapter is not available with some scenes.
CHANGING THE SETTINGS SUBTITLE LANGUAGE AUDIO LANGUAGE DVD-V DVD-V The unit allows you to select a language for subtitles during DVD (if available) playback. The unit allows you to select a language during DVD (if multi languages are available) playback. 1 Hit [SUBTITLE] during playback. ¡The subtitle language will be 1.ENG/6 1 Hit [AUDIO] during playback. 1.ENG Dolby D 3/2.1ch 48k/3 displayed on the display bar at the top of the screen.
CAMERA ANGLE VIRTUAL SURROUND DVD-V Some DVDs contain scenes which have been shot simultaneously from various angles. You can change the camera angle when the “ ” icon appears on the screen. DVD-V CD You can enjoy surround-sound effect over two speakers on this unit. 1 Press [V.SURR] once or [MODE] twice (CD: once) during playback. 1 Hit [ANGLE] during playback. ¡If the “ANGLE ICON” setting OFF 1/8 is “OFF” in the “DISPLAY” menu, the “ ” icon will not appear. (Refer to page 27.
THE ON-SCREEN INFORMATION DVD-V CD You can check the information about the current disc by hitting [DISPLAY]. For DVD-Vs For Audio CDs 1 Hit [DISPLAY] during playback to show current Chapter. ¡The elapsed and remaining 9/49 1 Hit [DISPLAY] during playback to show the current Track. ¡The elapsed and remaining playing time of the cur- 0:00:00 -0:03:30 playing time of the current chapter will be displayed. rent track will be displayed. 2 Hit [DISPLAY] again to show current Title.
CHANGING THE DVD SETUP ITEMS Language CUSTOM MENU DVD-V You can change the DVD player’s settings. 1 Hit [SETUP] twice in STOP mode so that the DVD SETUP menu appears. ¡Hit [L] to select “CUSTOM” SETUP then hit [ENTER]. QUICK CUSTOM INITIALIZE NOTE: ¡If the menu does not appear, hit [PLAY O] first, then hit [STOP C]. Make sure the disc is in STOP mode, then slowly hit [SETUP] twice. 2 Select the desired item. ¡Press [K / L] to select the desired item then hit [ENTER] to confirm.
B C DISPLAY SETTING AUDIO SETTINGS You can change certain aspects of the DVD display screens and on-screen messages on the TV screen. Choose the appropriate Audio settings for your equipment as it only affects during the playback of DVD Follow steps 1 to 2 in the “CUSTOM MENU” section on page 26. Follow steps 1 to 2 in the “CUSTOM MENU” section on page 26. 3 Press [K / L] to select the below items then 3 Press [K / L] to select the below items then hit [ENTER]. hit [ENTER].
D PARENTAL CONTROL IF YOU FORGET THE PASSWORD Parental Control limits the disc viewing that exceed your setting (with a password or playback will stop). This feature allows you to prevent discs with alternative scenes from being played by your children. 1 Hit the number buttons [4], [7], [3], [7] at step 3 . Then enter your new password. ¡Password will be cleared and parental level will be set to “ALL”. PARENTAL LEVEL 2 Proceed with steps 4 to 6 again.
TROUBLESHOOTING GUIDE If the unit does not perform properly when operated as instructed in this Owner’s Manual, check the player, consulting the following checklist. Problem No power. The unit does not respond to the remote control. Corrective Action • Make sure the power plug is connected to an AC outlet. • Make sure the power is turned on. • Check if the power plug is connected to an AC outlet. • Check the batteries in the remote control. • Aim the remote control directly at the remote sensor.
DVD Mode Problem No picture Disc cannot be played No sound No DTS audio is output Distorted picture Audio or subtitle language does not match the set up The camera angle cannot be changed Audio or subtitle language cannot be changed “Prohibited icon” appears on the screen, prohibiting an operation CD sound dropout No CD reproduction DVD picture dropout DVD picture freeze DVD picture in mosaic No DVD reproduction Corrective Action • Insert a correct video disc that plays on this unit.
MAINTENANCE CABINET CLEANING SERVICING • Wipe the front panel and other exterior surfaces of • Should your unit become inoperative, do not try to • the unit with a soft cloth immersed in lukewarm water and wrung dry. Never use a solvent or alcohol. Do not spray insecticide liquid near the unit. Such chemicals may cause damage and discoloration to the exposed surfaces. correct the problem by yourself. There are no userserviceable parts inside.
SPECIFICATIONS GENERAL SPECIFICATIONS Sound output: TV CRT : Television system: Channel coverage: VHF: UHF: CATV: Tuning System: Channel access: ELECTRICAL SPECIFICATIONS 9 inch in-line gun, 90˚ deflection tube NTSC-M TV Standard 2 ~ 13 14 ~ 69 2 ~13, A ~ W, W+1 ~ W+84, A-5 ~ A-1, 5A 181 channel frequency synthesized tuning system Direct access keyboard, programmable scan and up/down OTHER SPECIFICATIONS Terminals Antenna input: Video input: Audio L/R input: Headphone: Coaxial digital audio output (onl
INDICE ■ CONTROLES DE OPERACIÓN Y FUNCIONES . . . . . 33 PANEL FRONTAL DE LA UNIDAD . . . . . . . . . . . . . . . 33 MANDO A DISTANCIA . . . . . . . . . . . . . . . . . . . . . . . . . 33 VISTA POSTERIOR . . . . . . . . . . . . . . . . . . . . . . . . . . . . 33 PARA INSERTAR LAS PILAS . . . . . . . . . . . . . . . . . . . . 34 ■ PREPARACIÓN PARA LA UTILIZACIÓN . . . . . . . . . . 34 CONEXIONES DE ANTENA/CABLE . . . . . . . . . . . . . . 34 LA ANTENA INTERIOR . . . . . . . . . . . . . . . . . . . . . . . .
22. Botón CLEAR Para cancelar o borrar un ajuste entrado actualmente. 23. Botón DISPLAY Modo del televisor: Presione para visualizar el número del canal en la pantalla. Si presiona de nuevo, el número del canal desaparecerá. Modo de DVD: Visualiza el estado actual en la pantalla del televisor. 24. Botón SEARCH MODE Presione para localizar un punto deseado. 25. Botón AUDIO Presione para seleccionar un idioma de audio o un modo de sonido deseado. 26.
NOTA: • Cuando conecte una videograbadora monofónica (otra fuente) a esta unidad, conecte la toma de salida de audio de la videograbadora monofónica (otra fuente) a la toma AUDIO L de esta unidad. El audio saldrá igualmente por los canales izquierdo y derecho. ANTENA COMBINADA DE VHF/UHF La antena combinada de VHF/UHF de 75 ohmios puede conectarse a la toma ANT. ANTENA SEPARADAS DE VHF/UHF En algunas zonas será necesario utilizar una antena exterior.
NOTAS: • Cerciórese que su vehículo tiene un sistema eléctrico con tierra negativa de 13,2 voltios (12 voltios). • Cerciórese de utilizar sólo el cable de batería de coche entregado. El uso de otros cables puede dañar la unidad. • Cerciórese que la toma está limpia de cenizas y otros restos. • Cerciórese de enchufar firmemente el cable de batería de coche en la toma del encendedor de cigarrillos.
MIRANDO UN PROGRAMA DE TV SECCIÓN DE TV TV FUNCIONES Y AJUSTES DE TV 1 Encienda la unidad Presione [POWER] para encender la unidad. AJUSTES PARA LA PRIMERA VEZ 2 Seleccione el número de canal TV 1 Enchufe el cable eléctrico Enchufe el cable de alimentación de la unidad en una toma de CA. NOTA: • Si aparecen algunos dígitos en la esquina de la pantalla, presione [POWER] sin desenchufar el cable de la alimentación. 2 Encienda la unidad Presione [POWER] para encender la unidad. Presione [CH.
SECCIÓN DE DVD REPRODUCCIÓN DE UN DISCO REPRODUCCIÓN BÁSICA DVD-V CD Para empezar ¡Conecte el interruptor del amplificador y otros equipos, si fuera necesario. 1 Presione [POWER]. ¡La alimentación se conectará. 2 Presione [OPEN/CLOSE A]. ¡La bandeja de carga del disco se abrirá. 3 Ponga el dlsco en la bandeja con el lado de la eliguta hacia arriba. NOTAS: ¡Cuando se cambió el modo de DVD al modo de TV, el modo de DVD se desactiva primero y aparece la imagen y sonido de TV después de unos 4 segundos.
MEMO – 39 – ES
LIMITED WARRANTY FUNAI CORP. will repair this product, free of charge in the USA in the event of defect in materials or workmanship as follows: DURATION: PARTS: FUNAI CORP. will provide parts to replace defective parts without charge for one (1) year from the date of original retail purchase. Two (2) years for Picture Tube. Certain parts are excluded from this warranty. LABOR: FUNAI CORP. will provide the labor without charge for a period of ninety (90) days from the date of original retail purchase.