
Installation Instructions

Instruction Manual
D251402X012
3025 Actuator
May 2011
13
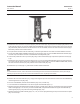
16. Unscrew the cap screws (key 25), disassemble the ring (key 24), the diaphragm (key 47) and the diaphragm plate
(key 26).
17. Unscrew the cap screws (key 70), remove the wiper ring and the seal retainer (key 4 and 5) and the O-ring (key 6).
18. If required, remove the casing bushings (keys 7 and 33) and the pins (key 28) from the diaphragm plate and
casing. If required, remove the travel scale, screw and nuts (keys 74, 75 and 76).
Size P460-200 Actuator Assembly
1. If removed, coat the bushings (keys 7 and 33) with lithium grease (key 201) and slide them into the diaphragm
casings.
2. Place the wiper ring (key 4) into the seal retainer (key 5). Apply lithium grease (key 201) to the O-ring (key 6), the
wiper ring and seal retainer assembly and install them into the diaphragm casing (key 1). Then insert the cap screws
(key 70) and tighten them.
3. If removed, insert the pins (key 28) into the diaphragm casing (key 3) and diaphragm plate (key 26).
4. Place the diaphragm (key 47) on the diaphragm plate (key 26). Install the ring (key 24) and the cap screws (key 25)
and tighten them.
5. Coat the threads of the stem (key 9) with anti-seize lubricant (key 202).
6. Apply anti-seize lubricant (key 202) to the internal thread of the two nut halves (key 10). Install the nut halves and
the retaining ring (key 11). Slide the diaphragm and diaphragm plate assembly (keys 24, 25, 26 and 47), the O-ring
(key 6), the tube (key 51), the wave washers (key 12).
7. Coat the internal thread of the travel stop (key 54) with anti-seize lubricant (key 202), screw it onto the stem and
tighten until the wave washers are completely compressed.
8. Place this stem assembly into the diaphragm casing (key 1). Take care when pushing the actuator stem through the
diaphragm casing so that the threads do not damage the bushing, O-ring or wiper ring.
9. Place the actuator springs (key 30 and 31).
10. Install the diaphragm casing (key 3) so that the vent and air connection are diametrically opposed. Take care when
lowering the casing around the stem so that the thread do not damage the bushing. Apply lithium grease to the
washer (key 53) and place it.
11. Apply anti-seize lubricant (key 202) on the nut internal thread (key 16) and screw it slowly to compress the
springs.
Note
When you replace actuator diaphragms in the field, take care to ensure the diaphragm casing bolts are tightened to the proper
load to prevent leakage, but not crush the material. Perform the following sequence with a manual torque wrench.
CAUTION
Over-tightening the diaphragm cap screws and nuts (keys 45 and 46) can damage the diaphragm. Do not exceed 16 NSm
(12 lbfSft) torque.
Note
Do not use lubricant on these bolts and nuts. Fasteners must be clean and dry.