
Instruction Manual

Instruction Manual
D200154X012
4194A, B, and C Controllers
September 2014
47
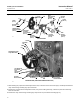
10. Remove the E‐ring (key 27) from the nozzle assembly (key 21).
11. Remove the nozzle assembly (key 21) and plastic washer (key 22) from the bottom of the set point beam assembly
(key 23).
12. Remove the retaining clip (key 26).
13. Remove the proportional band adjustment knob (key 25) and plastic washer from the set point beam assembly
(key 23).
14. Inspect the nozzle assembly (key 21), and replace it if necessary. Inspect the nozzle orifice, and clean it, if necessary.
Also, inspect the plastic washers, and replace them if necessary.
15. Inspect the nozzle assembly O‐ring (key 24) and replace it, if necessary.
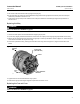
Assembly
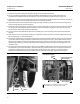
1. Apply a suitable lubricant, such as key 318, to the set point beam assembly; then position a plastic washer (key 22)
and the proportional band adjustment knob (key 25) on the set point beam assembly (key 23) as shown in
figure 5‐3.
2. Position the retaining clip (key 26) on the three posts of the proportional band adjustment knob.
3. Place the second plastic washer on the nozzle assembly. Apply a suitable lubricant, such as key 317, to the nozzle
assembly O‐ring.
4. Insert the nozzle assembly (key 21) through the set point beam assembly (key 23), the plastic washer (key 22), the
proportional band adjustment knob (key 25) and the retaining clip (key 26) into the cap. Align the nozzle with the
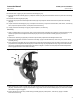
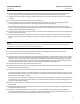
tab on the proportional band adjustment knob shown in figure 5‐4; make sure the proportional band adjustment
knob engages the flats on the nozzle assembly.
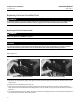
Figure 5‐4. Proportional Band Adjustment Knob Setting
W3761
TAB
HOLE
5. While holding the nozzle assembly (key 21) against the set point beam assembly (key 23), depress the retaining clip
(key 26), and install the E‐ring (key 27) into the E‐ring groove on the nozzle assembly (key 21). Ensure that all three
tabs of the E‐ring are engaged.
6. Inspect the O‐ring on the relay nozzle tubing assembly (key 18) and replace it, if necessary. Apply a suitable
lubricant to the O‐ring.