
Instruction Manual


Instruction Manual
D103361X012
24000SB Valve
March 2011
6
Lapping is the process of mating the valve plug to the seat ring, with an abrasive to produce a close fit. When valve
seat leakage becomes excessive, lapping becomes necessary. The plug and seat ring seating surfaces should be free of
large scratches or dents and the contact surface of the seats should be as narrow as possible.
1. Use a good quality lapping compound with a mixture that contains 280 to 600 grit. Apply at several spots around
the plug seating surface. Replace the plug and stem carefully in the bonnet.
2. Install the bonnet (key 8) into the valve body, without gasket and hand tighten. The bonnet will serve as a guide
during the lapping operation.
3. Lap the valve by applying a slight pressure on the stem and rotate the stem in short oscillating strokes
approximately 8 to 10 times or until you see an even and complete lap line. The plug should be intermittently lifted
and turned 90 degrees while lapping to keep the plug and seat ring concentric.
4. Clean the valve seat and plug (key 4) thoroughly when lapping is complete, removing all traces of lapping
compound.
Replacing Packing
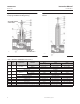
Refer to figure 3 and the standard and optional packing constructions (figure 8) to determine the packing that has
been preinstalled in your valve.
1. Disassemble the valve as directed earlier. Remove the locknuts (key 27) and indicator disk (key 58), and turn the
plug stem (key 5) out through the packing box. Remove the packing follower (key 10). Push out the old packing
(key 14) by working from the underside of the bonnet (key 8).
2. Standard Spring Loaded PTFE V-Ring Packing (figure 3): Carefully insert each piece in exact order shown in figure 8.
Tighten the packing follower (key 10) until it shoulders on the bonnet (key 8). This will compress the packing spring
(key 6) to enable constant stem sealing throughout packing life.
3. Molded Graphite Ribbon Packing (figure 8): Carefully insert each piece in exact order shown in figure 8. Hand
tighten the packing follower (key 10). Use a wrench to increase tightness by turning the follower an additional 60
degrees.
4. ENVIRO-SEALt Packing (figure 8): Carefully insert each piece in exact order as shown in figure 8. Tighten the
packing follower (key 10) until it shoulders on the bonnet, then back off 1/4 turn. This will compress the Belleville
spring (key 17) to ensure constant stem sealing is seated properly throughout the packing life.
Actuator and Valve Body Reassembly
1. Insert a new valve body gasket (key 49) and install the bonnet assembly (key 8).
2. Place the actuator yoke over the stem (key 5). While tilting the actuator back, drop the yoke drive nut (key 9) over
the stem (key 5). Run the locknuts (key 27), and the travel indicator (key 58), down as far as possible and counter
tighten the locknuts (key 27) to lock.
Carefully position the actuator over the stem (key 5), lift the plug stem, and turn the plug stem (key 5) into the
actuator stem as far as it will go before adjusting the bench range. See the following instruction manual (Baumann
Actuator Instructions, D103352X012) for reassembly and bench range adjustment.
CAUTION
When assembling or disassembling the valve, do not turn the valve stem while the plug is in contact with the valve seat.
This can damage the seating surface very quickly.
WARNING
To avoid personal injury or equipment damage due to possible sudden shifting or falling of the valve assembly, do not lift
the valve assembly by the handwheel.