CAUTION: Read all instructions carefully before installation. Save this Owner’s Manual for future reference. Model Nos. HD7002 1 & HD7005 0 EMERSON ® MoistAIR™ HD7002 & HD7005 Evaporative Console Humidifier Owner’s Manual Part No.
Limited Warranty All products covered by this Owner’s Manual are warranted against defects in workmanship and materials for one year from the date of sale except for motors, which are warranted for two years. This warranty does not apply to damage from accident, misuse or alteration nor where the connected voltage is more than 5% above the nameplate voltage, nor to equipment improperly installed or wired or maintained in violation of this Owner’s Manual. No other written or oral warranty applies.
Know Your Humidifier Fan Assembly Controls Bottle Cover Filter Support Assembly Filters Replacement No. HDC-2R or HDC411 NOTE: HDC411 provides two filter changes. Description Gallon Output / 24 hrs Litre Output / 24 hrs. Capacity of Bottle Capacity of Bottle * Sq. Ft. Coverage Fan Speeds Number of Filters Fill Light Auto Humidistat Auto Shut Off Controls CUL Listed Volts Hertz Amps Watts HD7002 & HD7005 7 26.5 2.5 Gallons 9.4 Litres 1500 3 2 Yes Yes Yes Rotary Yes 120 A.C. 60 1.
Humidifier Operations Humidified Air is Then Released Through the Top Your new Emerson humidifier is designed to satisfy home humidity requirements through the principle of evaporation of water into the air. After water is added to the bottle and positioned in the humidifier, the filters begin to soak up the water and become totally saturated in approximately 30 minutes. Air is drawn in from the rear of the humidifier and through the filters by means of one circulation fan.
Location Instructions next to an inside wall. Hot air registers and cold air from outside walls can affect the efficiencies of the controls. Unit should not be placed where warm air from a hot air register blows directly on unit. WARNING: For your own safety, do not use humidifier if any parts are damaged or missing. 1.
Water Fill (continued) Turn Counterclockwise to Remove “E-Z-Fill Side-Cap To fill this humidifier, close the control cover and remove the bottle cover. To remove the water bottle, lift the bottle straight up and out of the cabinet. The water bottle is designed with an “E-ZFill Side-Cap”. Remove the “E-Z-Fill SideCap” on the side of the water bottle by twisting counterclockwise. Place the opening of the water bottle under a water faucet (the bottle should fit under a four-inch clearance faucet).
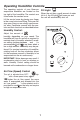
Operating Humidifier Controls The operating controls of your Emerson evaporative humidifier are located on the top right of the humidifier. The controls are found under the smoked cover Fill Light When the unit has a small amount of water left in it, the fill light will come on and the unit will automatically shut off. Lift the control cover by placing your finger in the round cutout and lifting. The cover will stay open. Now you can clearly see the control area.
Using Your Humidifier 1. Be sure unit is full of water and plugged in. 2. Set air flow control speed. 4. If humidifier stops running and the Fill Light is not illuminated, the humidity level is at the normal requirements for that setting or it is adjusting to the home conditions. The table below shows relative humidity percentages which are recommended at various outdoor temperatures.
Replacement and Care of Filters Water Bottle Cover WARNING: To reduce the risk of shock or injury from moving parts, always unplug humidifier before removing or replacing any parts. CAUTION: To help retard bacteria growth and keep maximum efficiency, the filters should be replaced at least once a season, or more often under hard water conditions. Use only Emerson HDC-2R or HDC411 replacement filters. NOTE: HDC411 provides two complete filter changes.
Replacement and Care of Filters (continued) 3. a. Remove the two filters and dispose of properly. Water Level Float b. Clean internal parts of the humidifier per the “Cleaning Your Humidifier” section of your owner’s manual. Float Retainer c. Install new filters inside the cabinet with the glue beads on the filter facing the center of the cabinet. Make sure the filters are resting on the floor of the cabinet. Filters d. Return the filter housing to the cabinet.
Cleaning Your Humidifier Refer to pages 9 and 10 to remove parts if necessary. NOTE: Before removing the internal parts of the humidifier cabinet, we recommend moving the humidifier to an area where floor coverings are not susceptible to water damage, i.e., kitchen or bath area. 2. Remove the bottle cover and water bottle. Grasp the fan assembly at the front center and rear center, and lift it off the cabinet. Set aside on a clean flat surface. 3.
Cleaning Your Humidifier (continued) Bi-Weekly Maintenance End of Season Maintenance Removing Scale 1. Pour one 8 ounce cup of undiluted white vinegar into the cabinet. Let solution stay in for 20 minutes. 2. Clean all interior surfaces with a soft brush. Dampen a soft cloth with undiluted white vinegar and wipe out the cabinet to remove scale. 3. Rinse thoroughly with clean warm water to remove scale and cleaning solution before disinfecting cabinet. 4.
Troubleshooting PROBABLE CAUSE TROUBLE REMEDY Unit will not run • Speed control in off position. and Fill Light is not • Selected humidity level is obtained. on. • No power. • Turn speed control clockwise. • Raise humidistat setting if desired. • Check 120 volt source for power. Unit will not shut • Float is not free. off. • Free float from obstruction. Unit will not dry • This is normal. out completely. • A small amount of water remains in the cabinet after fill light comes on.
Repair Parts PARTS LIST FOR EMERSON HUMIDIFIER MODEL NO.
Repair Parts Key No.
FOR TECHNICAL HELP, CALL (800) 654-3545 FROM USA OR (888) 744-4687 FROM CANADA (Please have complete model number) TM 9999 Highway 48 Markham, Ontario Canada L3P 3J3 © 2002 Emerson Electric Co. Part. No. SP6470 Form. No.