PERSONAL CD, CD-R/RW PLAYER w it h 4 0 SEC O N D EL EC T R O N IC ANTI-SKIP PROTECTION, and FM DIGITAL TUNER OWNER’S MANUAL HD8110 Visit our web site at www.emersonradio.com HD8110_052404.
Thank you......... For purchasing this Emerson Personal CD Player with FM digital tuner. The CD player has a 20 track programmable memory so you can listen to the songs on your favorite CD's in any order you choose. Or you can use the Random playback feature and let the player select the playback order for you. Use the 3-way Repeat feature to repeat a single track, the entire disc, or a programmed sequence of tracks, indefinitely.
IMPORTANT NOTES WARNING: TO PREVENT FIRE OR SHOCK HAZARD, DO NOT EXPOSE THIS UNIT TO RAIN OR MOISTURE. Avoid installing the unit in locations described below: • Places exposed to direct sunlight or • Dusty places. close to heat radiating appliances such • P l ac e s s u b j ec t t o c o n s t an t as electric heaters. vibration. • Humid or moist places.
PREPARATION FOR USE REMOVE THE TRANSIT CARD This personal CD player is shipped with a dummy CD ‘transit card’inside the CD compartment. The purpose of this card is to prevent the laser from moving during shipment of the product. This card must be removed before using the CD player. Slide the OPEN switch to the right to unlock the CD door. Remove the ‘transit card’ from the player and discard it. POWER SOURCES This personal CD player is designed to operate on two “AA” batteries, not included.
INSTALLING THE BATTERIES Note: The battery compartment is located inside the CD compartment. 1.) Slide the OPEN switch to the right to open the CD door. If you have not already done so, remove the dummy CD ‘transit card’and discard it. 2.) Press down on the “Arrow” mark in the center of the battery door and slide the door outward as shown until the door ‘pops’open. 3.) Insert two alkaline “AA” batteries in the battery compartment.
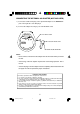
CONNECTING THE OPTIONAL AC ADAPTER (NOT INCLUDED) 1.) Connect the small female plug of the optional AC adapter to the “DC IN 4.5 V” jack on the right side of the CD player. 2.) Connect the adapter housing to your 120V AC 60Hz outlet. DC 4.5V INPUT JACK PLAY/ PAUSE PRESET MODE SKIP FWD./ TUN. UP RADIO STOP SKIP REV./ TUN. DOWN TO 120V/60Hz AC OUTLET OPTIONAL AC/DC ADAPTER Notes: • Never connect or disconnect the adapter from the AC outlet while your hands are wet.
CONNECTING THE STEREO HEADPHONES Connect the plug of the supplied stereo headphones to the green-colored PHONES jack on the left side of the cabinet. NOTE: Make sure the headphone plug is inserted into the PHONES jack as far as it will go. If the plug is not fully inserted, you may only hear sound from one side of the headphones. PLAY/ PAUSE PRESET MODE MEMORY SKIP FWD./ TUN. UP RADIO STOP SKIP REV./ TUN.
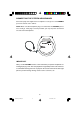
LOCATION OF CONTROLS AND INDICATORS 9 10 8 11 7 6 PLAY/ PAUSE PRESET MODE MEMORY SKIP FWD./ TUN. UP 12 RADIO 13 5 STOP SKIP REV./ TUN. DOWN 4 14 3 15 2 16 1 7 HD8110_052404.
1.) OPEN Switch – Slide to the right to unlock and open the CD door.. 2.) VOLUME Control – Raises or lowers the volume. 3.) PHONES Jack – Connect stereo headphones, included, to this jack. 4.) HOLD Switch. 5.) MEMORY Button. 6.) PRESET Button. 7.) MODE Button. CD - Selects the playback mode: Repeat 1/All, Shuffle, or Intro. FM Radio - Select FM STEREO/MONO. 8.) RADIO Button. 9.) LCD Display – Shows Track number, Playing time, Anti-Skip status, Program, Repeat, Shuffle, and Intro modes. 10.
LCD DISPLAY INDICATORS 3 4 5 6 7 2 8 9 10 1 11 12 1.) FM Radio Indicator. 2.) FM STEREO Indicator. 3.) PROG (Program) Indicator – Appears when programming tracks / FM preset stations, or playing programmed tracks. 4.) INTRO Indicator – Appears when Intro playback mode is selected. 5.) SHUFF (Shuffle) Indicator – Appears when Random playback mode is selected. 6.) REPEAT 1/ALL Indicators – Appears when the Repeat playback mode is selected. 7.
OPERATING INSTRUCTIONS SPECIAL FUNCTIONS HOLD Switch The HOLD switch (on the left side cabinet) must be in the ‘Off’(left) position to start the CD player. If you plan to carry the CD player in a handbag, briefcase, school bag, back pack, etc, slide the HOLD switch to the ‘On’ (right) position. While the HOLD switch is ‘On’all of the controls on the CD door are disabled. This prevents the player from starting accidentally by something pressing against the PLAY/PAUSE or RADIO button.
Electronic Skip Protection (ESP) This CD player includes an Electronic Skip Protection circuit that continuously stores 40 seconds of CD music in an electronic memory. If the player is bumped or shaken you will not hear any skipping because the player is reading from the memory, not directly from the disc. Of course if the shaking continues for more than 40 seconds, the ESP memory will be depleted and the player may then skip or stop if the shaking continues.
NORMAL CD PLAYBACK • Make sure you have installed the batteries. • Make sure the HOLD switch is set to the ‘Off’(left) position. • Make sure to set the VOLUME control to a low setting before you put on the headphones. IMPORTANT: This CD player can play normal CDs plus CD Recordable (CD-R) and CD Rewriteable (CD-RW) discs. However the playability of CD-R/RW discs may be affected by the type of software that was used in ‘ripping’ the tracks from the original discs and ‘burning’the tracks onto the blank media.
6.) Playback will continue until the end of the disc, then the player will stop automatically and the display will again show the total tracks and playing time on the disc. After approximately 30 seconds the power switches ‘Off’ automatically to conserve the batteries and the display goes blank. To stop playback before the disc ends press the STOP button at any time. Press the STOP button after the disc has stopped to shut the power ‘Off’completely.
MODE BUTTON Pressing the MODE button during CD playback cycles the player through the following four special playback modes: REPEAT 1 REPEAT ALL INTRO SHUFF (Shuffle) Playback. REPEAT PLAYBACK The player can be programmed to continuously repeat a single track or the entire disc automatically. One Track Repeat During playback press the SKIP FWD or SKIP REV buttons to select the track to be repeated, then press the MODE button once.
INTRO (Intro Scan) PLAYBACK The Intro Scan feature plays only the first 10 seconds of each track on the disc. This feature is useful when you are trying to find a particular song but you cannot remember the title. 1.) Load your disc in the player as usual and press the PLAY/PAUSE button to begin playback. 2.) When playback begins press the MODE button 3 times. The INTRO indicator flashes. 3.) Press the PLAY/PAUSE button once more. The INTRO indicator stops flashing and remains ‘On’.
PROGRAMMED PLAYBACK You can program up to 20 tracks on a disc to play in any desired order. NOTE: You can program a disc either during Playback or in Stop mode. 1.) Press the MEMORY button once. The Program Number ‘01’appears. The PROG indicator and the the track number ‘00’flash. 2.) Press the SKIP FWD or SKIP REV button to select the first track to be programmed. Example: Track 02. 3.
LISTENING TO THE RADIO 1.) Press the RADIO button, the FM radio frequency appears in the display. 2.) Tune to the desired station by pressing the TUN. UP or TUN. DOWN button. Each time the button is pressed, the frequency changes. 3.) To search for a station quickly (automatic tuning), keep the TUN. UP or TUN. DOWN button pressed until the frequency starts to change rapidly then release the buttons. The tuner will stop on the first strong station. Repeat until you find the desired station. 4.
PRESETTING STATIONS IN MEMORY Up to 20 FM stations can be stored into the Preset memories. They will remain in memory as long as the batteries are installed. 1.) Press the RADIO button to turn the radion ‘On’. 2.) Press the TUN. UP or TUN. DOWN button to tune a station. 3.) Press the MEMORY button – the display blinks. 4.) While the the display is blinking, press the PRESET button to select the Preset channel to store. Example: 04. 5.
CARE AND MAINTENANCE CLEANING THE CABINET Wipe with a soft cloth. If the cabinet is very dirty, dampen the cloth with a weak solution of neutral detergent and water, and then wipe clean. CLEANING THE LENS A dirty lens will cause sound skipping and, if the lens is very dirty, the CD may not work. Open the disc cover and clean the lens as follows: DUST OR DRY PARTICLES Using a camera lens brush/blower, blow on the lens several times, then wipe it lightly with the brush to remove dust.
LIMITED WARRANTY Emerson Radio Corp. warrants manufacturing defects in original material, including original parts and workmanship, under normal use and conditions, for a period of ninety (90) days from the date of original purchase in the U.S. With your dated proof of purchase, we will provide repair service at no charge for labor and parts at an authorized Depot Repair Facility, or replace the product in our discretion.
EMERSON Part No. 16-2937 Printed in China 405-01 HD8110_052404.