Portable Stereo Speaker System with AM/FM Digital Tuner and Digital Alarm Clock OWNER’S MANUAL iP105BK R Made for all iPod® models including iPod® nano, iPod® shuffle and iPod® mini Visit our web site at www.emersonradio.com iP105_052207.
CAUT I ON TO PREVENT FIRE OR SHOCK HAZARD, DO NOT USE THIS PLUG WITH AN EXTENSION CORD, RECEPTACLE OR OTHER OUTLET UNLESS THE BLADES CAN BE FULLY INSERTED TO PREVENT BLADE EXPOSURE. TO PREVENT FIRE OR SHOCK HAZARD, DO NOT EXPOSE THIS APPLIANCE TO RAIN OR MOISTURE.
… … … .For Your iPod® Thank you for purchasing this portable speaker system for your iPod ® by Emerson Research. This compact system is perfect for those times when you want to share the music with your friends, or when using ear buds or headphones is not convenient. This system includes a digital tuning AM/FM stereo radio with 40 preset station memories, and a full featured digital alarm clock that can wake you to the radio, a buzzer, or even to your iPod® .
I M P O R TAN T N O T E S • Avoid installing this unit in places • Operate controls and switches as exposed to direct sunlight or close to described in the manual. heat radiating appliances such as • Before turning on the power, make electric heaters, on top of other stereo certain that the AC power cord is equipment that radiates too much properly installed. heat, places lacking ventilation or • When moving the set, be sure to first dusty areas, places subject to disconnect the AC power cord.
P R E PAR AT I O N F O R U S E Unpacking and Set-Up • The display carton contains the main unit, the AC power cord, and 5 separate dock adapters for use with older iPod® models. Make sure that all the components are removed from the carton and that nothing is accidentally discarded. We recommend that you save the carton and packing materials in the event that your unit even needs to be returned for service.
Installing The Batteries There are two battery compartments on the back cabinet. Remove the battery compartment covers by pressing down on the ‘arrow’marks and sliding the covers downward in the direction of the arrows as shown. Install 6 “C” batteries in the main compartment as shown. Place the battery ribbon into the compartment before inserting the batteries to make removing the batteries easier.
Replacing The Batteries When the sound of the system becomes weak or distorted during battery operation it is probably time to replace the 6 “C” batteries. The life expectancy of the batteries depends on a number of factors including the temperature and the volume level at which the system is operated. If the system is always played at or near the maximum level, the batteries will become exhausted faster than if the system is played at low to medium volume levels.
Power Source This system is designed to operate on 120V AC 60Hz house current only. Connecting this system to any other power source may cause damage to the system and such damage is not covered by your warranty. AC Outlet AC Plug NOTE: The system has a polarized AC plug with one wide blade and one narrow blade. The plug will only fit into matching polarized AC outlets. This is a safety feature to reduce the possibility of electric shock.
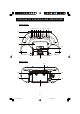
L O C AT I O N O F C O N T R O L S AN D I N D I C ATO R S Front Panel 4 5 6 7 8 9 10 11 12 17 3 2 13 1 1 14 Back Panel 17 16 18 15 19 20 8 iP105_052207.
1.) Speakers. 2.) Clear Protective Cover. 3.) Carrying Handle. 4.) POWER Button - Press to turn the unit ‘On’or ‘Off’. 5.) FUNCTION Button - Press repeatedly to switch among iPod, AUX, and RADIO modes. 6.) TIME SET/MEMORY Button - To set time in power ‘Off’mode. Saves radio stations in the memory in radio mode. 7.) ALARM/PRESET UP Button - To set alarm time and select the Alarm mode. In radio mode, selects the desired preset station. 8.) PLAY/PAUSE-BAND Button - Press to start iPod® playback.
LCD Display 4 5 6 7 3 2 8 1 9 13 12 11 10 1.) Radio Band and Clock AM Indicator. 2.) iPod Select Indicator. 3.) RADIO Select Indicator. 4.) Radio Band FM Indicator. 5.) XBASS Indicator. 6.) FM Stereo Indicator. 7.) , , (Buzzer, Radio, iPod) Alarm Indicators. 8.) MEMORY Indicator. 9.) Volume Level (00-30), Radio Channel (1-20) Display. 10.) Volume Indicator.. 11.) Clock, Radio Frequencies Display. 12.) Clock PM Indicator. 13.) AUX Select Indicator. 10 iP105_052207.
O P E R AT I N G I N S T R U C T I O N S • Regardless of whether you will be using the system on AC or battery power, make sure that you have installed the 2 “AAA” back–up batteries. • If the system will be used on AC power make sure that the AC power cord is properly connected to the socket on the back cabinet and to your AC outlet. Make sure that your AC outlet is ‘live’.
1.) Press the TIME SET/MEMORY button once. “12:Hr” appears on the display and the “12” flashes. This indicates that the display is set for the 12-Hour format with AM/PM indicators. This is the factory default setting. You also have the option of displaying the time in 24-Hour format, also referred to as “Military Time”. In the 24-Hour format midnight is displayed as “0:00”, “1:00 PM” is displayed as “13:00”, “6:00 PM: is displayed as “18:00”, etc. There are no AM or PM indicators in the 24-Hour format.
4.) Press the TIME SET/MEMORY button again. The hour digit stop flashing and the minute digits begin to flash. Press either the / or / buttons to move the display back or forward to the correct minute. 5.) When the correct time is showing on the display press the TIME SET/MEMORY button once more. The minute digits stop flashing and the clock begins to run. Only the colon ( : ) continues to flash. The flashing colon acts as a seconds counter. 13 iP105_052207.
Display Viewing Angle – IMPORTANT The display in this portable system is designed to be the clearest and most visible when you are looking down at the display from above. If you are looking at the display ‘head-on’, or looking up at the display from below, the numbers on the display may seem to fade or may become completely invisible. This is a common characteristic of all liquid crystal displays and is not an indication of any problem with your unit.
Listening To The Radio 1.) Press the POWER button to turn the power ‘On’. The display back lighting comes on and the display appears as: Press the BAND button to switch the radio between FM and AM bands if necessary. When listening to the FM band, raise the telescoping FM rod antenna and extend it to its full length. 2.) Tune to the desired station as follows: • Automatic Tuning Depress and hold the TUNING + / – buttons until the display begins to move, then release the buttons.
4.) To increase the bass response, especially at lower volume levels, press the X-BASS button. The XBASS indicator appears in the display. NOTE: if you experience any distortion when listening to music with strong bass at higher volume levels, switch the Bass Boost circuit ‘Off’. 5.) When you are finished listening press the POWER button to shut the power ‘Off’. The display back lighting turns off and the display changes from radio frequency back to the current time.
Antenna Information FM - Raise the telescoping FM rod antenna and adjust its direction until you find the position that provides the best reception. AM - The AM bar antenna is inside the cabinet. If AM reception is unsatisfactory try turning the entire unit slowly until you find the position that provides the best reception. 17 iP105_052207.
Presetting Stations In The Tuner Memory The tuner in this system has 40 preset station memories that allow you to store up to 20 of your favorite AM and 20 of your favorite FM stations. 1.) Tune to the first station that you wish to memorize by either the Automatic or Manual method above. Example: FM 93.5 MHz. 2.) Press the TIME SET/MEMORY button once. The preset number “1” appears and the MEMORY indicator ‘flashes’indicating that you can store your station in memory number 1. 3.
Recalling Stations In The Tuner Memory Turn the system ‘On’and select the Radio function as usual. Press the ALARM/PRESET UP button repeatedly to scroll through all of the station in the tuner memory. Changing A Station In The Tuner Memory Tune to the new station that you wish to memorize, press the TIME SET/MEMORY button and then press the ALARM/PRESET UP button until the display is showing the memory that you wish to change. Press the TIME SET/MEMORY button once more.
20 iP105_050807.p65 9/5/2007, 15:21 * No adapter provided. Please use the adapter that was included with your 5G iPod® model at time of purchase. Adapters Please use the adapter that was included with this iPod® at time of purchase. It will fit properly into the docking station of this system. NOTE: No adapter is provided for the 5G (Fifth Generation) 30GB and 60GB iPod® models with video capability.
Docking And Playing Your iPod® The docking station in this system was designed in accordance with Apple’s Universal Well design. Any model of dockable iPod® can be used with this system including the audio only models, iPod® photo models, the iPod® mini, the iPod® nano, and the iPod® models with video capability. To properly support your iPod® in the docking station you must use the adapter specifically designed for your model.
2.) Place your iPod® into the docking adapter. Make sure that your iPod® is fully inserted into the docking adapter and that the HOLD switch on your iPod® is set to the ‘Off’position. Close the splash resistant cover. If you are operating this system on AC power your iPod® display may come on and show the ‘Charging’or ‘Charged’battery icons. If you are operating this system on the batteries, you iPod® screen will go blank. The batteries in this system will not charge the iPod’s internal battery. 3.
Listening To An iPod® Shuffle Or Other External Sources 1.) Connect the headphone jack from your iPod® Shuffle, MP3 player, personal CD player to the AUX IN (Auxiliary Input) jack on the back panel of this unit. (2G iPod® Shuffle) NOTE: The connection cable is not included. 2.) Press the POWER button of this system to turn the power ‘On’ and press the FUNCTION button until the AUX indicator appears in the display. 3.
Setting The Alarm Time And Alarm Mode (Buzzer/Radio/iPod) NOTE: We suggest that you set the Alarm time with the power ‘On’and the Function set to the AUX mode. This will keep the display backlighting ‘On’and make the settings easier. 1.) Depress and hold the ALARM/PRESET UP button for 3 seconds. This display changes to wake up time and the Hour digits and the Buzzer indicator begin to flash. 2.
5.) To change the alarm mode or to cancel the alarm, continue to press the ALARM/PRESET UP button. The alarm indicator changes from Buzzer to Radio to iPod mode. Press the ALARM/PRESET UP button once more and the alarm indicator disappears to confirm that the Alarm is ‘off’. 6.) At the selected wake up time the system will turn on to the Buzzer, the Radio, or the iPod depending on the mode you selected.
Snooze Control When the alarm turns ‘on’in the morning you may press the SNOOZE button for a few minutes extra sleep. The unit turns ‘Off’and the Alarm indicators flash faster. The alarm will stop for 9 minutes and then turn on again. The snooze operation may be repeated several times, but after one hour the alarm will not turn on again. Stereo Headphone Jack For private listening without disturbing others you may connect a set of stereo headphones, not included, to the PHONES jack on the back cabinet.
C AR E AN D M AI N T E N AN C E There are no user serviceable parts inside this radio. Please refer all service problems to a qualified service facility. Care Of Cabinet If the cabinet becomes dusty, wipe the exterior with a soft dust cloth only. Never use dusting sprays or polishes on the cabinet. If the cabinet becomes dirty or smudged with fingerprints it may be wiped with a soft cloth that has been slightly dampened with a mild soap and water solution.
LIMITED WARRANTY Emerson Radio Corp. warrants manufacturing defects in original material, including original parts and workmanship, under normal use and conditions, for a period of ninety (90) days from the date of original purchase in the U.S. With your dated proof of purchase, we will provide repair service at no charge for labor and parts at an authorized Depot Repair Facility, or replace the product in our discretion.
R iP105-052207-01 iP105_052207.