R Portable iPod® Docking Station with Digital Tuning Stereo Receiver, Digital Clock and Remote Control Made for all iPod ® models including iPod ® nano, iPod ® shuffle and iPod ® mini OWNER’S MANUAL iP550 (Silver Color) iP550BK (Black Color) Visit our web site at www.emersonradio.com iP550_041907.
CAUT I ON TO PREVENT FIRE OR SHOCK HAZARD, DO NOT USE THIS PLUG WITH AN EXTENSION CORD, RECEPTACLE OR OTHER OUTLET UNLESS THE BLADES CAN BE FULLY INSERTED TO PREVENT BLADE EXPOSURE. TO PREVENT FIRE OR SHOCK HAZARD, DO NOT EXPOSE THIS APPLIANCE TO RAIN OR MOISTURE.
Thank you for purchasing this Portable iPod® Docking Station from Emerson Research. This compact portable unit allows you to listen to any dockable iPod® (available as of January 2006) through the built in speakers, for those times when you want to share you music with others, or when listening through your ear buds is simply not an option. We've even provided an iPod® compatible USB connector to allow connection of your iPod® Shuffle as well.
I M P O R TAN T N O T E S • Avoid installing this unit in places • Operate controls and switches as exposed to direct sunlight or close to described in the manual. heat radiating appliances such as • Before turning on the power, make electric heaters, on top of other stereo certain that the AC power cord is equipment that radiates too much properly installed. heat, places lacking ventilation or • When moving the set, be sure to first dusty areas, places subject to disconnect the AC power cord.
PREPARATION FOR USE Unpacking and Set-up • This carton contains the main unit, 5 plastic adapters to insure that all dockable iPod® s fit securely in the docking station, and the remote control. Confirm that you have all of these items and make sure that nothing is accidentally discarded with the packing materials. • We recommend that, if possible, you save the carton and packing materials in the event that your unit ever needs to be returned for service.
Power Sources This system is designed to operate on 8 “C” batteries, not included, or on normal 120V 60Hz AC house current. Attempting to operate this system on any other power source may cause damage to the unit, and such damage is not covered by your warranty. AC Operation Insert the small female plug of the AC power cord into the AC socket on the back panel. The plug can only be inserted one way. Insert the AC plug into your normal 120V 60Hz AC household outlet. The display will show “AM 12:00”.
Installing The Batteries The battery compartment is located on the bottom cabinet. We recommend that you place the unit on a soft surface such as a carpet, on a towel or blanket before turning the unit upside down to install the batteries. This will prevent any scratches on the cabinet finish. 1.) With the unit upside down press the two battery cover locking tabs in the direction of the arrow marks and remove the battery compartment cover. 2.
Battery Precautions • Replacement of batteries must be done by an adult. • Do not mix old and new batteries. • Do not mix alkaline, standard (carbon-zinc) or rechargeable (nickel-cadmium) batteries. • The supply terminals are not to be short-circuited. • Non-rechargeable batteries are not to be recharged. • Exhausted batteries are to be removed. • Only batteries of the equivalent type are to be used. • Batteries are to be inserted with the correct polarity. • Dispose of batteries properly.
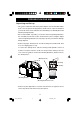
LOCATION OF CONTROLS AND INDICATORS Front Panel 4 3 3 2 5 1 6 7 Top Panel 10 11 12 13 9 8 24 23 21 22 20 19 17 15 16 18 14 19 20 5 8 iP550_041907.
1.) Aux (Auxiliary Input) Jack. 2.) iPod® Docking Station. 3.) Speakers. 4.) Remote Control Sensor. 5.) Docking Cradle. 6.) Phones (Stereo Headphone) Jack. 7.) Battery Compartment (Bottom Cabinet). 8.) Power Button. 9.) FM Telescopic Antenna. 10.) Carrying Handle. 11.) Sleep Button. 12.) Multi-Function LCD Display. 13.) Function Button. 14.) Volume + Button. 15.) Volume – Button. 16.) Skip Forward / Tuning (Up) Button. 17.) Skip reverse / Tuning (Down) Button. 18.) Band/iPod Play Button. 19.
LCD Display 3 4 5 6 7 8 9 10 2 11 1 14 13 12 1.) Volume Level (00-64), Sleep Time, Radio Channel Display. 2.) VOLUME Indicator. 3.) MEMORY Indicator. 4.) FM Indicator. 5.) SLEEP Timer Indicator. 6.) RADIO Select Indicator. 7.) iPod Select Indicator. 8.) Battery Low Indicator. 9.) AUX Select Indicator. 10.) FM STEREO Indicator. 11.) MUTE Indicator. 12.) Clock, Radio Frequencies Display. 13.) Clock PM Indicator. 14.) AM Indicator. 10 iP550_041907.
Remote Control 6 7 5 8 9 10 11 4 3 2 12 1 13 R 1.) iPod Play/Band Button. 2.) 14 Skip reverse / Tuning – Button. 3.) Volume + Button. 4.) Mute Button. 5.) Time / Display Button. 6.) Infrared Transmitter. 7.) Power Button. 8.) Memory Button. 9.) Function Button. 10.) Preset + Button. 11.) Preset – Button. 12.) Skip Forward / Tuning + Button. 13.) Volume – Button. 14.) Lithium Battery Compartment (Back Cabinet). 11 iP550_041907.
Remote Control The remote control supplied with this system allows you to operate all of the features and functions found on the main unit control panel. The remote control receiver is located behind the left speaker grill. The effective operating distance of the remote control is approximately 15 feet. Please note that bright sunlight can interfere with the proper operation of the remote control, so the operating range may be reduced when the unit is used outdoors on a sunny day.
When the operation of the remote becomes intermittent or fails completely you should replace the battery as soon as possible. The battery number is CR2025 or equivalent. To replace the battery, put the remote control face down, slide the battery holder out of the remote control as shown in the illustration. Remove the original battery from the holder and install a new CR2025 battery with the “+” side facing up. Then slide the battery holder back into the remote control.
OPERATING INSTRUCTIONS • Make sure that you have either installed the 8 “C” batteries or have connected the unit to your household AC outlet. • Make sure that you have removed the clear plastic battery spacer tab from the remote control. Setting The Clock NOTE: The clock can only be set while the system is in the power ‘Off’mode. If the power is ‘On’press the Power button on the main cabinet or remote control to shut the power ‘Off’, the proceed to set the clock as follows: 1.
5.) When the correct time appears on the display press the Time/Display button once more to enter the time and start the clock running. The Minute digits stop flashing and only the colon (:) continues to flash once per second to confirm that the clock is running. NOTES: After pressing the Time/Display button you must press the ( ) or ( ) buttons within 10 seconds while the display is flashing or the time cannot be adjusted.
Listening To The Radio 1.) Press the Power button on the main unit or remote control to turn the system power ‘On’. The display lighting comes ‘On’. 2.) Press the Function button on the main unit or the remote control until the RADIO indicator appears in the display. The first time you select the RADIO function the display will show: “FM 87.5 MHz”. To switch back and forth between FM and AM bands press the Band/iPod Play button repeatedly.
5.) Press the Volume + or – buttons on the main unit or the remote control to adjust the volume to the desired level. The VOLUME level indicator appears in the display when you adjust the volume. The indicator range is from “00” (minimum) to “64” (maximum). 6.) When you are finished listening press the Power button on the main unit or the remote control to switch the power ‘Off’. The display lighting turns off and the display changes from radio frequency to the correct time.
Antenna Information AM: The AM bar antenna is located inside the cabinet. If AM reception is unsatisfactory, try turning the entire unit slightly until the AM antenna is picking up the strongest possible signal. FM: The telescopic rod FM antenna is located on the left side of the cabinet. Pull it out of the cabinet as far as it will go until the swivel base is exposed. Then raise the antenna to the vertical position, or to the position that provides the best FM reception.
Presetting Stations In The Tuner Memories The tuner in this system has 20 preset station memories that allow you to memorize up to 10 of your favorite FM stations and 10 of your favorite AM stations for immediate recall at the touch of a button. 1.) Tune to the first station that you wish to memorize by either the Automatic or Manual Tuning method in the “Listening To The Radio” section. Example: FM 93.5 MHz. 2.) When the desired station appears in the display press the Memory button once.
6.) Repeat steps 4 and 5, selecting a different preset memory number each time until you have stored up to 10 FM stations in the memory. 7.) Press the Band/iPod Play button to switch from the FM band to the AM band and then follow the above procedure to enter up to 10 of your favorite AM stations in the tuner memory. Recalling Preset Stations Turn the system ‘On’, select the RADIO function and the desired band as usual.
21 iP550_041907.p65 19/4/2007, 15:50 ® and 2G iPod® nano models at time of purchase. "Docking Station Dust Cover. Install This Cover In The Docking Station If No iPod® Will Be Docked For An Extended Period of Time." * No adapters provided. Please use the adapters that were included with your 5G iPod Adapters nano (1G) nano (2G) This system includes 5 different adapters designed to allow you to securely connect any “dockable” iPod® model to the docking station.
Connecting and Playing Your ‘Dockable’ iPod ® (Refer To Separate Instructions For The iPod ® Shuffle) IMPORTANT: To avoid any unwanted distortion when listening to your iPod® through the speakers of this system we recommend that you shut ‘Off’the equalizer in the iPod® before inserting it in the docking station of this system. To shut off the iPod® equalizer, go to the “Main Menu” in your iPod® , scroll to the “Settings” menu, select the “EQ” setting and turn the EQ ‘Off’. 1.
NOTE: If you are using either the 30GB or 60GB fifth generation iPod ® models with video capability or the 2G (Second Generation) iPod® nano, use the adapters that were supplied with the iPod ® at time of purchase. They will fit correctly in the docking cradle of this system.
7.) If necessary, press the Band/iPod Play button to begin playback. 8.) Press the Volume + / – buttons on this system to adjust the iPod® volume level. NOTE: When your iPod® is docked in this system the click-wheel volume control on the iPod ® is automatically defeated. The volume can only be adjusted with the controls on this system. 9.) To skip forward or back to other iPod® tracks press the ( ) or ( ) ® buttons on the top panel, on the remote control, or use the iPod click-wheel navigation controls.
Removing or Changing The iPod ® Adapter If you will be using different ‘dockable’iPod® models with this system you will have to install the appropriate adapter in the docking area for each different iPod® model. The procedure for removing and changing the iPod® adapter is as follows: 1.) Remove your iPod® from the docking station as usual. 2.) Lift up on the docking cradle and remove it from the docking station as shown. 3.
Connecting and Playing A 1G (First Generation) iPod® Shuffle The docking station of this system includes an Apple USB connector specifically designed for the 1G (First Generation) iPod® Shuffle with direct USB connector. NOTE: If you have a new 2G (Second Generation) iPod® Shuffle you may connect it to the Auxiliary Input jack of this system. Please refer to the connection instructions on page 30.
3.) Press the Function button on this system to select the iPod function. The “iPod” indicator appears in the display. 4.) Press the Volume + / – buttons on this system to adjust volume until the Volume Level Indicator display is showing “60”. 5.) Press the Play/Pause button on the iPod® Shuffle to begin playback in either the Normal or Shuffle mode, according to your selection in Step 1 above. NOTE: Pressing the Band/iPod Play button of this system has no ® effect for the iPod Shuffle. 6.
Charging the iPod ® Battery IMPORTANT! The battery charging circuit in this system only functions when this system is being operated on AC power. This system will not charge the iPod® batteries when you operating this system on battery power. When your iPod® is connected to the ‘docking’ station of this system, and the iPod® is not playing, the iPod® battery will be recharged automatically. The battery will be charged whether the power of this system is ‘On’or ‘Off’.
Sleep To Music Timer (Main Unit Only) This system includes a sleep to music timer that allows you to fall asleep to up to 90 minutes of music from the radio or from your iPod® and then shuts the power off automatically. The sleep timer function can be selected while the system is 'On' or ‘Off’. 1.) Press the Sleep button on the top panel of the main unit. (There is no Sleep button on the remote control.
Listening To A 2G (Second Generation) iPod® Shuffle, MP3 Player, Or Other External Source This system includes a 3.5mm mini stereo Auxiliary Input (Aux) jack on the left side panel so that you can easily connect any external audio source with a headphone jack or a Line Out jack and listen to your external source through the speakers of this system. Use the Auxiliary Input jack to connect the new 2G (Second Generation) iPod® shuffle, older non-dockable iPods, other MP3 players, personal CD players, etc.
4.) You should hear the sound from your external source through the speakers of this system. NOTE: If you connected the Line Out jack of your external source then you only need to adjust the volume control of this system. If you connected the headphone jack of your external source then you may need to adjust both the volume control of your external source and the volume control of this system to find the most desirable volume setting. 5.
Stereo Headphone Jack This system includes a 3.5mm mini stereo Phones jack on the right side panel so that you can listen privately without disturbing others. When the headphone (not included) is connected to the Phones jack of this system the internal speakers are automatically shut off. IMPORTANT! Before you put on your headphones please reduce the volume control of this system to a low level. Then put your headphones on and gradually increase the volume to a comfortable listening level.
CARE AND MAINTENANCE Care Of The Cabinet If the cabinet becomes dusty, wipe it with a soft cloth. If the cabinet becomes smudged or dirty, clean it with a soft, slightly dampened cloth. Never allow water or any liquid to get inside the cabinet. Never use any abrasive cleaners or cleaning pads as these will damage the finish of your system. Lithium Battery Precautions • Dispose of the old battery properly. Do not leave it lying around where a young child or pet could play with, or swallow it.
LIMITED WARRANTY Emerson Radio Corp. warrants manufacturing defects in original material, including original parts and workmanship, under normal use and conditions, for a period of ninety (90) days from the date of original purchase in the U.S. With your dated proof of purchase, we will provide repair service at no charge for labor and parts at an authorized Depot Repair Facility, or replace the product in our discretion.
R iP550-041907-03 iP550_041907.