
User Guide


Installation Drawings
77 Liebert
®
APM
™
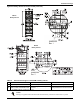
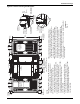
Figure 61 Seismic mounting bracket details
Cabinet
Rear Door
Cabinet
Front Door
Rear Anchor
Hardware
(Not Supplied)
Rear Cabinet
Floor Bracket
Front Cabinet
Base Bracket
Front Cabinet
Base Bracket
(See Detail B)
FLOOR
Anchor
SEISMIC ANCHORING
Bottom Of Units
(Viewed From Top Looking Down)
6.5"
(165mm)
6.5"
(165mm)
6.5"
(165mm)
4.3"
(110mm)
4.3"
(110mm)
4.3"
(110mm)
6.9"
(175mm)
6.9"
(175mm)
6.9"
(175mm)
17.7" (450mm)
16.5" (420mm)
9.8"
(250mm)
9.8"
(250mm)
DISTRIBUTION
CABINET
UPS
15-90KVA
BATTERY
CABINET
39.2"
(997mm)
11.0"
(280mm)
11.0"
(280mm)
5.5"
(140mm)
5.5"
(140mm)
5.5"
(140mm)
5.5"
(140mm)
5.5"
(140mm)
5.5"
(140mm)
5.5"
(140mm)
5.5"
(140mm)
5.5"
(140mm)
SLOT 16mm
RAD 7mm, Typical
Rear Base
Bracket
See Detail A
(FRONT)
(REAR)
BYPASS
3.5"
(89mm)
3.7"
(94mm)
2.7"
(69mm)
3.7"
(94mm)
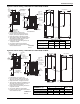
NOTES
1. Recommended floor anchor: 1/2" ITW ramset/red head
self-drilling anchor, ICBO #ER-1372 or equivalent (not
supplied). Follow manufacturer’s instructions.
2. Position rear floor brackets on floor at least .75"
from rear wall. Mark location and drill holes (Detail A)
to a minimum depth of 4.12" (104.6mm) into the concrete.
3. Install rear cabinet base bracket (Detail A) to existing
holes on underside of unit with tabs facing rear wall.
Use supplied hardware and torque to 365 lb-inch (41.2 Nm).
Loosen leveling bolt locking nut and tighten after
bracket is secured.
4. Install front cabinet base bracket (Detail B) to existing
holes on underside of unit with bent flange facing front.
Use supplied hardware and torque to 365 lb-inch (41.2 Nm).
Loosen leveling bolt locking nut and tighten after
bracket is secured.
5. Move cabinet into position with rear tabs into slots of
floor bracket. Tabs to extend at least 1/2" through floor
bracket (Detail A). Then attach front floor brackets to front
cabinet base bracket but do not fully tighten hardware.
6. Mark hole locations and remove brackets. Drill and install
floor brackets. Unit door can be removed for better access.
Reinstall front floor brackets to front cabinet brackets with
supplied hardware and torque to 235 lb-in (26.5 Nm).
7. After all cabinets are moved into place and secured to the
floor, multiple cabinet configurations are then bolted together.
8. If side walls are present, 1.0" (25.4mm) minimum distance from either
side wall is required.
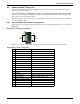
Detail B
UAM08020
Rev. 2
Detail A
Rear Cabinet
Base Bracket
Rear
Wall
FLOOR
.75
(19mm)
Minimum
.5
(13mm)