
User manual


Maintenance
Liebert
®
DS
™
142
Mandatory Cleaning of the Drain Valve
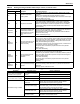
Always clean the drain valve before installing a new cylinder. Figure 105 shows an exploded view of
the drain valve for reference to clean it.
1. Remove old cylinder as previously described.
2. Note that the ring terminal for the drain valve green ground wire is sandwiched between the
drain valve and the drain pan.
3. Remove the two screws securing the drain valve body to the drain pan.
4. Remove the hose clip and hose connection from the drain valve body.
5. Drain valve assembly is now free to be taken to a sink for disassembly and cleaning.
6. Remove the snap fit red cap from the coil assembly and slide the coil off the actuator.
7. Loosen actuator using a wrench and unscrew from the plastic body.
8. Clean the exposed core, spring and plastic drain valve pot
9. Reinstall in the reverse order.
10. Hand tighten the actuator back into place, then secure it by using a wrench to turn it a quarter of
a turn.
11. Clean out the end of the hose, then reconnect it to the drain valve body with the clamp.
12. Fit mounting screws back through the drain valve body, one through ring terminal on the green
wire.
Figure 105 Drain valve assembly
NOTE
Be cautious when putting the spring back into the plunger, the taper end of the spring must be
installed toward the solenoid.
Actuator
Plunger Spring Sleeve
Holding Coil
Male Slip-On
Connection Tabs