
User manual


Troubleshooting
34
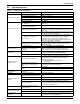
8.0 TROUBLESHOOTING
Table 13 Troubleshooting the XDP
Symptom Possible Cause Check or Remedy
Pump will not energize
No main power Check L1, L2 and L3 for rated voltage.
Loose electrical connections Tighten connections.
Overloads tripped Allow pump to cool. Check amp draw.
Tripped circuit breaker Check circuit breaker to pump(s).
Incorrect phase wiring See Table 12.
Pump will not start or run
No chilled water
Check and verify that there is supply chilled water to the
Liebert XDP.
Isolation valve(s) on pump suction
and/or discharge is closed.
Open all isolation valves completely during normal operation.
Supply chilled water is too high
Check and verify that the chilled water temperature setpoint is
at 50°F (10°C) or lower and that there is flow on the chilled
water side.
Liebert XD cooling modules are Off
Check Liebert XD cooling modules to make sure that they are
On prior to starting the Liebert XDP.
Low Refrigerant Temperature
(high dew point)
Check alarm(s) history on Liebert XDP. The Liebert XDP was
operating below the dew point for a significant amount of time.
Check humidity in conditioned space, lower humidity if
necessary to allow Liebert XDP to operate at a lower
temperature. (Disconnect must be switched to Off then back
On to allow Liebert XDP to reset itself).
Pressure switch not making contact
Check both differential pressure settings. If not within 6 psi, ± 1
psi (41kPa, ±7kPa; 0.41 bars, ±0.07bars) then manually
change accordingly.
Not enough charge See 5.1 - Checklist for Liebert XDP Startup.
Pump will not start
Chilled water valve not closing
completely.
Wait at least 10 minutes before calibrating. Access the
Advanced Menu>Factory Settings>Calibrate Actuator.
Contact Liebert Services for assistance, 1-800-543-2778.
Pump noisy
Cavitation due to vapor in pump
Check for adequate charge in system, refer to the User's
Manual. 5.1 - Checklist for Liebert XDP Startup
Worn motor bearings Replace pump
Liebert XDP (Pump)
suddenly stops
Low Refrigerant Temperature
1. Check humidity of the room along with the location of
remote sensors. Make sure that the sensors are not in a cold
area where there is insufficient air flow for accurate,
representative readings.
2. Chilled Water temperature is too cold.
3. Load is too light.
Low Chilled Water Temperature
Alarm and Loss of Flow Pump X
Alarm
Check supply chilled water temperature.
Supply Refrigerant Sensor Failure
Alarm
Check wiring.
Call service.
Clogged filter/dryer
and/or impeller
Debris or other contaminants in
refrigerant
Replace.
Pipe rattle Loose pipe connections Check pipe connections.
Chilled water valve not
working
Motor operates but valve won't open
Check linkage for adjustment and be sure that it is tight on the
valve.
No 24 VAC power to motor Check for 24 VAC between P52-1 and P52-4.
No signal from control Check 24 VAC at P22-1 (close) or P22-3 (open).
Motor not operating
Unplug P22 from the board. Jumper P22-5 to P52-4 for
grounding, then jumper P22-1 to P52-1 to drive close. Remove
jumper to close and then jumper P22-3 to P52-1 to drive open.
If motor fails to work, replace it.
Motor burnout
Check control panel for welded
contactor contacts or welded
overload contacts
Replace defective components.
Main 24 VAC fuse trips
Shorts or loose connections Check the wiring connections of the 24 VAC circuit.
Faulty circuit board Replace the circuit board.
Unstable pump
operation
R-134a pump loop overcharged
While pump is running R-134a receiver level must be within
recommended levels (see
Figure 30).