SITE MONITORING AND SERVICES OPENCOMMS™ NFORM USER MANUAL Version 1.
TABLE OF CONTENTS OPENCOMMS™ NFORM . . . . . . . . . . . . . . . . . . . . . . . . . . . . . . . . . . . . . . . . . . . . . . . . . . . . . . . .1 1.0 WHAT IS NFORM? . . . . . . . . . . . . . . . . . . . . . . . . . . . . . . . . . . . . . . . . . . . . . . . . . . . . . . .2 1.1 How Does Nform Work? . . . . . . . . . . . . . . . . . . . . . . . . . . . . . . . . . . . . . . . . . . . . . . . . . . . . . . . 2 1.2 What’s New in Version 1.2. . . . . . . . . . . . . . . . . . . . . . . . . . . . . . . .
9.0 CONFIGURING NFORM DEVICES . . . . . . . . . . . . . . . . . . . . . . . . . . . . . . . . . . . . . . . . . . . . 21 9.1 Add a Device . . . . . . . . . . . . . . . . . . . . . . . . . . . . . . . . . . . . . . . . . . . . . . . . . . . . . . . . . . . . . . . 21 9.2 Set Up the Device . . . . . . . . . . . . . . . . . . . . . . . . . . . . . . . . . . . . . . . . . . . . . . . . . . . . . . . . . . . 22 9.2.1 9.2.2 9.2.3 Device Setup tab . . . . . . . . . . . . . . . . . . . . . . . . . . . . . . .
13.0 MANAGING ALARMS . . . . . . . . . . . . . . . . . . . . . . . . . . . . . . . . . . . . . . . . . . . . . . . . . . . . . 53 13.1 View Alarms . . . . . . . . . . . . . . . . . . . . . . . . . . . . . . . . . . . . . . . . . . . . . . . . . . . . . . . . . . . . . . . 54 13.2 View Alarm Data Definition—SiteNet Integrator Only. . . . . . . . . . . . . . . . . . . . . . . . . . . . . 54 13.3 Silence the Default Beep . . . . . . . . . . . . . . . . . . . . . . . . . . . . . . . . . . . . . . . . . .
FIGURES Figure 1 Sample Nform configuration . . . . . . . . . . . . . . . . . . . . . . . . . . . . . . . . . . . . . . . . . . . . . . . . . . . . . . . 7 TABLES Table 1 Table 2 Table 3 Table 4 Table 5 Table 6 Table 7 Table 8 Table 9 Table 10 Table 11 Table 12 Table 13 Table 14 Table 15 Table 16 New features in Nform Version 1.2 . . . . . . . . . . . . . . . . . . . . . . . . . . . . . . . . . . . . . . . . . . . . . . . . . . 3 Configure tab menu options - summary . . . . . . . . . . . . . . . . . . .
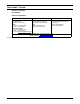
OPENCOMMS™ NFORM Version 1.2 Release User Manual Liebert® Corporation Liebert Corporation Liebert Europe Liebert Asia 1050 Dearborn Drive P.O. Box 29186 Columbus, Ohio 43229 Sales Phone: 1 800 877 9222 FAX: 1 614 841 6022 Technical Support Phone: 1 800 222 5877 FAX: 1 614 841 5471 E-mail: monitoring@liebert.
What Is Nform? 1.0 WHAT IS NFORM? Liebert developed Nform to use Simple Network Management Protocol (SNMP) to monitor and manage a wide variety of networked equipment, protecting it from costly damage resulting from power failures and mechanical breakdowns. The monitored equipment can include industrial air conditioning units, Uninterruptible Power Supply (UPS) units and other devices that accommodate an SNMP card to communicate over an Ethernet network.
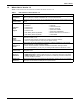
What Is Nform? 1.2 What’s New in Version 1.2 Table 1 summarizes the new features available in Nform Version 1.2. Table 1 New features in Nform Version 1.2 Feature Improvement Client Server Architecture Connects multiple Nform Clients to a single Nform Server. Operators can now manage the Nform system from multiple workstations with concurrent client licenses. Client Enhancements The Nform Client on the server can now load automatically when the server receives a new alarm.
How Do You Contact Liebert for Technical Support? 2.
Who Can Benefit From Nform? 3.0 WHO CAN BENEFIT FROM NFORM? Any industry operating devices utilizing the SNMP protocol can benefit from using Nform to protect valuable equipment, data and other assets in the event of power or mechanical failure. Nform’s protection can be extended beyond equipment manufactured by Liebert to encompass other makers’ SNMP devices. Nform ships with templates—specifications and functionality—for Liebertbuilt SNMP devices.
What is Required to Use Nform? 4.0 WHAT IS REQUIRED TO USE NFORM? Visit the Liebert Web site at http://nform.liebert.com for the latest product information. The Web site always has the most detailed and up-to-date information on system requirements and Nform’s capabilities. 4.1 Connecting host computer and SNMP devices SNMP communications allow you to take full advantage of Nform’s features. The host computer connects to an SNMP-enabled device over a network.
Sample Nform Configuration 5.0 SAMPLE NFORM CONFIGURATION Nform is installed on a single workstation and can be configured to monitor and manage up to 30 SNMP devices by default. The user has the option of expanding Nform’s network capabilities with additional licenses. Licenses are available in increments of 30, 100 or 500 additional monitored and managed devices. The primary license key allows one local user; licenses are available to add one, five or 10 concurrent users.
Installing the Software 6.0 INSTALLING THE SOFTWARE This section explains how to install OpenComms Nform. • For a first-time installation, follow the instructions in 6.1 - Initial Installation. • If you are upgrading to a newer version of Nform and want to keep configuration settings, proceed to 6.3 - Upgrading to a Newer Version of Nform. 6.1 Initial Installation • Insert the OpenComms Nform CD in the CD drive. The Installation Wizard starts automatically.
Installing the Software 6.3 Upgrading to a Newer Version of Nform When upgrading to a newer version, the user does not need to remove the existing installation. During the upgrade, Nform preserves all configuration files—for example, configured devices, floor plans, actions. To install the Nform software upgrade, follow the steps below (for complete details, see 6.1 - Initial Installation): • Launch the installation file Setup.exe from the CD.
Overview of Nform Net Event Manager 7.0 OVERVIEW OF NFORM NET EVENT MANAGER This section provides a quick look at the features available with various SNMP devices and the functions accessible through Nform’s tabs, menus and toolbar buttons. The Nform Net Event Manager’s two tabs—Navigate and Configure—logically divide Nform’s functionality. • The Navigate tab displays the operational status and condition of monitored and managed devices. This tab becomes more important after Nform is fully set up.
Overview of Nform Net Event Manager 7.1.1 Configure Menus and Toolbar Buttons When the Configure tab is selected, Nform displays three menus at the top of the window: File, Edit, and Help. Each menu has a drop-down list of options, which appear only when applicable. For example, the Save option appears in the File menu only when a change needs to be saved. The Toolbar buttons, which appear directly below the menu, offer alternatives for selected menu options, as shown below.
Overview of Nform Net Event Manager 7.2 Navigate Tab—Overview The main features of the Navigate tab are: • Viewing summary status, alarm history, and parametric data for any device in the navigation tree • Tracking alarms in an event log and in user-specified files • Responding to alarms Access to the Navigate tab is unlimited; it can be viewed by the Administrator or the Power User group. This permits any authorized user to view the status of monitored, managed devices and respond to alarms.
Overview of Nform Net Event Manager 7.2.1 Navigate Menus and Toolbar Buttons When the Navigate tab is selected, Nform displays up to four menus at the top of the window: File, View, Alarms, and Help. Each menu has a drop-down list of options. Menus and options appear only when applicable. For example, the Alarms menu is available only when alarms are displayed. The Toolbar buttons, which appear directly below the menu, offer alternatives for selected menu options, as shown below.
Overview of Nform Net Event Manager 7.2.2 Informational Icons in the Navigation Tree The navigation tree’s informational icons change to indicate normal operation, active alarms, communications loss and other conditions of SNMP devices. Icon denotes device with active alarm Icon denotes loss of communication with device Table 4 summarizes the meaning of icons Nform employs to indicate the status of monitored and managed SNMP devices.
Overview of Nform Net Event Manager 7.3 Nform Features Table 5 lists the features available in Nform. Table 5 Features available in Nform Feature System Features OpenComms Nform 1.2 Centralized Event Logging Yes Multi-User Yes Authenticated Access Yes Auto Logoff (Enhanced Security) Yes SiteScan Web Interface Yes MultiLink Interface Yes Windows NT 4.
Getting Started With Nform 8.0 GETTING STARTED WITH NFORM After installing the software, you should change the default password for security purposes and enter the license key so you can begin configuring devices for monitoring. NOTE The Nform ports and standard SNMP ports may have to be open for the firewall; otherwise, Nform might not function properly. Saving Configuration Changes Some changes to Nform’s configuration are saved automatically; others will need to be saved before they take effect.
Getting Started With Nform 8.4 Change the Administrator Password The software has two users, Administrator and Power User. The Administrator has full access to configuration and monitoring; the Power User has viewing privileges only. These user names cannot be changed. The default password for both users is liebert (all lowercase letters). Liebert recommends changing the password for the Administrator for security purposes.
Getting Started With Nform 8.5 Enter the Nform License Key You must install the Nform license key from the sticker on the CD case before configuring Nform to manage and monitor devices and inform users of conditions affecting SNMP devices. • If you purchased the Nform-Enterprise pre-bundled package, the primary license key allows for five concurrent users and 100 devices to be monitored. The Enterprise package also includes an Advanced Notification License and a MultiLink Network Shutdown License.
Getting Started With Nform 8.6 Install the MultiLink Network Shutdown License (Optional) If you purchased the MultiLink Network Shutdown License—either separately or as part of the Nform-Enterprise pre-bundled package—two steps are needed to activate the MultiLink shutdown features: • First, install the MultiLink Network Shutdown License as described in this section. • Then configure MultiLink devices as described in 10.0 - Configuring MultiLink Devices.
Getting Started With Nform 8.7 Set Up Security Settings As a security precaution, you may enable a feature that locks the Nform application after a specified amount of idle time following the Administrator logon. When this occurs, the application remains locked until the user enters a password. This feature is intended to prevent unauthorized personnel from using the Administrator’s workstation to alter Nform settings. By default, this feature is disabled (False) with an idle time of 25 minutes.
Configuring Nform Devices 9.0 CONFIGURING NFORM DEVICES This section describes how to configure devices that will be monitored, add floor plans as visual aids, set up the navigation tree and view or change settings for alarm, trap and SNMP services. 9.1 Add a Device To add a device: • Log on as Administrator and click on the Configure tab. • In the left side of the window, click on Device Manager, then on SNMP Devices. • Click on the File menu at the top of the window, then click on New.
Configuring Nform Devices 9.2 Set Up the Device The SNMP Devices window has three tabs: • The Device Setup tab allow you to enter a community string and timeout value. • The Views tab lets you determine which informational items appear in the Navigate tab. • The Alarms tab allows you to set up alarms and corresponding actions. 9.2.1 Device Setup tab The window opens with the Device Setup tab selected, as shown below.
Configuring Nform Devices 9.2.2 Views tab The Views tab displays the types of data that can be retrieved from an SNMP device and displayed in the Navigate tab as the Filtered View—for example, the type of device, model number and device status. Liebert supplies a template for each SNMP device, containing data points applicable to that device. (See Appendix B - Data Monitored by Nform for examples.) For non-HTML devices, you may select items to be displayed in the Navigate tab.
Configuring Nform Devices 9.2.3 Alarms tab The Alarms tab allows you to link actions, such as sending an e-mail, to specific alarms—this is described later in 11.2.4 - Assign Actions to Alarms. Liebert supplies a template for each SNMP device, containing the types of alarms applicable to that device. (See Appendix B - Data Monitored by Nform for examples.) You may also change the name of an alarm to better mesh with your system or procedures.
Configuring Nform Devices 9.3 Add Devices to Navigation Tree The Navigation tree window allows you to designate which managed devices will be monitored and appear on the Navigate tab. You may set up different views for the Administrator and Power User. This window opens if you clicked Yes in the final step described in 9.2.1 - Device Setup tab. Another way to open this window is: • Log on as Administrator and click on the Configure tab.
Configuring Nform Devices 9.4 Add Floor Plans to Show Device Location Floor plans may be added to Nform’s navigation tree as visual reminders of where devices are located, as in the example shown at right. Users may design these floor plans or contact Liebert for custom-built plans. Floor plans must be in HTML format and placed in the Floorplans folder as described in this section.
Configuring Nform Devices 9.5 Add Floor Plans to Navigation Tree After adding floor plans to Nform, you must also place them in the navigation tree. Managed devices can be placed under the appropriate floor plan to help the System Administrator pinpoint SNMP devices for troubleshooting.
Configuring Nform Devices 9.6 Services and Applications 9.6.1 Alarm Service - Configuration Nform has seven alarm service options that may be configured, as shown in Table 6. Liebert recommends keeping the default values for Options 1, 2 and 3. Table 6 Alarm service options Option Default Notes 1. Alarm service IP address Server where Nform was installed Enter the IP address of the workstation where alarms are reported. 2.
Configuring Nform Devices 9.6.2 Alarm Service - Event Alarms The Alarm Service has event alarms, listed in Table 7, that you may map to any configured action— for example, an e-mail action or a file write action. Table 7 Event alarms Event alarm Description Comm Check Successful For use by Liebert Global Services to check Nform’s alarm processing Managed Device Not Responding These event alarms are recorded only when SNMP Agent Polling is enabled (see 9.6.4 - SNMP Service).
Configuring Nform Devices 9.6.3 Trap Service The Trap Service is responsible for receiving and processing alarm notifications, or traps, from managed devices. Diagnostic features in this service can be used to troubleshoot network communication problems between OpenComms Nform and SNMP devices. The trap service has two options: • The trap port—by default, this is 162. • A diagnostic testing mode—by default, this feature is disabled. Note: Use the diagnostic mode with caution.
Configuring Nform Devices 9.6.4 SNMP Service Nform has SNMP Service features for polling devices and testing Nform’s handling of traps, as listed in Table 8. • SNMP Agent Polling allows you to set up Nform to poll devices for their status at a specified interval. By default, this feature is disabled (False) with a time interval of 1 minute. When this feature is enabled, the icons in the Navigate tab indicate the status of each device (see 7.2.
Configuring MultiLink Devices 10.0 CONFIGURING MULTILINK DEVICES This section describes how to configure MultiLink 1.5 clients to receive shutdown notifications from Nform. 10.1 Requirements to Use MultiLink Features There are three requirements to use this feature: 1. A MultiLink Network Shutdown License The MultiLink Network Shutdown License must be installed before configuration. For detailed instructions, see 8.6 - Install the MultiLink Network Shutdown License (Optional).
Configuring MultiLink Devices 10.2 Add a MultiLink Client Before adding and setting up MultiLink clients for notifications, the MultiLink Network Shutdown License must be installed in the OpenComms Nform system and MultiLink 1.5 Client software must be installed on all workstations and servers that require orderly shutdown, as described in 10.1 Requirements to Use MultiLink Features. The next step is to add each workstation running MultiLink 1.5 Client software to the Nform system.
Configuring MultiLink Devices 10.3 Set Up a MultiLink Notify Action After adding MultiLink 1.5 client computers to Nform, you may configure Nform to send notification traps to selected clients when an alarm is received. Three types of traps may be sent: • Warning Shutdown (On Battery) • Critical Shutdown (Low Battery) • Cancel Shutdown (Return to Normal) To set up a MultiLink Notify action: • Log on as Administrator and click on the Configure tab.
Local and Server Notification Configuration 11.0 LOCAL AND SERVER NOTIFICATION CONFIGURATION This section describes how to configure Nform to alert administrators and users when alarms are received. It also details how to set up Nform to respond to alarms with certain actions, such as sending e-mails, recording event history and running an external program to protect data or equipment. 11.
Local and Server Notification Configuration 11.2 Server Notifications Certain Nform features may be set up to protect valuable equipment, data and other assets by responding automatically to alarms in SNMP devices affected by such events as power failures, overheating and mechanical failures.
Local and Server Notification Configuration 11.2.1 Set Up an E-Mail Action To set up an e-mail: • • • • Log on as Administrator and click on the Configure tab. In the left side of the window, click on Local and Server Notifications. In the right side of the window, double-click on Server Notifications, then on Email Actions. In the File menu, click on New. (Or click the New button on the toolbar.) This opens the Email Actions window, shown below right.
Local and Server Notification Configuration 11.2.2 Set Up a File Write Action To set up a File Write Action: • • • • Log on as Administrator and click on the Configure tab. In the left side of the window, click on Local and Server Notifications. In the right side of the window, double-click on Server Notifications, then on File Write Actions. In the File menu, click on New. (Or click the New button on the toolbar.) This opens the File Write Actions window, as shown below right.
Local and Server Notification Configuration 11.2.3 Set Up an External Program to Run To set up an external program to run: • Log on as Administrator and click on the Configure tab. • In the left side of the window, click on Local and Server Notifications. • In the right side of the window, double-click on Server Notifications, then on Run External Program. • In the File menu, click on New. (Or click the New button on the toolbar.) This opens the Run External Program Action window, as shown below right.
Local and Server Notification Configuration 11.2.4 Assign Actions to Alarms After an action is created, it must be assigned to an alarm for a managed device before it becomes operative. An action—for example, sending e-mail notifications—may be assigned to more than one alarm. Nform permits configuring actions separately for each alarm on each managed device. Each action may be set up to be performed at particular stages of an alarm condition: when it occurs, when it is cleared or both (default).
Local and Server Notification Configuration 11.3 Advanced Notification The Get Request feature allows Nform to collect data on the status of connected devices at the time of an event, such as an alarm, and store the data in a file for later review. With Set Request, Nform can control devices based on an event—for example, turn on a fan when a high temperature is detected. This section describes how to use these features, which require an additional Nform license key (see Table 16 for details).
Local and Server Notification Configuration 11.3.2 SNMP Set Request To set up an SNMP set request to control a device: • Log on as Administrator and click on the Configure tab. • In the left side of the window, double-click on Local and Server Notifications, then on Advanced Notification and finally on SNMP Set Request. • In the File menu, click on New. (Or click the New button on the toolbar.) This opens the SNMP Request Setup window, shown below right.
Nform Monitoring—Navigation Tree 12.0 NFORM MONITORING—NAVIGATION TREE Nform constantly monitors the devices set up using the Configure tab and performs actions as specified in the configuration settings for each device. This section describes how to use the Nform Net Event Manager to check the status of any SNMP device configured for monitoring. 12.1 Viewing the Navigation Tree The navigation tree allows you to view the status of all configured devices.
Nform Monitoring—Navigation Tree 12.2 Information Available for HTML-Supported Devices Nform’s Navigate window for devices with Web-enabled SNMP cards shows tabs that permit viewing parametric data, altering some device settings and viewing the event log. The number of tabs shown depends on the type of device. For more information about device settings, review the documentation related to the SNMP card. 12.2.
Nform Monitoring—Navigation Tree 12.2.2 HTML control tab (selected devices only) The HTML control tab allows you to take actions such as testing a UPS battery or turning an SNMP device on or off. This tab appears only for certain devices with Web-enabled SNMP cards. NOTE The Control feature may not be available on every HTML-supported device. To use the HTML control tab: • • • • • • Log on as either Administrator or Power User. Click on Nform’s Navigate tab.
Nform Monitoring—Navigation Tree 12.2.3 HTML configure tab (selected devices only) The HTML configure tab allows you to change some configuration settings in the device’s SNMP card. This tab appears only for certain devices with Web-enabled SNMP cards. NOTE The Configure feature may not be available on every HTML-supported device. To use the HTML configure tab: • • • • • Log on as either Administrator or Power User. Click on Nform’s Navigate tab.
Nform Monitoring—Navigation Tree 12.2.4 HTML event log tab (selected devices only) The HTML event log tab allows you to view data from the event log in the device’s SNMP card. This tab appears only for certain devices with Web-enabled SNMP cards. NOTE The Event Log feature may not be available on every HTML-supported device. To use the HTML event log tab: • • • • Log on as either Administrator or Power User. Click on Nform’s Navigate tab.
Nform Monitoring—Navigation Tree 12.2.5 HTML support tab The HTML support tab displays vital information about the SNMP card and the device, along with technical support contact information. To use the HTML support tab: • • • • Log on as either Administrator or Power User. Click on Nform’s Navigate tab. In the left side of the window, click on the device you wish to view. In the right pane, click on the HTML support tab. The example below shows device information for an HTML-supported UPS.
Nform Monitoring—Navigation Tree 12.3 Information Available for Non-HTML Devices For devices without HTML support (non-HTML devices), Nform’s Navigate window displays data points—you may select or rename these data points in the device setup (see 9.2.2 - Views tab). This section describes how to query the device to display current values. Additionally, you can enter set values for any data point, download those set values to Nform and view the definition of a data point on certain devices. 12.3.
Nform Monitoring—Navigation Tree 12.3.2 Set Values Nform allows you to enter a set value for certain data points—only those with Write permission, noted by “W” in the Variable Permission column, as shown below. A set value determines when Nform performs a particular action, such as displaying an alarm for a device. As an example, you might want to enter a high-temperature value of 85°F as an alarm setpoint for a MiniMate2 unit. Actual values for any device will depend on your application.
Nform Monitoring—Navigation Tree 12.3.3 Download Device After entering set values, as described in 12.3.2 - Set Values, you must download them to the device before Nform can recognize them. You may download all set values at once or download an individual set value. Download All Set Values at Once To download all set values that have been entered for a device: • • • • Log on as Administrator. Click on Nform’s Navigate tab. In the left side of the window, click on the device you wish to change.
Nform Monitoring—Navigation Tree 12.3.4 View Data Definition To assist users in entering set values, Nform provides data definitions for some devices. Each definition provides a description of the data point and its valid values. To view a data definition and allowable values: • • • • Log on as either Administrator or Power User. Click on Nform’s Navigate tab. In the left side of the window, click on the device you wish to view.
Managing Alarms 13.0 MANAGING ALARMS This section describes how to view a listing of alarms, silence the default beep, change the status of alarms, add notes about an alarm, and change the colors that denote alarm status in the listing. Nform assists in managing alarms by displaying their status, denoting each type with a different color of text. This enables the user, either the Administrator or Power User, to see at a glance whether a new alarm has been received and if action is required.
Managing Alarms 13.1 View Alarms There are several ways to view alarms in the Net Event Manager. • Alarms are displayed when Nform is started before you log on. • Once you are logged on as either Administrator or Power User, there are two ways to view alarms: • Click on the Navigate tab, then select OpenComms Nform Alarm Logging at the top of the navigation tree (this reveals all alarms from all devices in the navigation tree).
Managing Alarms 13.3 Silence the Default Beep Nform can be configured to play a beeping sound—the default beep—in the monitoring computer when Nform receives an alarm from an SNMP device. This beep can be silenced through the Net Event Manager. To silence the default beep: • Log on as Administrator or as Power User. • Click on the Events menu at the top of the window, and then click on Silence. or • Click on the Silence button on the toolbar. 13.
Managing Alarms 13.6 Add or View Alarm Comments Nform allows you to add notes to any alarm in the alarm listing. The notes can be viewed and edited at a later time. The notes can perform several functions, including helping you keep track of actions taken to resolve an alarm condition and document the underlying cause of an alarm. NOTE Comments are not saved in the alarm log. 13.6.
Managing Alarms 13.7 Change Colors Indicating Alarm Status You may change the default alarm status colors to suit your preferences. To do so: • Log on as either Administrator or Power User. • Click on the Navigate tab and select Options from the View menu. This opens the OpenComms Nform Settings window. • Click the Browse button beside the alarm color to be changed.
Running Nform 14.0 RUNNING NFORM After installation, the Nform services begin running in the background, monitoring and managing all configured devices. Nform continues running constantly unless stopped through the Windows Services feature. The same option allows you to resume Nform services without having to restart the computer. 14.1 Starting or Stopping Nform Services Under normal circumstances, you will not need to start or stop Nform services.
Uninstalling Nform / Removing License Keys 15.0 UNINSTALLING NFORM / REMOVING LICENSE KEYS This section describes how to remove the Nform application and how to delete a secondary Nform license key or the MultiLink Network Shutdown License. 15.1 Uninstalling Nform To remove Nform from your computer, run the Windows Add/Remove Programs control panel. • Click on the Start button, then on Settings, and then on Control Panel. • In the Control Panel window, double-click on Add/Remove Programs.
Uninstalling Nform / Removing License Keys 15.2 Deleting License Keys 15.2.1 Deleting Secondary Nform License Keys Your primary Nform license key cannot be deleted, but you may wish to remove a secondary license key—for example, to move it to another computer to monitor a different group of devices. The primary license key appears first in the list in the right side of the window when License Key Administration is selected in the Configure tab.
Liebert Software Program License Agreement 16.0 LIEBERT SOFTWARE PROGRAM LICENSE AGREEMENT This section contains the license agreement for Liebert OpenComms™ Nform. LIEBERT OPENCOMMS™ NFORM SOFTWARE LICENSE AGREEMENT This OpenComms™ Nform Software License Agreement (“Agreement”) is a legal agreement between you and Liebert Corporation, an Ohio, United States of America, corporation, (“Liebert”).
Liebert Software Program License Agreement LIEBERT OPENCOMMS™ NFORM SOFTWARE LICENSE AGREEMENT (continued) LIMITED WARRANTY: Liebert represents that it has the right and authority to grant the license herein.
Technical Information & Frequently Asked Questions APPENDIX A - TECHNICAL INFORMATION & FREQUENTLY ASKED QUESTIONS 1. What is a DHCP server? DHCP is the acronym for Dynamic Host Configuration Protocol. This protocol allows hostnames to be allocated dynamically when computers are connected to a network. This protocol is often used to remotely grant a hostname to a computer for a limited time, as when a student uses a computer for a quarter or longer. See RFC-1541 for more detailed information.
Data Monitored by Nform APPENDIX B - DATA MONITORED BY NFORM Liebert supplies a template for each SNMP device, containing data points and alarms applicable to that device. The names of data points and alarms can be changed (see 9.2.2 - Views tab). • Data points are the information Nform compiles from polling a managed SNMP device. • Alarms are out-of-tolerance conditions that Nform reports to users. Tables 13 and 14 below show sample data points and alarms for environmental and UPS units with SNMP cards.
Data Monitored by Nform B.2 SAMPLE VALUES FROM A UPS The information available for monitoring varies by type of unit being monitored—the type of UPS, cooling unit or other SNMP device. Table 15 shows an example of monitoring data points with sample values obtained from a UPS with an SNMP card. Table 15 Sample device information available for monitoring - Example for a UPS Data point Sample value lcUpsIdentManufacturer Liebert lcUpsIdentModel GXT700MT-120 lcUpsIdentSoftwareVersion 2.7.
Ordering Parts From Liebert APPENDIX C - ORDERING PARTS FROM LIEBERT The table below lists part numbers for items available from Liebert Global Services. To obtain any item, visit the Liebert Web site at http://nform.liebert.com or contact your local Liebert representative, value-added reseller, or distributor. Table 16 Nform Part Numbers Item Part Number Description Nform-Enterprise Software on CD-ROM (Primary license key - 5 users, 100 devices) NFORM-EPRISE Nform Version 1.
SITE MONITORING AND SERVICES OPENCOMMS™ NFORM The Company Behind the Products With over a million installations around the globe, Liebert is the world leader in computer protection systems.