HOME AUDIO SYSTEM with 3 CD CHANGER and DIGITAL AM/FM RECEIVER OWNER'S MANUAL MS3100 Visit our web site at www.emersonradio.
BEFORE WE BEGIN Thank you.................. for purchasing this Emerson audio product. The Emerson brand is your assurance of quality, performance and value. Our engineers have included many useful and convenient features in this product. Please be sure to read this Owner's Manual completely to make sure you are getting the maximum benefit from each feature. This product was manufactured using the highest quality components and standards of workmanship.
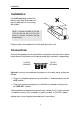
IMPORTANT NOTES CLASS 1 LASER PRODUCT CLASS 1 LASER PRODUCT APPAREIL Á LASER DE CLASSE 1 PRODUCTO LASER DE CLASE 1 CAUTION INVISIBLE LASER RADIATION WHEN OPEN AND INTERLOCKS DEFEATED. AVOID EXPOSURE TO BEAM This product contains a low power Laser Device. • Operate controls and switches as described in the manual. • Before turning on the power, make certain that the connecting cords and power cord are properly installed.
PREPARATION FOR USE UNPACKING AND SET-UP Carefully remove the unit from the carton and remove all packing material from the unit. Remove any labels or stickers which may be on the front or top of the set, but do not remove any labels from the back or bottom. We suggest that you retain the original carton and packing materials in case it ever becomes necessary to return your unit for service. This is the only sure way to protect the unit from damage in transit.
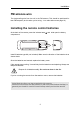
Installation Installation For shelf mounting, extend the left and right flaps at the back of the unit and place it on a strong flat surface. Note - Leave at least 6 inches (15cm) above the unit for the door to open without being obstructed. Finally, position the speakers to the left and right of the unit. Connections Connect the speakers to the red and black terminals on the back of the unit as shown below. (Hold down red or black terminal flap, insert wire, release flap.
Installation FM antenna wire The single trailing wire from the unit is the FM antenna. This should be positioned for best FM reception (do this when you're tuning - in to radio stations–see page 18). Installing the remote control batteries At the back of the remote, press the indented area compartment. and slide open the battery Install 2 batteries type AA (not included). Make sure the direction of the batteries is as shown above. Once the batteries are inserted, replace the battery cover.
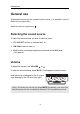
Installation Ready to switch on Plug the unit into the AC outlet. will be On the front panel, the light above the POWER button red to indicate that the unit is in standby. (Standby means pluggedin but not switched on.) Switch the unit on by pressing the POWER button change to green. (To switch the unit back to standby, simply press . The red light will again.) The unit is now ready to use. Note–If necessary, peel off the label entitled 'IMPORTANT NOTES' on the outside of the CD door.
Setting the clock Setting the clock 1. Press to switch the unit on. 2. Press the AUX button. (Note the time setting appears at the centre of the display.) 3. Press MEMORY so that the hour setting flashes, then immediately press + or - to set the correct hour. Note – check the AM / PM indicator (to the left of the hour) to ensure you make the correct setting. 4. Press MEMORY repeatedly so that the minute setting flashes, then immediately press + or - to set the correct minute.
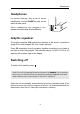
General use General use All general functions can be operated by the remote. You shouldn't need to lower the front panel flap. Switch the unit on by pressing . Selecting the sound source To select the sound source you wish to listen to, press: CD / SELECT to listen to compact disc, or FM / AM to listen to radio, or AUX to listen to auxiliary equipment connected to the AUX jacks. ( See page 4.) Volume To adjust the volume, use VOLUME or . To stop the sound instantly, press MUTE.
General use Headphones For private listening, plug a pair of stereo headphones into the PHONES socket on the lower left side panel. When headphones are plugged in, the speakers are switched off automatically. PHONE S Graphic equalizer The graphic equaliser (EQ) adjusts the character of the sound. It provides a range of four tonal shapes: flat, rock, classic and pop. Press EQ repeatedly to set the graphic equaliser according to your taste or the style of music being played.
CD operation CD operation All CD functions can be operated by the remote. You shouldn't need to lower the front panel flap. Switch the unit on and press CD / SELECT. Important Never open or close the CD door rapidly by hand - doing so will damage the mechanism. In an emergency situation (eg.a power cut) where you have no option other than to open or close the door by hand, do so very slowly and very gently. APPLY ONLY LIGHT PRESSURE - NEVER USE FORCE ON THE DOOR.
CD operation To eject, simply open the CD door using and remove the disc. Note there's a cutout to the left of each player so that you can place your finger under the edge of the disc to remove it. Playing one disc 1. Load the disc as previously shown. (Alternatively, press one of the CD buttons on the remote.) 2. Press one of the three buttons below the disc you wish to play: The number of the disc playing ( 1 or 2 or 3 ) is indicated at the left of the front panel display.
CD operation Searching tracks To search within tracks while a disc is playing, hold in the or button. Pause and stop To pause during play, press To stop play, press (press again to resume play). . Repeat play You can repeat all discs, one disc, or just one track.
CD operation Playing all discs 1. Load the discs as shown earlier. Note that discs will be played in order. If you don't want to start with disc 1 , press CD / SELECT to select 2 or 3 (indicated at the left of the front panel display). 2. Press to start play. To select tracks or pause, stop, etc, use buttons (see page 11). For repeat and random play, see previous page. , , and Playing a programmed selection of tracks You can program the unit to play a selection of tracks from the discs loaded.
CD operation or to select the TRACK number on that disc. (To select all 4. Press tracks on the disc, press or so that TRACK AL is displayed.) 5. Repeat steps 2, 3 and 4 for each programmed track. (Note that P - 0 1 advances to P - 0 2, P - 0 3 etc as you program each track.) You can check your program by pressing PROG repeatedly. As P - 0 1, P - 0 2 advances, check the displayed disc and track numbers.
CD operation Editing the program Before editing, make sure no disc is playing. To change a track, press PROG repeatedly (until the required P umber is displayed) then press or to change the TRACK number. To delete a track, press PROG repeatedly (until the required P - number is displayed) then press or to change the TRACK number to - - . To add a track, press PROG repeatedly (until TRACK 0 0 flashes) then use CD / SELECT and or to select required disc and TRACK number.
CD operation Additional CD functions Track introductions ) to start play, only the first 10 seconds of If INTRO is pressed (instead of each track will be played. This enables you to scan through a CD (or a programmed selection of tracks) automatically. The introduction feature can also be used to help you search for a track-when you hear the track you require, press INTRO again and that track will continue playing.
CD operation Instant play (Alternatively, press one of the CD buttons on the remote.
Radio operation Radio operation All radio functions can be operated by the remote.You shouldn't need to lower the front panel flap. Tuning-in a new radio station Pressing BAND selects radio operation. The display indicates the tuning frequency, and just to the right of it, the band: FM, or AM. Repeatedly pressing BAND changes the band.
Radio operation 3. Press MEMORY followed by MEMs or MEMt so that the memory number flashes to the left of the frequency, for example: MEMORY CH 02 89. 1 MHz FM. After a few seconds the flashing stops and the memory number is set. Note-Instead of using MEMs and MEMt you can use the number keys on the remote. In the above example, you would press MEMORY followed by 2. Note after pressing MEMORY you must enter a memory number within 5 seconds, otherwise the number will not be stored.
Timer operation Timer operation The timer function allows you to set the unit to switch itself on and off automatically, for example, to wake you up each morning. While setting up the timer, make sure you carry out each step within five seconds, otherwise your entry will not be accepted in the memory and you will have to start again. Note-During timer setup, always check the AM/PM indicator (to the left of the time) to ensure you make the correct settings. 1.
Timer operation The timer on and off times have now been set. To check them at any time, press MODE repeatedly to step through the TIMER ON and TIMER OFF settings on the display. 8. To activate the timer, lower the front panel flap and press TIMER so that TIMER appears at the right of the display. 9. Press to switch off the unit to standby. Timer operation is now set. The unit will switch itself on and off at the set times every day.
CARE AND MAINTENANCE There are no user serviceable parts inside the unit. Do not attempt any adjustments other than those described in the manual. Refer all other problems to qualified service personnel. Compact Disc Care • To remove a disc from its storage case, press down on the centre of the case and lift the disc out, holding it carefully by the edges. • Treat the disc carefully. Handle the disc only by its edges. Never allow your fingers to come in contact with the shiny, unprinted side of the disc.
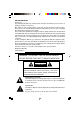
WALL MOUNTING INSTRUCTIONS If you decide to wall mount your MS3100 audio system, please read and carefully follow these instructions: General Precautions and Recommendations * When choosing a location for wall mounting remember that the main unit must be connected to an AC outlet. The AC power cord of the main unit should be able to hang straight down from the main unit to the AC outlet. See Figure 1.
If there is no AC outlet directly below the desired mounting location, you may use a UL approved extension cord. In this case you should allow the AC plug of the main unit to reach all the way to the floor and connect the extension cord on the floor, not above the floor. See Figure 2. Correct Incorrect Figure 2 Although all major functions of this system, including opening/closing the front cover, can be operated by the remote control, you must still load and unload your CDs manually.
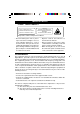
5) Before You Drill: Make sure there are no water plpes, gas pipes, electrical wires on other obstructions or hazards behind the wall in your chosen mounting location. If you are not sure about this. and don't know how to check, perhaps you should consider having the system mounted by someone with the necessary experience. 6) Use a 3/16" drill bit in your electric drill and drill completely through the drywall.
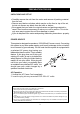
9) Loosen the screw until there is a gap about 1/8" between the screw head and the wall . 1/8" GAP 10) Position the main unit over the two screw heads so that the heads of the screws fit into bottom of each "Keyhole" on the back cabinet. When the two screw heads are inside the keyholes, slide the main unit slightly downward until each screw head is in the top of the keyhole.
EMERSON RADIO CORP. LIMITED WARRANTY What does this warranty cover ? Any manufacturing defects in original material, including original parts and workmanship, under normal use and conditions. For how long? For a period of ninety (90) days from the date of original purchase in the U.S.
EMERSON RADIO CORP. EMERSON Part No.