MICRO AUDIO SYSTEM with CD PLAYER OWNER'S MANUAL MS7608 Visit our web site at www.emersonradio.com MS7608_ib061802.
WARNI NG TO PREVENT FIRE OR SHOCK HAZARD, DO NOT USE THIS PLUG WITH AN EXTENSION CORD, RECEPTACLE OR OTHER OUTLET UNLESS THE BLADES CAN BE FULLY INSERTED TO PREVENT BLADE EXPOSURE. TO PREVENT FIRE OR SHOCK HAZARD, DO NOT EXPOSE THIS APPLIANCE TO RAIN OR MOISTURE.
BEFORE WE BEGIN Thank you… … … … … … for purchasing this Emerson audio product. The Emerson brand is your assurance of quality, performance and value, and has been since 1912. Our engineers have included many useful and convenient features in this product. Please be sure to read this Owner’s Manual completely to make sure you are getting the maximum benefit from each feature. This product was manufactured using the highest quality components and standards of workmanship.
IMPORTANT NOTES • Avoid installing this unit in places exposed to direct sunlight or close to heat radiating appliances such as electric heaters, on top of other stereo equipment that radiates heat, places lacking ventilation or dusty areas, places subject to constant vibration and/or humid or moist areas. • Store your CDs in a cool area to avoid damage from heat. • Do not attempt to clean this unit with chemical solvents as this might damage the finish. Use a clean dry cloth.
PREPARATION FOR USE UNPACKING AND SET-UP • Carefully remove the unit from the carton and remove all packing material from the unit. • Remove any labels or stickers which may be on the front or top of the set, but do not remove any labels from the back or bottom. • We suggest that you retain the original carton and packing materials in case it ever becomes necessary to return your unit for service. This is the only sure way to protect the unit from damage in transit.
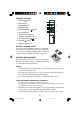
LOCATION OF CONTROLS AND INDICATORS TOP PANEL 5 6 7 4 8 9 10 11 3 2 1 19 17 15 20 18 16 14 12 13 BACK PANEL 22 23 21 1.) 2.) 3.) 4.) 5.) 6.) 7.) 8.) 9.) 10.) POWER On/Off Button. PHONES Jack. STANDBY LED Indicator. CD Compartment. TUNING Control. VOLUME Down Button. VOLUME Up Button. BASS Boost ON/OFF Selector. AM/FM/FM ST. Selector. CD/RADIO Selector. 11.) CD DOOR OPEN 12.) PLAY/PAUSE Button. 13.) STOP Button. 14.) Multi Function Display. 15.) MUTE Indicator. 16.) Forward SKIP/SEARCH 17.
REMOTE CONTROL 1.) VOLUME Buttons. 8 2.) MUTE Button. 7 6 5 4 3 2 1 3.) RANDOM Button. 4.) REPEAT Button. 5.) CD SKIP/SEARCH Button. 6.) CD STOP Button. 9 10 7.) CD PLAY/PAUSE Button. 11 8.) POWER / STANDBY Button. 9.) CD SKIP/SEARCH 10.) VOLUME Button. Button. 11.) Battery Compartment. BATTERY INSTALLATION Insert 2 pcs ‘AA’size (Alkaline) batteries (not included) into the battery compartment of the remote controller.
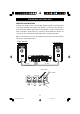
OPERATING INSTRUCTIONS SPEAKER CONNECTION Connect each speaker to the corresponding speaker terminals on the back panel of the main unit. Make sure that the left speaker is connected to the left pair of speaker terminals and the right speaker to the right pair of speaker terminals. Also make sure that the speaker wires are correctly connected: that the red wires are connected to the red terminals and the black wires to the black terminals.
LISTENING TO RADIO TUNER INFORMATION This system features a normal AM/FM analog tuning system. Unlike a digital tuner it does not automatically lock in on the exact frequency of a station. However instead of a dial scale and a moving dial pointer we have included a digital frequency display to help you tune more accurately. Do not be concerned if you cannot easily tune the display to the exact frequency of your favorite stations, especially on the AM band.
4.) Rotate the tuning control until the exact frequency of the desired station appears on the display. If you have tuned to an FM Stereo station and the Band selector is set to FM FM ST, the stereo indicator will appear in the display. Note: If you are listening to a weak or distant FM Stereo station and reception fades or is noisy, setting the Band selector to the FM position will normally provide some improvement. However the sound will no longer be in stereo. 5.
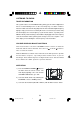
PLAYING COMPACT DISCS Normal Playback 1.) Press the POWER/STANDBY button 6 on the main unit or the remote control. 6 The main display lighting comes 'On' and the STANDBY LED indicator goes 'Off'. 3 1 7 2 5 2.) Set the CD/RADIO selector to the CD position. Two bars "– –" will flash in the display for a few seconds while the player tries to read the disc and then "00" will appear, indicating that there is no disc in the player. 3.) Press the CD DOOR OPEN button to open the CD door.
Pause Control To pause temporarily during playback press the PLAY/PAUSE button again. The sound stops PLAY and the Play indicator flashes, but the disc continues to spin. Press the PLAY/PAUSE button once more to cancel pause and resume normal playback. The play indicator stops flashing. Skip/Search Controls ( / ) To start playback from a specific track insert your disc and wait for the display to show the total number of tracks.
Repeat Playback You can repeat either a single track or the entire disc continuously. Repeat function can be activated while the disc is playing or while the disc is stopped, but there must be a disc in the player. To Repeat a Single Track: • Press the SKIP/SEARCH button to select the desired track. REPEAT PLAY • Press the REPEAT button once. The REPEAT indicator flashes. • Press the PLAY/PAUSE button to begin playback. The selected track will be repeated continuously.
Random Playback Note: The RANDOM button is located only on the remote handset. The Random function can be activated while the disc is playing or while the disc is stopped, but there must be a disc in the player. • Load your disc and wait until the total tracks PLAY RANDOM appear on the display. • Press the RANDOM button on the remote control. The RANDOM indicator appears in the display. • Press the PLAY/PAUSE button. The PLAY indicator also appears.
Programmed Playback Notes: • You can program up to 20 tracks on a disc to playback in any desired order. The same track number can be programmed to play several times if desired. • There is no PROGRAM button on the remote control. The PROGRAM button is located on the main unit only. • The player must be in the Stop mode to enter a program. You cannot enter a program while a disc is playing. 1.) Load your disc and wait for the total tracks to appear.
6.) Repeat Step 5 until you have entered up to 20 tracks in the memory. 7.) Press the PLAY/PAUSE button to begin programmed playback. The PLAY indicator appears together with the PROGRAM PROGRAM PLAY indicator. Playback will begin on the first programmed track and continue until all of the programmed tracks have been played.
CARE AND MAINTENANCE COMPACT DISC CARE • To remove a disc from its storage case, press down on the centre of the case and lift the disc outs, holding it carefully by the edges. • Fingerprints and dust should be carefully wiped off the disc’s recorded surface with a soft cloth.Unlike conventional records, compact discs have no grooves to collect dust and microscopic debris, so gently wiping with a soft cloth should remove most particles. Wipe in a straight line from the inside to the outside of the disc.
TROUBLESHOOTING GUIDE Should this unit exhibit a problem, check the following before seeking service. Symptom Possible Cause Solution Radio Noise or sound Station not tuned properly for Retune the AM or FM distorted on AM or FM broadcasts. AM or FM. FM: Wire antenna is not broadcast station. Extend FM Wire antenna. extended. AM: The Loop antenna is not Reposition the Ant. until FM STEREO indicator positioned correctly. FM station is mono or station best reception is obtained.
EMERSON RADIO CORP. LIMITED WARRANTY What does this warranty cover ? Any manufacturing defects in original material, including original parts and workmanship, under normal use and conditions. For how long? For a period of ninety (90) days from the date of original purchase in the U.S.
EMERSON RADIO CORP. EMERSON Part No. : 16-2869 206-01 MS7608_ib061802.