
User manual


Accessing an RPC2 Communications Module via the Web Interface
Emerson
®
RPC2
™
36
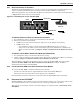
SNMPv1/v2 Traps
An administrator can configure up to 20 users to receive notifications from the RPC2 communications
module, identified by IP address or hostname, trap listen port and community string. To configure
SNMPv1/v2 Traps:
1. From the side navigation bar of the System tab, click Manage Protocol>SNMP>V1V2 Traps.
2. Enter the network name, port number and community string in the appropriate fields.
3. Check the box to enable the heartbeat feature.
4. Click the Save icon, ✔, at the top of the page when finished.
5. To verify the configuration, click the Verify icon at the top of the page.
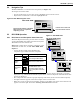
SNMPv3 Traps
An administrator can configure up to 20 users to receive notifications from the RPC2 communications
module. Users must be identified by IP address or hostname, trap listen port and community string.
To configure SNMPv3 Traps:
1. From the side navigation bar of the System tab, click Manage Protocol>SNMP>V3 Traps.
2. Enter the user name, port number and destinations.
3. Use the drop-down menu to enable or disable notifications.
4. Check the box to enable the heartbeat feature.
5. Click the Save icon, ✔, at the top of the page when finished.
6. To verify the configuration, click the Verify icon at the top of the page.
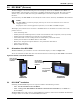
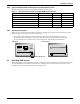
Web Server
An administrator can configure access to the module through the Web interface.
To configure access through the Web interface:
1. From the side navigation bar of the System tab, click Manage Protocol>Web Server.
2. Use the drop-down menu to select either HTTP or HTTPS for the Web Server.
3. Enter the port number for the HTTP or HTTPS server.
4. Enter the amount of time in seconds the RPC2 communications module refreshes.
5. Click the Save icon, ✔, at the top of the screen when finished.
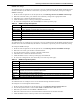
Table 12 SNMPv1/v2 trap descriptions
Parameter Description
Entry Enter up to 20 targets to receive traps.
Network Name The IP address or network name of the target to receive traps.
Port The Trap Listen Port where traps will be sent. Use 162 if the host computer uses standard ports.
Community The community string used the by the IP host for this entry (case sensitive, up to 32 characters).
Heartbeat Check the box to enable a heartbeat check.
Clear Click Clear to delete all values for this entry.
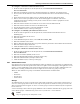
Table 13 SNMPv3 traps descriptions
Parameter Description
Entry Enter up to 20 targets to receive traps.
User Name The IP address or network name of the host to receive traps.
Notify Enable or disable notifications being sent to the user from the module.
Destination
The IP address or the network name of the network host that will receive notifications from the
module. Use a comma to separate multiple hosts.
Heartbeat Check the box to enable a heartbeat check.
Port The Trap Listen Port where traps will be sent. Use 162 if the host computer uses standard ports.
Clear Click Clear to delete all values for this entry.