
User manual


Accessing an RPC2 Communications Module via the Web Interface
37 Emerson
®
RPC2
™
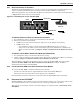
4.8.6 Authentication
Authentication can be performed locally or on a remote Kerberos, LDAP, Radius or TACACS+
authentication server. If the rack PDU is managed by an Avocent
®
DSView server, DSView
authentication is also supported.
The rack PDU also supports remote group authorizations for the LDAP, Radius and TACACS+
authentication methods.
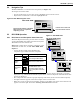
An administrator can configure authentication using the Web interface or the command line
interface. The default authentication method for the rack PDU is Local. Any authentication method
that is configured for the rack PDU is used for authentication of any user who attempts to log in
through Telnet, SSH or the Web manager
To select an authentication type:
1. From the side navigation bar of the System tab, click Authentication.
2. Use the drop-down menu to select the authentication type.
3. Click the Save icon, ✔, at the top of the page.
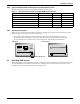
Remote Servers
Using a remote server requires configuring its IP address and, in most cases, other parameters before
it can be used. The following remote servers require configuration:
•DSView
• RADIUS
• TACACS+
•LDAP(S) AD
•Kerberos
To configure a DSView authentication server:
1. From the side navigation bar of the System tab, click Authentication>Remote
Servers>DSView.
2. Enter IP Address 1 - 4 for the DSView servers.
3. Click the Save icon, ✔, at the top of the page.
To configure a RADIUS authentication server:
1. From the side navigation bar of the System tab, click Authentication>Remote
Servers>Radius.
2. Enter the IP addresses of the First Authentication Server and First Accounting Server.
3. If used, enter the IP addresses for the Second Authentication Server and Second Accounting
Server.
4. Enter the secret word or passphrase in the Secret field (applies to both first and second
authentication and accounting servers), then re-enter the secret word or passphrase in the
Confirm Secret field.
5. Enter the desired number of seconds for server time-out in the Timeout field.
6. Enter the desired number of retries in the Retries field.
7. Click the Save icon, ✔, at the top of the page.