Portable CD-R/RW Player with Digital Tuning AM/FM Radio OWNER'S MANUAL PD5812 Visit our web site at www.emersonradio.
WARNING TO PREVENT FIRE OR SHOCK HAZARD, DO NOT USE THIS PLUG WITH AN EXTENSION CORD, RECEPTACLE OR OTHER OUTLET UNLESS THE BLADES CAN BE FULLY INSERTED TO PREVENT BLADE EXPOSURE. TO PREVENT FIRE OR SHOCK HAZARD, DO NOT EXPOSE THIS APPLIANCE TO RAIN OR MOISTURE.
INFORMATION: This equipment has been tested and found to comply with the limits for a Class B digital device, pursuant to Part 15 of the FCC Rules. These limits are designed to provide reasonable protection against harmful interference in a residential installation. This equipment generates, uses and can radiate radio frequency energy and, if not installed and used in accordance with the instructions, may cause harmful interference to radio communications.
PREPARATION FOR USE Unpacking and Setup • • • Carefully remove the unit from the display carton and remove all packing material from the unit itself. The detachable AC power cord is packed in the carton separately from the unit. Make sure that the AC power cord is not accidentally discarded with the carton or packing material. Press the OPEN/CLOSE area to open the CD compartment door.
PREPARATION FOR USE (CONTINUED) Headphones For private listening, plug headphones (not included) into the Headphone jack on the side of the unit. The speakers will be disconnected when headphones are used PROTECT YOUR FURNITURE This model is equipped with non-skid rubber 'feet' to prevent the product from moving when you operate the controls. These 'feet' are made from non-migrating rubber material specially formulated to avoid leaving any marks or stains on your furniture.
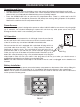
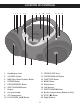
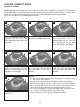
LOCATION OF CONTROLS 1 2 3 16 4 56 17 7 8 9 10 18 1. 2. 3. 4. 5. Headphones Jack VOLUME Control BBS (Bass Boost System) Button POWER Button PROG/MEMORY Button 6. 7. 8. 9. SKIP/TUNING o Button Display Carrying Handle CD Compartment 11. 12. 13. 14. 15. 16. 11 12 13 14 19 20 15 OPEN/CLOSE Area P.MODE/MEM UP Button FUNCTION Button BAND Button Rod Antenna Left Speaker 17. SKIP/TUNING n Button 18. Battery Compartment (Bottom of Unit) 19. STOP (X) Button 20. Right Speaker 10.
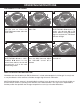
OPERATING INSTRUCTIONS LISTENING TO THE RADIO 1 2 3 1 1 2 Press the POWER button 1 to turn the unit on. Press the FUNCTION button 2 to select the Radio mode. Press the BAND button to select AM or FM. 1 4 1 If you press and hold the SKIP/TUNING n 1 or SKIP/ TUNING o 2 button for one second, then release, the unit will automatically scan to the next broadcasting station. Use the SKIP/TUNING n 1 or SKIP/TUNING o 2 button to select the desired AM or FM station.
TO SET/RECALL THE RADIO PRESETS (10AM/10FM) 1 2 3 1 2 2 3 1 Press the POWER button 1 to turn the unit on. Press the FUNCTION button 2 to select the Radio mode. Press the BAND button 1 to select AM or FM. Use the SKIP/TUNING n 2 or SKIP/TUNING o 3 button to select the desired AM or FM station. Press the PROG/MEMORY button; “MEM” will blink in the display and a preset number will appear.2 4 5 6 1 Select the desired preset number (up to 10 each band) by repeatedly pressing the P.
PLAYING COMPACT DISCS NORMAL PLAYBACK NOTE: Although this CD player can read CD-R and CD-RW discs, in addition to normal CDs, the playability of CD-R/RW discs may be affected by the type of software that was used to create the discs, as well as the quality and condition of the blank media you are using. 100% playability cannot be guaranteed. This is not an indication of a problem with the player. 1 2 3 Press the POWER button 1 to turn the unit on. Press the FUNCTION button 2 to select the CD mode.
CD PAUSE CONTROL 1 2 During CD playback, if you wish to pause the disc momentarily, press the PLAY/PAUSE ( ) button. 2 Playback stops but the disc continues to spin and the Play ® indicator blinks in the display. Press the PLAY/PAUSE ( ) button again to release Pause and resume normal CD playback. 2 The sound returns and the Play ® indicator lights solid.
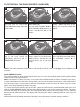
TO REPEATEDLY PLAY BACK ONE TRACK/ALL TRACKS/RANDOM 1 2 2 3 3 1 1 1 2 4 To repeat a single track, press the P.MODE/MEM UP button 1 once; “ ” will blink in the display. Press the SKIP/TUNING n 2 or o 3 button to select the specific track that you wish to repeat. When the desired track number appears in the display, press the PLAY/PAUSE ( ) button 4 to begin playback. The specific track you selected will be repeated continuously. To repeat all of the tracks on a disc continuously, press the P.
4 5 3 3 1 6 2 1 2 Press the SKIP/TUNING n 1 or o 2 button to select the first track that you wish to program. When the desired track number (Example: Track 5) appears in the display, press the PROG/ MEMORY button 3 to set the track into memory. Repeat step 4 to enter up to 20 tracks in the program memory. 7 NOTES ON PROGRAMMED PLAYBACK: • You can review the program by pressing the PROG/MEMORY button when playback is stopped.
CARE AND MAINTENANCE Caring for Compact Discs • Treat the disc carefully. Handle the disc only by its edges. Never allow your fingers to come in contact with the shiny, unprinted side of the compact disc. • Do not attach adhesive tape, stickers, etc. to the compact disc label. • Clean the compact disc periodically with a soft, lint-free, dry cloth. Never use detergents or abrasive cleaners to clean the compact disc. If necessary, use a CD cleaning kit.
TROUBLESHOOTING GUIDE Should this unit exhibit a problem, check the following before seeking service. Symptom Possible Cause Solution Station not tuned properly for AM or FM. Retune the AM or FM broadcast station. FM: Telescopic antenna is not properly adjusted. Reorient FM telescopic antenna. AM: Unit is not positioned correctly. Rotate unit until best reception is obtained. Radio function not selected. Press the FUNCTION button. Volume at minimum. Increase volume. CD function not selected.
LIMITED WARRANTY Emerson Radio Corp. warrants manufacturing defects in original material, including original parts and workmanship, under normal use and conditions, for a period of ninety (90) days from the date of original purchase in the U.S. With your dated proof of purchase, we will provide repair service at no charge for labor and parts at an authorized Depot Repair Facility, or replace the product in our discretion.
® EMERSON PART NO.