
User's Manual


Installation
17 SOLA HD
®
S5KC
™
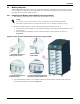
2.3 Mechanical Installation
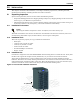
Two installation modes are available for the SolaHD S5KC UPS: tower installation and rack
installation.
2.3.1 Tower Installation
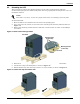
1. Once the UPS is in the desired location, adjust the leveling feet to secure its position, as shown in
Figure 16.
a. Use an open end wrench to turn the lower nut to raise or lower the leveling foot.
b. After the unit is level, tighten the upper nut against the frame to prevent the height from
changing.
Figure 16 Adjust the leveling feet
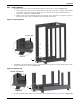
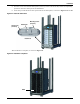
2. For added stability or earthquake-resistant installations, the shipping brackets can be used to
secure the unit to the floor.
a. Drill holes 10.3mm (13/32") in the floor for stationary mounting; these will accommodate the
mounting bolts removed from the pallet. Refer Figure 17 for the layout.
b. Use the mounting screws to install the mounting brackets on the front and rear of the UPS.
c. Secure the mounting brackets to the floor with the mounting bolts (see Figure 17).
For greater stability, use a higher-grade bolt.
Figure 17 Installation position and drilling hole dimensions for stationary mounting
Lower nut is bonded to
leveling foot; used to raise
and lower foot
Upper nut is threaded on
leveling foot; used to hold
foot height
716mm
(28.19")
340mm
(13.39")
M10
screw
Floor-Mounting Hole Layout
Mounting Bolt
Mounting
Bracket