
Installation Guide

10
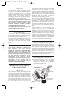
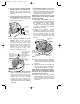
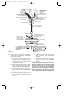
28. Insert the connected ends of the wires
up through the open side of the
hanger bracket and into the outlet box
as shown in Figure 16.
29. Screw two 1-1/4” threaded studs
(supplied with the ceiling fan) into the
tapped holes in the hanger bracket
(Figure 16).
30. Slide the receiver up and over the
hanger bracket. Press the receiver
against the ceiling, holding it in place
while installing the ceiling cover in
accordance with the instructions in
the Ceiling Fan Owner’s Manual.
31. Install the fan blades in accordance
with the instructions in the Ceiling Fan
Owner’s Manual.
32. Install the optional Emerson Light
Fixture in accordance with the
instructions in the Light Fixture
Owner’s Manual.
NOTE: To prevent damage to the
receiver, turn “off” the electricity at the
wall switch before installing or
removing light bulbs on the ceiling fan
or light fixture.
OUTLET BOX
RECEIVER
CEILING
COVER
HANGER
BRACKET
1-1/4"
THREADED
STUDS (2)
Figure 16
Operation
IMPORTANT
Fan installation must be completed,
including the installation of the fan
blades, before testing of the remote
control.
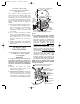
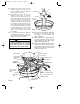
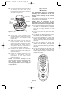
Your remote control (Figure 17) has full
control of your fan and lights.
NOTE: Prior to operation of the
downlight from the remote control,
make sure the switch on the light is ON.
1. To set the desired fan speed, press the
HI, MED, or LOW button to operate
your fan on high, medium, or low
speed.
2. To turn your fan off, press the OFF
button.
3. To change the airflow direction of the
fan blades, press the REV button.
4. To turn the downlight on, press and
release the DN button. The light will
turn on at the light intensity previously
selected.
5. To turn the uplight on, press and
release the UP button. The light will
turn on at the light intensity previously
selected.
6. To vary the intensity of the light, hold
the DN or UP button down until the
desired light intensity is reached, then
release the button.
®
OFF
REV
LOW
MED
HIGH
UP DN
Figure 17
BP7270-1 5/6/05 1:29 PM Page 10