TM EMERSON AND THE G-CLEF LOGO ARE REGISTERED TRADEMARKS OF EMERSON RADIO CORP., PARSIPPANY, NEW JERSEY, U.S.A. EWL20D6 (20 inch) If you need additional operating assistance after reading this owner's manual or to order replacement accessories, please call TOLL FREE : 1-800-256-2487. Or visit our WEB SITE at http://www.EmersonAudioVideo.
PRECAUTIONS WARNING: TO REDUCE THE RISK OF FIRE OR ELECTRIC SHOCK, DO NOT EXPOSE THIS APPLIANCE TO RAIN OR MOISTURE. THIS SYMBOL INDICATES THAT DANGEROUS VOLTAGE CONSTITUTING A RISK OF ELECTRIC SHOCK IS PRESENT WITHIN THIS UNIT. CAUTION RISK OF ELECTRIC SHOCK DO NOT OPEN THIS SYMBOL INDICATES THAT THERE ARE IMPORTANT OPERATING AND MAINTENANCE INSTRUCTIONS IN THE LITERATURE ACCOMPANYING THE APPLIANCE. CAUTION: TO REDUCE THE RISK OF ELECTRIC SHOCK, DO NOT REMOVE COVER (OR BACK).
14.Lightning-For added protection for this unit receiver during a lightning storm, or when it is left unattended and unused for long periods of time, unplug it from the wall outlet and disconnect the antenna or cable system. This will prevent damage to the unit due to lightning and power-line surges. 15.Power Lines-An outside antenna system should not be located in the vicinity of overhead power lines or other electric light or power circuits, or where it can fall into such power lines or circuits.
SUPPLIED ACCESSORIES Remote Control Unit Batteries Owner’s Manual ( NE242UD ) 2 AA Batteries ( 1EMN21904 ) • If you need to replace these accessories, please refer to the PART NO. under the illustrations and call our help line mentioned on the front page. • Depending on your antenna system, you may need different types of Combiners (Mixer) or Separators (Splitter). Contact your local electronics store for these items.
TABLE OF CONTENTS PRECAUTIONS . . . . . . . . . . . . . . . . . . . . . . . . . . . . . . . .2 IMPORTANT SAFEGUARDS . . . . . . . . . . . . . . . . . . . . . .2 SUPPLIED ACCESSORIES . . . . . . . . . LOCATION . . . . . . . . . . . . . . . . . . . TO AVOID THE HAZARDS OF ELECTRICAL SHOCK AND FIRE . . MOISTURE WARNING . . . . . . . . . . SYMBOLS USED IN THIS MANUAL TILT STAND . . . . . . . . . . . . . . . . . . . . . . . . . . . . . . . . .4 . . . . . . . . . . . . . .4 . . . . . . . . . . . . . . . . .
FEATURES TV Mode • MTS/SAP Tuner • Infrared remote control • Trilingual on screen TV setup display available in • Auto power off system–If there is no air signal input • English, Spanish or French • 181 channel capability PLL frequency synthesizer • • tuner with direct station call (A converter may be necessary to view scrambled cable channels.) Closed Caption Decoder–You may view specially labeled (cc) TV programs, movies, news, etc.
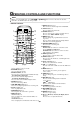
OPERATING CONTROLS AND FUNCTIONS NOTE • When you select DVD mode, press [PLAY O] or [EJECT A] first or insert a disc into the disc slot. Otherwise, the DVD features are not operated. - REMOTE CONTROL POWER PICTURE SELECT 1 2 3 1 2 3 4 5 6 7 8 15 16 0 17 VOL. 18 +10 SKIP ZOOM 5 6 CH.
26. RETURN button (P.22) Press to return to the previous screen in the setup menu. 27. A-B button (P.23) Press to repeat the playback of a selected section. 28. ANGLE button (P.26) Press to change the camera angle to see the sequence being played back from a different angle (if available). 29. REPEAT button (P.23) Repeats playback of the current disc, title, chapter or track. 30. SUBTITLE button (P.25) Press to select a desired subtitle language. - CONTROL PANEL 31 3233 34 35 31.
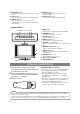
PREPARATION FOR USE ANTENNA/CABLE CONNECTION NOTE • Cables used here are commercially available. • For your safety and to avoid damages to the unit, unplug the antenna cable from the ANT jack before moving the unit. - ANTENNA/CABLE CONNECTION IF YOU HAVE A JACK ON THE WALL Connect the TV to the wall-mounted antenna jack with an RF cable (commercially available). [Rear of this unit] IF YOU HAVE A WIRED CABLE L T ITA OU DIGDIO L) IA AU AX O (C 2 EO VID Connect the TV to the wired antenna cable.
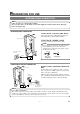
EXTERNAL CONNECTION ex. AUDIO AL UT GIT O DI DIOIAL) AUOAX (C O2 VIDE R DIO L AU VIDEO2 CP ON MP Y EN T Pb Headphone ・ To connect a headphone (not supplied) for personal listening. Pr R DIO L AU VIDEO1 EO O1 VID VIDE S- VIDE O T AN AD HE E ON PH You can connect this unit to your own Audio/Video equipment. • Be sure to turn off the power to all components in the system before connecting another component. • Refer to the Owner’s Manuals for the equipment to be connected to the unit.
TV SECTION INITIAL SET UP WATCHING A TV PROGRAM When you turn on the power for the first time, the SELECT LANGUAGE screen is displayed. Select the language for screen display and perform auto programming of the channels. Press[POWER] to turn on the unit. 1 • If the TV screen shows snow TV 1 NOTE • If any digits are displayed in the corner of the screen, press [POWER] without unplugging the power cord. 2 NOTE 2 Press [CH. K / L] or the Number buttons to select the desired channel number.
ADDING/DELETING CHANNELS CHANNEL SET UP The channels you no longer receive or seldom watch can be deleted from the memory. (Of course, you can add the deleted channel into the memory again.) AUTO CHANNEL PROGRAMMING As the initial setting, this unit has memorized all channels, including the ones not available in your area. This feature automatically puts only available channels into the memory. 1 Press [SETUP] then press [K] or [L] to point to “CHANNEL SET UP”.
POWER PICTURE SELECT 1 Press [SETUP] then press [K] or [L] to point 3 9 8 +10 SKIP ZOOM - TV SET UP - MUTE CHANNEL SET UP V-CHIP SET UP LANGUAGE [ENGLISH] CAPTION [OFF] B BACK LIGHT [BRIGHT] SETUP PLAY REV TV OPERATION AND SETTINGS 0 to “BACK LIGHT”. VOL. +100 SLEEP FWD STOP PAUSE DISC MENU SLOW 2 Press [ENTER] then press [s] or [B] to select to “BRIGHT”, “NORMAL” or “DARK”.
NOTE CLOSED CAPTION SYSTEM • Even if there is a power failure of any You can view specially labeled (cc) TV programs, movies, news and pre-recorded tapes with either a dialogue caption or text display. CAPTION mode: You can watch dramas, movies and news while captioning the dialogues and the contents of news. TEXT mode: You can watch half screen text information if you want. 1-2: You may get these captions or text information by selecting either “1” or “2”.
1 2 A 3 TV RATING SET UP CH. 7 8 6 Follow steps 1 to 3 in the V-CHIP SET UP. 4 Press [K] or [L] to select the desired TV rat- 9 VOL. +100 SLEEP 0 ing to be blocked then press [ENTER] repeatedly to set “BLOCK” or “VIEW”.
6 Press [SETUP] to exit the menu. • Make sure you enter exactly the same new code in the “CONFIRM CODE” space as one in the “NEW CODE” space. If they are different, the “NEW CODE” space is cleared for redoing. SETUP NOTE 5 Press [SETUP] to exit the menu. • To change the rating, the TV must be turned SETUP to an unprotected program. If “PROTECTED PROGRAM by ...” appears on the screen, please change the channel to a station that is not protected.
DVD SECTION ABOUT THE DISCS PLAYABLE DISCS Playable discs DVD-Video * 1,2,4,6,10,11 DVD-RW DVD-R * 1,3,4,5, 6,7,9,10 Mark (logo) Region code Recorded signals Disc size Disc type or Example Title 1 Digital video 5 inches (12cm) (MPEG2) Title 2 Chapter 1 Chapter 2 Chapter 3 Chapter 4 Chapter 1 Chapter 2 DVD+RW DVD+R * 1,3,4,5, 6,8,9,10 Audio CD * 4,6,10 Audio CD 5 inches Digital audio (12cm) Example Track 1 Track 2 Track 3 Track 4 Track 5 Track 6 CD-RW CD-R * 4,5,6,9,10 • NEVER play back th
PLAYING A DISC POWER PICTURE SELECT 4 Press [STOP C] to stop playback. EJECT STOP 3 SKIP ZOOM 5 Press [EJECT A] to remove the disc from the unit. MUTE EJECT PLAY REV FWD STOP PAUSE DISC MENU SLOW DISPLAY ENTER SETUP TITLE RETURN • Shaded buttons are used for following operation. BASIC PLAYBACK GETTING STARTED Turn on the power of amplifier and any other components, if necessary. 1 Press [POWER] then the power will turn on. POWER 2 Open the disc door manually.
DISC MENU RESUME 1 Press [DISC MENU]. 1 During playback, press [STOP C]. DISC MENU Resume ON • The DVD main menu will appear. symbol may • If the feature is not available, appear on the TV screen. • If disc menu is available on the disc, audio lan- STOP guage, subtitle options, chapters for the title and other options will appear for selection. Press ’PLAY’ to play from here. To play the beginning, press ’STOP’ first and then ’PLAY’. • Resume message will appear on the TV screen.
FAST FORWARD / FAST REVERSE ZOOM The Zoom function allows you to enlarge the video image and to pan through the enlarged image. 1 During playback, press [FWD g] or [REV h]. REV 1 Press [ZOOM] during playback. FWD ZOOM SLOW • Playback will continue. • “ g 1” or “h 1” appears on the screen. 2 Press [ZOOM] repeatedly to select the 2 To select another speed, repeat step 1 until required zoom factor: ZOOM1, ZOOM2, ZOOM3 or OFF. your required speed number appears on the screen.
SEARCH FUNCTION 1 2 2 Within 30 seconds, select the desired track 3 number using the Number buttons. CH. 4 5 6 7 8 9 VOL. +100 SLEEP 0 1 4 7 +10 SKIP 2 5 8 3 6 9 0 ZOOM MUTE • To select single-digit track number, press [0] first if the total number of track in the disc is 10 or more. (e.g. Press [0] [3] for track number 3.) • Playback will start at the selected track. PLAY FWD STOP DISC MENU SLOW Using [SKIP H / G ] DISPLAY During playback, press [SKIP G] to move the next track.
TIME SEARCH MARKER SET UP SCREEN 1 During playback, press [SEARCH MODE] Use markers to memorize your favorite places on a disc. repeatedly to display the Time Search on the TV screen. SEARCH MODE repeatedly 1 Press [SEARCH MODE] repeatedly during playback to display the Marker screen. _:_ _:_ _ TOTAL 1:29:00 SEARCH MODE 2 Within 30 seconds, enter a desired disc time 2 5 8 _ _ _ _:_ _:_ _ 2 Press [s] or [B] to select 1, 2, 3, 4, 5, 6, 7, using the Number buttons.
SPECIAL PLAYBACK FUNCTION A-B REPEAT PLAY REV FWD STOP DISC MENU SLOW 1 Press [A-B] at your chosen starting point. DISPLAY A-B ENTER SETUP TITLE RETURN CLEAR SEARCH MODE REPEAT A-B AUDIO ANGLE MODE SUBTITLE •“ 2 Press [A-B] again at your chosen end point. A-B • Shaded buttons are used for following operation. •“ A-B” appears briefly on the TV screen, and the repeat sequence begins. REPEAT 3 To exit the sequence, press [A-B]. REPEAT is available only during playback.
PROGRAM RANDOM PLAYBACK You may determine the order in which tracks will play. 1 In stop mode, press [MODE]. This function shuffles the playing order of tracks instead of playback in the sequence. 1 In stop mode, press [MODE] twice. MODE RANDOM • The “PROGRAM” screen will appear. CD-DA MODE 2 Press [▲ ] or [▼] to select a track, then press twice TOTAL 0:45:55 RANDOM PROGRAM - - no indication - - PLAY [ENTER]. • “RANDOM” screen appears.
CHANGING THE SETTINGS DISPLAY AUDIO LANGUAGE ENTER TITLE RETURN CLEAR SEARCH MODE REPEAT A-B AUDIO ANGLE MODE SUBTITLE The unit allows you to select a language during DVD disc (if multi languages are available) playback. • Shaded buttons are used for following operation. 1 Press [AUDIO] during playback. SUBTITLE LANGUAGE AUDIO The unit allows you to select a language for subtitles during DVD disc (if available) playback. 1.ENG Dolby D 3/2.
CAMERA ANGLE VIRTUAL SURROUND Some DVD discs contain scenes which have been shot simultaneously from various angles. You can change the camera angle when the “ ” icon appears on the screen. You can enjoy surround-sound effect over two speakers on this unit. 1 Press [MODE] repeatedly during playback then press [ENTER] to set it “1”, “2” or “OFF”. 1 Press [ANGLE] during playback.
THE ON-SCREEN INFORMATION 2 Press [DISPLAY] again to show current Total DISPLAY ENTER SETUP TITLE Track. RETURN 4/12 0:13:45 - 0:45:40 • Shaded buttons are used for following operation. ALL: Current track number / Total tracks Current repeat setting appears only when the repeat setting is active T: Track repeat A: All Tracks repeat A B: A-B repeat Remaining time of the entire disc Elapsed time of the entire disc You can check the information about the current disc by pressing [DISPLAY].
CHANGING THE DVD SET UP ITEMS D QUICK MENU • You can select the “TV MODE” or “DOLBY DIGITAL” from the QUICK menu quickly. To access the QUICK menu, select “QUICK” instead of “CUSTOM” at step 1 . LANGUAGE SETTING Follow steps 1 to 2 in the CUSTOM MENU . 3 Press [K] or [L] to select the desired item then press [ENTER]. TV SET UP MENU IN DVD MODE • SETUP You can access the TV SETUP menu by pressing [SETUP] from the DVD mode, and select only “LANGUAGE” and “BACK LIGHT”.
DRC (Dynamic Range Control): 3 Press [K] or [L] to select the below items then SETUP press [ENTER]. SETUP DISPLAY TV MODE STILL MODE 4:3 LETTER BOX AUTO DOWN SAMPLING: SETUP AUDIO DRC DOWN SAMPLING DOLBY DIGITAL DISPLAY TV MODE STILL MODE ON ON BITSTREAM • To compress the range of soft to loud sound. • The default setting is “ON”. ENTER TV MODE: QUICK You can change certain aspects of the DVD display screens and on-screen messages on the TV screen.
4 Press [K] or [L] to select “PARENTAL LEVEL” ANGLE ICON: • Press [ENTER] repeatedly to turn Angle icon “ON” or “OFF”. • The default setting is “ON”. SCREEN SAVER: • Press [ENTER] repeatedly to turn Screen Saver “ON” or “OFF”. • The default setting is “OFF”. • If you select “ON”, the screen saver program starts when there is no input from the unit for 5 minutes in stop mode. then press [ENTER].
LANGUAGE CODE LIST Abkhazian Afar Afrikaans Albanian Amharic Arabic Armenian Assamese Aymara Azerbaijani Bashkir Basque Bengali;Bangla Bhutani Bihari Bislama Breton Bulgarian Burmese Byelorussian C-E Cambodian Catalan Chinese [CHI] Corsican Croatian Czech [CZE] Danish [DAN] Dutch [DUT] English [ENG] Esperanto Estonian F-H Faroese Fiji 4748 4747 4752 6563 4759 4764 5471 4765 4771 4772 4847 5167 4860 5072 4854 4855 4864 4853 5971 4851 5759 4947 7254 4961 5464 4965 5047 6058 5160 5161 5166 5261 5256 Language
TROUBLESHOOTING GUIDE If the unit does not perform properly when operated as instructed in this Owner’s Manual, check the unit, consulting the following checklist. PROBLEM No power No operation by infrared remote control CORRECTIVE ACTION • Make sure the power plug is connected to an AC outlet. • Make sure the power is turned on. • Check if the power plug is connected to an AC outlet. • Check the batteries in the remote control. • Aim the remote control directly at the remote sensor.
PROBLEM Sound OK, picture poor Picture OK, sound poor No operation by infrared remote control CORRECTIVE ACTION • Try a new channel, if OK, then possible station trouble. • Is antenna connected to jack on the back of the set? • If outside antenna is being used, check for broken wire. • Check for local interference. • Adjust “CONTRAST” & “BRIGHTNESS” control. • Try a new channel, if OK, then possible station trouble. • Check for local interference. • Make sure the AC cord is connected to an AC outlet.
DVD Mode PROBLEM CORRECTIVE ACTION • Insert a correct video disc that plays on this unit. • Press [SELECT] to select DVD mode, then try other DVD feature. • Insert the disc. Disc cannot be played • Clean the disc. • Place the disc correctly, with the label facing back of the unit. • Cancel the parental control or change the control level. • Connect the audio cables firmly. No sound • Turn the power of the audio component on. • Correct the audio output settings.
MAINTENANCE CABINET CLEANING • DISC HANDLING Wipe the front panel and other exterior surfaces of the unit with a soft cloth immersed in lukewarm water and wrung dry. Never use a solvent or alcohol. Do not spray insecticide liquid near the unit. Such chemicals may cause damage and discoloration to the exposed surfaces. • • Handle the discs so that fingerprints and dust do not adhere to the surfaces of the discs. • Always store the disc in its protective case when it is not used.
INDICE ■ INDICE . . . . . . . . . . . . . . . . . . . . . . . . . . . . . . . . . . . . . 36 ■ CONTROLES DE OPERACIÓN Y FUNCIONES . . . . . 36 PARA INSERTAR LAS PILAS . . . . . . . . . . . . . . . . . . . . 37 ■ PREPARACIÓN PARA LA UTILIZACIÓN . . . . . . . . . . 38 CONEXIONES DE ANTENA/CABLE . . . . . . . . . . . . . . 38 CONEXIÓN EXTERNA . . . . . . . . . . . . . . . . . . . . . . . . . 39 SECCIÓN DE DVD ■ REPRODUCCIÓN DE UN DISCO . . . . . . . . . . . . . . . . 42 REPRODUCCIÓN BÁSICA . . . . . . . . . .
21. Botón REV h Presione para ver la imagen en DVD en retroceso o en cámara lenta de retroceso. Botón FWD g Presione para mover en avance rápido o en cámara lenta en el disco. 22. Botón STOP C Presione para detener la reproducción del disco. 23. Botón DISC MENU Muestra el menú del DVD. 24. Botón ENTER Presione para establecer un ajuste. 25. Botones K (Arriba) /L (Abajo) /{ (Izquierda) / B (Derecha) Presione para seleccionar o ajustar los ítems del menú. 26.
PREPARACIÓN PARA LA UTILIZACIÓN CONEXIONES DE ANTENA/CABLE NOTA • Los cables utilizados aquí están disponibles en los comercios. • Para su seguridad y para evitar daños a la unidad, desconecte el cable de antena de la toma ANT antes de trasladar la unidad. - CONEXIONES DE ANTENA/CABLE SI TIENE UNA TOMA DE PARED Conecte el televisor a la toma de antena de pared con el cable RF (disponible en los comercios).
CONEXIÓN EXTERNA ej. AUDIO AL UT GIT O DI DIOIAL) AUOAX (C O2 VIDE R DIO L AU VIDEO2 CP ON MP Y EN T Auricular ・ Para conectar auriculares (no suministrados) y escuchar en privado. Pb Pr R DIO L AU VIDEO1 EO O1 VID DE VI S- VIDE O T AN AD HE E ON PH Utilice esta conexión si su propio equipo A/V (ej. videograbadora) tiene tomas de salida de audio y vídeo. Cuando se usa un cable Vídeo-S, se obtiene una imagen mejor. - ENTRADA DE VÍDEO1 ej.
SECCIÓN DE TV OPERACIÓN DE TV Y AJUSTES INSTALACIÓN INICIAL Cuando se enciende la unidad por primera vez, se muestra la pantalla de SELECT LANGUAGE. Seleccione el idioma de visualización de pantalla y ejecute la autoprogramación del canal. TV - SUGERENCIAS ÚTILES 1. VERIFIQUE ANTENA/CABLE/STATÉLITE ESTÁ BIEN CONECTADO. 2. VERIFIQUE “PREA. AUTO CA.” ESTÁ BIEN AJUSTADO. 3. LEA LA PÁGINA FRONTAL DEL MANUAL DEL USUARIO O PANEL TRASERO PARA EL NO. TEL. DE AYUDA A LOS CLIENTES.
AJUSTE DE CANAL IDIOMA DE MENÚ PROGRAMACIÓN AUTOMÁTICA DE CANAL 1 Presione [SETUP] y a continuación presione [K] o [L] para seleccionar el “IDIOMA”. De acuerdo con la configuración de fábrica, esta unidad ha memorizado todos los canales, incluidos los que no están disponibles en su localidad. Esta función solo pone automáticamente en memoria los canales disponibles. - TV PREP. - SETUP 1 Presione [SETUP] y a continuación presione [K] o [L] para señalar “AJUSTE DE CANAL”.
SECCIÓN DE DVD REPRODUCCIÓN DE UN DISCO POWER PICTURE SELECT 4 Presione [STOP C] para detener la reproducción. EJECT STOP 3 SKIP ZOOM 5 Precione [EJECT A] para extraer la disco de MUTE la unidad. EJECT PLAY REV FWD NOTA STOP PAUSE DISC MENU SLOW • Cuando el modo DVD se ha cambiado al modo DISPLAY ENTER SETUP TITLE RETURN • Los botones sombreados se utilizan para las siguientes operaciones.
MENÚ DE DISCO REANUDACIÓN 1 Presione [DISC MENU]. 1 Durante la reproducción, presione [STOP C]. DISC MENU • Aparecerá el menú principal de DVD. • Si esta función no está disponible, REANUDACIÓN ACTIVADA STOP el símbolo puede aparecer en la pantalla del televisor. • Si el menú de disco está disponible en el disco, aparecerán las opciones de idioma de audio, de subtítulos, capítulos del título y otras para su selección.
TM LIMITED WARRANTY FUNAI CORP. will repair this product, free of charge in the USA in the event of defect in materials or workmanship as follows: DURATION: PARTS: FUNAI CORP. will provide parts to replace defective parts without charge for one (1) year from the date of original retail purchase. Certain parts and LCD image burn-in are not covered under this warranty. LABOR: FUNAI CORP. will provide the labor without charge for a period of ninety (90) days from the date of original retail purchase.