
User Guide
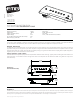

ACS PICKUP Page 2
If your instrument does not have a strap button you can simply drill the 31/64” hole
using the brad point drill. No pilot hole is required. If your instrument already has a
strap button, remove it. Fill the strap button hole with a piece of wood doweling to
provide a solid/flat surface for the brad point drill. Then drill the 31/64“ hole, the
dowel will be drilled out during the process. Remove the sawdust from the instrument
and proceed.
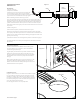
3) Refer to diagram #1
A) Remove the strap button, nut and finish washer from the jack.
B) Insert the jack through the soundhole, then through the end block of the guitar.
At this point you will need to adjust the rear hex nut to allow for the thickness of the
endblock. The rear hexnut should be adjusted allowing you to tighten the outer nut to
get the jack nice and snug.
C) Re-attach the washer and nut and tighten into place then screw the strap peg on.
D) Thread the Shield cover onto the jack and tighten. The cable will be connected in
the next step.
General Notes:
1) Remove the Strings.
2) Output Jack Installation:
A 31/64 inch (12mm) hole is required for the output jack.
The hole should be no larger than 1/2 inch in diameter.
It is recommended that this hole be drilled by someone with the
proper tools and skill to maintain the finish of your guitar.
Read the following instructions before you proceed.
Installation Instructions:
EMG Model: ACS
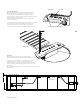
Battery Board Installation:
1) Install 2 CR2032 Lithium Cell Batteries into the battery holder
as shown in Diagram #2. The positive (+) side of both batteries
should be facing out, towards you.
Plug the output jack cable onto the 3-pin header marked JACK on the
battery board. with the terminals facing up as shown. Also, plug
the pickup cable (the end without the velcro) onto the 3-pin header
marked PICKUP. The terminals on the pickup cable should also be
facing up.
Before installing the battery board, be sure the neck block is clean
and dust free. Remove the adhesive backing from the dual-lock
fastener and adhere the entire battery assembly to the neck block.
It takes about 24 hours to fully adhere.
Install the Velcro Coin:
Diagram #3 shows the Velcro coin installed on the inside of the guitar
top. It’s provided for convenience and not a necessary part of the
installation. It makes it easy to affix the pickup cable if you remove
the pickup for visibility reasons, or for travel. Remove any dust from
the inside top of the guitar, remove the adhesive backing and fix the
coin to the inside top of the instrument.
The matching piece of velcro is on the pickup cable.
Velcro Coin
Diagram #3
Diagram #1
Guitar
End Block
Steps A and C
Step B
Step D
Diagram #2
Neck Block
Output Jack
Cable
Pickup Cable
Connector
Terminals
Visible