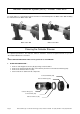
INSTRUCTION MANUAL ® ProSet 1600 Series Pneumatic Blind Rivet Tool
Contents Introduction ................................................................................................................................................. 2 Safety Instructions ...................................................................................................................................... 3 Specifications.............................................................................................................................................. 4 Packaged Accessories......
Safety Instructions TO INSURE PROPER FUNCTIONING AND SAFE OPERATION READ THIS MANUAL CAREFULLY BEFORE SETTING UP OR OPERATING THE POP® ProSet™ 1600 SERIES TOOLS 1. DO NOT use this tool in a manner other than that recommended by Emhart Teknologies. 2. Always wear eye protection when using or when near a tool that is in use. 3. This tool is NOT designed for use in explosive atmospheres. 4. Inspect tool for damage before connecting to air supply including all air connections. 5.
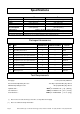
Specifications ® Weight Length Height Stroke Air Consumption Pulling Force Noise Level* Vibration Level ® ProSet 1600 ProSet 1600MCS 2.15 lbs. (0.98 kg) 2.30 lbs. (1.05 kg) 10.83” (275 mm) 10.71” (272 mm) 8.94” (227 mm) 8.94” (227 mm) 0.71” (18 mm) 0.71” (18 mm) 0.043 cu. ft. per rivet 2.47 scfm (max.) (1.22 l per rivet) (70 l /min (max.)) 1090 lbs. @ 90 psi (4850 N @ 0.62 MPa) LAeq,T = 80.2 dB(A), LWA = 85.0 dB(A), LPeak = 110.4 dB(C) 2 2 0.54 m/s , Time to 2.
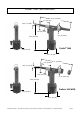
ProSet® 1600 Tool Dimensions 10.83” (275 mm) 3.3” (82 mm) .682” (17.3 mm) 1.82” (46.3 mm) 1.83” (46.5 mm) 8.94” (227 mm) ProSet® 1600 2.99” (76 mm) 3.27” (83 mm) 10.71” (272 mm) 3.23” (82 mm) .682” (17.3 mm) 1.82” (46.3 mm) 1.83” (46.5 mm) 8.94” (227 mm) ProSet® 1600 MCS 2.99” (76 mm) 3.27” (83 mm) Emhart Teknologies - 50 Shelton Technology Center, Shelton CT 06484 - Tel.
Common Nosepieces Closed End Rivet Diameter Open End HR Rivets Steel Mandrel Aluminum Mandrel Aluminum Body Steel Body 2.0 mm PRN214 - - - - 3/32” (2.4 mm) PRN314* - - - - 1/8” (3.2 mm) or 7/64” (2.8 mm) PRN414* PRN424 PRN434 PRN414* PRN4HR 5/32” (4.0 mm) PRN514* Jaw Pusher FAN239-176* (PRG402-02 - JAWS) FAN239-176* DPN239-144* PRN524 PRN534 PRN514* - * Included with the tool Use FAN239-176 instead of DPN239-144 (installed) when using 3/32” (2.
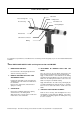
Front End Service Jaw Guide Nose Housing Nut Pulling Head Nose Housing Jaw Guide Lock Housing Adapter Wrench Flat Jaw Guide Lock motion O-Ring For optimum tool performance, Front-End Service should be performed regularly as per the “Preventative Maintenance Schedule”. ! Note: UNPLUG AIR SUPPLY while servicing front-end to avoid INJURY. 1. REMOVE NOSE HOUSING: 4. REASSEMBLY OF INTERNAL PARTS AND JAW GUIDE: Unscrew the Nose Housing Nut by hand and slide Nose Housing off the tool. 2.
Mandrel Collection System (MCS) – ProSet® 1600 MCS For safety purposes, removing the Collector from the tool automatically turns the MCS suction OFF. Refitting the Collector turns the MCS suction ON. MCS suction OFF MCS suction ON Cleaning the Collector Silencer For optimum performance, the Collector Silencer should be cleaned at regular intervals as per the “Preventative Maintenance Schedule”. ! Note: UNPLUG AIR SUPPLY while servicing Collector to avoid INJURY. 1.
2. RE-ASSEMBLE THE COLLECTOR : • • • • Secure Collector End (104) to Collector Body (101). Use a screwdriver or similar tool to hold the Collector End in place during re-assembly (see picture below). Place the Collector Silencer (103) onto the Collector End (104). Place Collector End Cap (105) on Collector Body End (104). Install and tighten Collector End Nut (106) on Collector End (104). Screwdriver Tool Assembly Torque Requirements Item Part No.
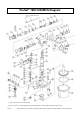
ProSet® 1600/1600MCS Diagram Use with 3 size rivets (*) These items require Loctite® 242 adhesive. (†) These items have a specific tightening torque as indicated in the “Tool Assembly Torque Requirements” table. Page 10 Emhart Teknologies - 50 Shelton Technology Center, Shelton CT 06484 - Tel.
Emhart Teknologies - 50 Shelton Technology Center, Shelton CT 06484 - Tel.
Parts List Item 1 2 3 4 5 6 7 8 9 10 11 12 13 14 15 16 17 18 19 20 21 22 23 24 25 26 27 28 29 30 31 33 34 35 36 37 38 39 40 44 45 46 47 48 49 50 51 52 53 54 57 60 61 62 63 Part No.
Optional Parts and Kits are also available separately. Part No. Description Part No. Description PRN214 Nose piece for 2.0 mm rivet (Micro Rivets) 37 DPN900-006 O-Ring 2 PRG402-02 Jaws for 2.0 mm rivet (Micro Rivets) 46 DPN900-007 O-Ring 1 DPN239-110 17mm Hex.
Hydraulic Oil Charging Procedure ! IMPORTANT. TOOL MUST BE DISCONNECTED FROM THE AIR SUPPLY. USE ONLY APPROVED HYDRAULIC OIL SPECIFIED IN THIS MANUAL. Fig. 1 1. Disconnect from air supply. 2. Remove Nose Housing (6) and Collector (96). 3. Remove four Socket Head Cap Screws (88) using 4mm Hex-Key wrench (accessory). (Fig. 1) 4. Turn tool upside down and remove Chamber (89). Then pull out Air Piston Assembly (57). (Fig. 2) 5. Drain the oil from the tool into a waste oil container. 6.
12. When there are no more bubbles in the oil, top off the hydraulic oil in the Sleeve Lower (51) to the level of the Backup Ring (53). 13. Make sure the Jaw Guide (3) is loose (see Step 7). Push the Air Piston Assembly (57) into the Sleeve Lower (51) to the half-way point. While holding the Air Piston at the half-way point, replace the Nose Housing and hand tighten. 14. With a clean rag, wipe off any oil on the Air Piston Assembly (57), Handle Lower Assembly (54), and Sleeve Lower (51).
Safety Data SEAL LUBE (P/N: PSA075508P) ® LUBRIPLATE 130-AA Manufactured by: Fiske Brothers Refining Co. Phone: (419) 691-2491 Emergency: (800) 255-3924 ® ALVANIA EP Grease 1 Prod Code: 71124 Manufactured by: Shell Oil Products Phone: (877) 276-7285 MSDS#: 57072E-5 First Aid: SKIN: Remove any contaminated clothing and wash with soap and warm water. If injected by high pressure under skin, regardless of the appearance of its size, contact a physician IMMEDIATELY.
Troubleshooting Symptom Probable Cause Remedy Tool not connected to air supply. OS Valve is in “OFF” position. Insufficient air pressure. Air pressure is too high. Tool is low on hydraulic fluid. Connect to recommended air supply source. Slide OS Valve to ON position. Adjust air supply pressure. Adjust air supply pressure. Service tool by qualified service personnel. Possible jam due to debris in Nose Housing. Perform “Front End Service” and check for debris or damage.
EC Declaration of Conformity We, Emhart Teknologies Tucker Fasteners Limited Birmingham B42 1BP United Kingdom. Declare that: ProSet® 1600 ProSet® 1600 MCS Conforms to the following standards: EN ISO 12100 part 1 and part 2 ISO 3744 ISO prEN 792 part 1 EN ISO 4871 ISO prEN 15744 EN 28662 - 1 EN 12096 Following the provisions of the Machine Directive 98/37/EEC which replaces Directive 89/392/EEC and its amending Directives 91/368/EEC, 93/44/EEC and 93/68/EEC.
Notes Emhart Teknologies - 50 Shelton Technology Center, Shelton CT 06484 - Tel.
Emhart Teknologies USA Office 50 Shelton Technology Center Shelton, CT 06484 Tel: 877-EMHART-1 FAX: 800-225-5614 Canada Office 9870 Boulevard du Golf Anjou, Quebec Canada Tel: 514-351-0330 FAX: 514-351-0458 Mexico Office Av. Antonio Dovali Jaime No 70 Torre B Piso 9 La Fe, Santa Fe Mexico, D.F. 01210 Tel: 52-55-5326-7100 FAX: 52-55-5236-7141 www.emhartamericas.com © Emhart Teknologies P513.