
User manual


16
|
ENGLISH
Is my router correctly connected to the wall outlet? You can check this by verifying that
the POWER LED is on.
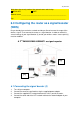
6.2 Configuring the signal booster (2)
1. Turn on your computer.
2. Open your internet browser (e.g. Internet Explorer or Firefox).
3. Type ‘http://192.168.8.1’ in the address bar.
4. Press the ‘Enter key’ or click ‘Go to’.
5. Click ‘Setup Tool’.
6. You will now be asked for a ‘Username’ and a ‘Password’. Fill out ‘admin’ in the
‘Username’ field and ‘admin’ in the ‘Password’ field and press the enter key.
7. Click ‘Advanced Setup’ in the left menu.
8. Click ‘Network’ in the left menu.
9. Click ‘LAN/DHCP Server’.
10. Select ‘Stop’ at ‘DHCP Server’.
11. Click ‘Apply’ at the right side in the menu ‘DHCP Server’.
12. Type ‘192.168.8.200’ in the ‘LAN IP address’ field.
13. Type ‘255.255.255.0’ in the ‘Subnet mask’ field.
14. Click the button ‘Apply & Restart’.
Note! If you wish to log in to your router at a later point in time, you must assign a fixed
IP address to your computer.
1. Click ‘Start’.
2. Click ‘Control Panel’.
3. Double click ‘Network Connections’.
4. Right click the appropriate ’LAN Connection’.
5. Click ‘Properties’.
6. Select ‘Internet-protocol (TCP/IP)’.
7. Click ‘Properties’.
8. Select ‘Use the following IP Address’.
9. Enter ‘192.168.8.25’ in the ‘IP Address’ field.
10. Enter ‘255.255.255.0’ in the ‘Subnet mask’ field.
11. Click ‘OK’.
12. Enter ‘http://192.168.8.200’ in the address bar to log in to the router.
6.3 Securing your signal booster (2) (WPA2 AES)
If you use the router as a signal booster with another device, WPA2 AES security is
supported. If you use another type of wireless router, WEP security is recommended.
To avoid having uninvited guests probing your wireless network we strongly
recommend securing your wireless network.
1. Click ‘Wireless Wizard’.