
Operation Manual


31 | ENGLISH
5. Click ‘Record’.
6. Click at the field behind ‘Rec Mode’ and choose ‘Power Up’.
7. Click ‘Apply’.
8. Click ‘OK’ until you are at the main menu.
9. The moment the EM6015 will be started again, recordings will be made
continuously.
5.4 Making recordings during motion detection
1. Make sure the EM6015 is completely started and you see the EM6015’s image
on screen.
2. Click the right mouse button once.
3. Click ‘Main Menu’.
4. Enter your password (if setup before) or leave it empty.
5. Click ‘Advanced’.
6. Click ‘MD’.
7. CH1 stands for the camera which is connected to channel 1. If you want to
enable motion detection, select ‘On’ at ‘Status’.
8. Set the amount of sensitivity for motion detection at ‘Sensitivity’. ‘1’ is the least
sensitive, ‘4’ is highly sensitive.
9. Click ‘Setup’ behind ‘MD Area’.
10. By default, the entire screen is selected as motion detection area. By pressing
the left mouse button and keeping it pressed while simultaneously moving the
mouse, you can select a specific area on screen. The selected area will be given
a red colour. It means that everyone and everything which is present in the red
area, will be detected by motion detection.
11. Click the right mouse button once.
12. Click ‘Apply’.
13. Click ‘OK’.
14. Click ‘Exit’ until you are at the main menu.
5.5 Time based recording with motion detection
Making recordings using motion detection saves on specific times saves hard disk
space compared to other methods of recording. Therefore, older recordings will be
stored longer. ‘Time based recordings with motion detection’ is recommended to use.
1. Make sure the EM6015 is completely started and you see the EM6015’s image
on screen.
2. Click the right mouse button once.
3. Click ‘Main Menu’.
4. Enter your password (if setup before) or leave it empty.
5. Click ‘Record’.
6. Click at the field behind ‘Rec.Mode’ and choose ‘Timer Record’.
7. Click ‘Schedule’.
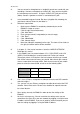
8. In the following screen you will see the days of the week (Sun. till Sat.).