EM4172 myiSharing NAS
| ENGLISH EM4172 – myiSharing NAS Table of contents 1.0 Introduction ........................................................................................................... 8 1.1 Packing contents ............................................................................................... 8 2.0 Software / Firmware .............................................................................................. 8 2.1 Overview .............................................................................
| ENGLISH 5.14 Customize Shortcuts...................................................................................... 35 5.15 Add New Shortcut.......................................................................................... 36 5.16 Delete Shortcut .............................................................................................. 36 5.17 Arrange Icons ................................................................................................ 37 5.17.1 Sort Desktop Icons ......
| ENGLISH 6.4.8 View Downloaded Files .............................................................................64 6.5 Email ............................................................................................................... 65 6.5.1 Toolbar ......................................................................................................66 6.6 Image Viewer .................................................................................................. 67 6.7 My Music ...............
| ENGLISH 9.1 Accounts ....................................................................................................... 109 9.1.1 Create a user account .............................................................................110 9.1.2 Delete a user account ..............................................................................110 9.1.3 Change the password ..............................................................................110 9.2 Network .......................................
| ENGLISH 12.1.4 Toolbar ..................................................................................................140 12.1.5 Context menu ........................................................................................141 12.1.6 Change View .........................................................................................143 12.1.7 Sort items ..............................................................................................146 12.1.8 Search for a File .................
| ENGLISH 15.2 Web Interface .............................................................................................. 168 15.2.1 Login .....................................................................................................169 15.2.2 File Upload ............................................................................................170 15.2.3 File Download ........................................................................................173 15.2.4 Batch Rename ...............
| ENGLISH 17.2.3 Record a movie and upload it to the NAS ..............................................241 17.2.4 Upload photos or Videos to your NAS....................................................242 17.2.5 Check your upload progress ..................................................................244 17.2.6 Read your file and Stream your media on the go ...................................244 18.0 Frequently Asked Questions and other related information .............................. 249 19.
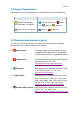
| ENGLISH 2.2 System Requirements Following are the system requirements for the operating system and web browser. Operating System Windows XP, Windows Vista, Windows 7 and above MacOS X 10.5 and above Web Browser Internet Explorer 7.0+, 3.1+, Safari 4+, Safari 4+, Firefox Chrome 9+ Firefox 3.5+ 2.3 Recommended browser plug-ins To make full use of all the functions and features in the web interface, following browser plug-ins are recommended or even required.
| ENGLISH 2.4 Supported file systems for USB drives When a USB drive is used as system drive (HOME), it has to be formatted by the myiSharing disk manager using the XFS file system. Otherwise, when the USB drive is attached as additional storage to access data from it, following file systems are supported: FAT32 NTFS HFS (read only) EXT2, EXT3, EXT4 XFS The maximum HDD capacity that is supported for USB drives is 2TB. When using the USB copy function, the maximum file size (total file size) is 32GB. 3.
| ENGLISH 3.1 Step 1 - HDD Installation For the system drive, we recommend using an internal hard drive. This should be a blank drive, because all existing data gets erased during the formatting process. 3.2 Step 2 - Login The easiest way to locate your device on the network and login is through the myiSharing web portal. 1. Open your web browser (e.g. IE, Firefox, Safari, Chrome). 2. Go to http://isharing.eminent-online.com. 3. Your default home server name is the MAC address of your network drive.
| ENGLISH 5. Login to your account. The default user name and password for the administrator is admin. For security reasons, we strongly recommend changing the password after the first login. If you are unable to login through the web portal, login to your network router and lookup the IP address of your network drive in the DHCP log. Copy the IP address and paste it into the URL field of your web browser. This opens the login page directly on the local network without going through the web portal.
| ENGLISH 3. Select Auto and click OK. This will automatically create the necessary partitions and format the drive(s). 4. Click Auto to setup and format the drive(s). The automatic setup wizard Auto only supports internal hard drives. If you want to use an external USB drive as your system drive, you need to use the Expert mode and manually create the partitions. 3.4 Step 4 - Uploading Files Once the system drive has been setup, you can start uploading your digital media files to the network drive.
| ENGLISH 3. In the menu bar, click Upload. 4. Select one of the available upload methods. If in doubt, select the traditional form upload. This will work on most browsers but you will have to upload the files one at the time. Instead, if you are running one of the more recent browsers, select Upload by HTML5, which allows you to drag and drop multiple files directly into the upload window. 5. Upload your media files.
| ENGLISH 3.5 Step 5 - Streaming Files Once you have uploaded your digital media files, you can setup the media server and the music server to stream your music and videos on the home network. 3.5.1 UPnP-AV Media Server The media server streams your files to other UPnP-AV and DLNA compliant clients (e.g. PS3, Xbox360, Windows Media Player, etc.). To find DLNA compliant media devices that can play your media files on the network drive, look for the “DLNA Certified” logo. 1.
| ENGLISH 3.6 Step 6 - Sharing Files There are several ways you can share files with your family and friends but before you start, it's easiest to give them a user account on the network drive. 1. 2. 3. 4. 5. 6. In the toolbar, click on Preferences. Select Accounts. Click New. Enter a username. Enter a password and confirm it. Click Save to create the new account. Each user gets its own HOME directory for private files and has access to the PUBLIC directory to share files among the different users.
| ENGLISH 3.6.1 Public Directory Files that are stored in the PUBLIC directory are accessible to all users (read & write). Simply copy a file to the PUBLIC folder and the next time another user logs in, they can view it. It doesn't matter if the user logs in via web interface or mounts the network drive on the home network. 3.6.
| ENGLISH 4. Enable the option Share this folder and select the users you want to share the folder with. 5. Click Apply to save the settings. 6. Click Refresh and the folder icon shows a hand to indicate that this folder is currently shared.
| ENGLISH If your friends do not have a user account, you can still share your files by selecting either Email or Publish instead of Group. This will create a public link, that you can then send to your friends. Clicking on it will open the album and display the files you have shared. A shared folder is only accessible via web interface. If you mount the drive via SMB or access it through FTP, the shared folders are not available. 4.
| ENGLISH 4. Select your language (1), enter the name of your home server (2) and click enter (3). 1 2 3 5. Login to your account. The default user name and password for the administrator is admin. For security reasons, we strongly recommend changing the password after the first login. You can always use the MAC address to locate your device but you can also register your own device name and choose something that is a bit easier to remember. For more details, see Preferences > Portal Server.
| ENGLISH If you get the error Device Offline, make sure that your device is connected to the internet and the power is turned on. The system LED should be a solid color and it should not be flashing. To further troubleshoot this error, check that your network router allows incoming traffic to your network drive. 4.
| ENGLISH 4.3 Finder Utility on Windows If you are unable to login through the iSharing web portal and you don't know how to find out the IP address of your network drive, you can download and install the finder utility. This will allow you to scan for the network drive on your home network (LAN) and connect to the login page. Download the finder utility for Windows : http://downloads.eminentonline.com/EM4172_isharingFinder_Windows.zip 1.
| ENGLISH 4.4 Finder Utility on Mac If you are unable to login through the iSharing web portal and you don't know how to find out the IP address of your network drive, you can download and install the finder utility. This will allow you to scan for the network drive on your home network (LAN) and connect to the login page. Download the finder utility for Mac OS X : http://downloads.eminentonline.com/EM4172_isharingFinder_MAC.zip 1.
| ENGLISH 5.0 Desktop Overview The desktop is the first thing you see after you login through the web interface. It is the place where you can manage and view your files online as well as configure the device settings. The taskbar at the top of the screen is fixed but you can customize everything else on the desktop, including the shortcuts, the toolbar and the wallpaper. To customize your workspace, right-click on the icons or on the wallpaper to access the context menu.
| ENGLISH 5.1 Taskbar The taskbar on top of the screen is a permanent menu that contains the system menu and some other important information as well as a couple of shortcuts that are often needed. The taskbar cannot be customized or moved to another location. The information seen in the taskbar changes depending on the user who is logged in and the window that is currently open. Icon Description Opens the system menu.
| ENGLISH 5.2 System Menu Click on the Eminent logo in the top left corner of the screen to open the system menu. 5.3 About Legal information about this software. 5.4 Server Info All the important information about your network drive is displayed here. If you contact tech support, please refresh the data and include this information in your ticket or email.
| ENGLISH 5.5 Disk Information Shows detailed information about all the drives that are currently connected to the system (e.g. internal SATA drives, RAID array, external USB drive). 5.6 Password To change the password of the currently logged in user, enter the old password, enter the new password twice and then click Apply to save the changes.
| ENGLISH 5.7 Applications The applications folder contains all the built-in programs, available applications, default media folders and settings for the device. Double-click on any of the icons to open the application.
| ENGLISH 5.8 System Appearance In this menu, you can customize your wallpaper, change the theme and select the language of the web interface.
| ENGLISH Field Description Wallpaper Customize the wallpaper of your desktop. Themes Select your preferred theme from the list of available designs. Please note that there is currently only one theme available, so there is no option to change this setting. Language Select your preferred language for the web interface from the list of available languages.
| ENGLISH 5.9 Show/Hide Toolbar Click to hide or show the toolbar. 5.10 Show Windows Show all the windows that are currently open, both hidden and visible windows. Select any of the windows to open it. 5.11 Quit Select Quit to log out or shut down the system.
| ENGLISH Field Description Shut Down Click “Shut Down” and then choose: Shut Down to completely turn off the system Restart to reboot the system. Logout Logout the current user from the web interface. Cancel Abort and go back to the previous screen. 5.12 Shortcuts The default shortcuts on your desktop give you quick access to your media files (e.g. documents, photos, music, videos) that are stored on the network drive.
| ENGLISH 5.13 Default Shortcuts By default, the system creates the following shortcuts on your desktop. 5.13.1 MyCloud Opens the file explorer window to manage and view the files that are stored on the network drive. 5.13.2 My Photos/Music/Videos Opens the corresponding folder for photos, music or videos in the file explorer.
| ENGLISH 5.13.3 Applications Opens the applications folder which contains all the built-in programs, available applications, default media folders and settings for the device. 5.13.4 Recycle Bin Opens the recycle bin, listing all the files that have been previously deleted through the web interface.
| ENGLISH Button Function Description Refresh Click to refresh the content in the recycle bin. Clear Click to permanently delete all files in the recycle bin. Restore Click to restore the selected file(s) to the original folder. Cut Click to move the selected file(s) to another directory. Use Paste in the destination window to complete moving the file. Delete Click to permanently delete the selected file(s). Properties Click to see the properties (e.g.
| ENGLISH 5.15 Add New Shortcut To add a shortcut to an application, open the Applications folder and drag any of the applications to the desktop. To add a shortcut to a folder or a file, open the MyCloud file explorer and drag any folder or file to the desktop. 5.16 Delete Shortcut To delete a shortcut, there are two options. Right-click on the shortcut and select Delete from the context menu. Drag and drop the shortcut in the recycle bin, then select OK in the pop-up windows to delete it.
| ENGLISH 5.17 Arrange Icons To re-arrange the icons, simply drag them to your preferred location on the desktop. 5.17.1 Sort Desktop Icons 1. Right-click on a shortcut or any place on the desktop to open the context menu. 2. Select Sort Desktop Icons and it will re-arrange all icons starting from the top left corner. 5.17.2 Restore Desktop Icons 1. Right-click on a shortcut or any place on the desktop to open the context menu. 2.
| ENGLISH 3. Adjust the sliders to change the size of the icons and the text. 4. To revert back to the factory default setting, click Reset. 5.19 Toolbar The toolbar gives you quick access to your applications and settings. You can delete unwanted shortcuts and add new ones by dragging a new application from the Application folder to the toolbar. Whereas the shortcuts on your desktop are hidden behind other windows, the toolbar stays on top, so you always have access to it.
| ENGLISH 5.20 Customize Toolbar 5.20.1 Add New Application 1. Open the Applications folder. 2. Drag an application on top of an existing application in the toolbar. 3. Re-arrange the position by dragging the icon to the new location. 5.20.2 Delete Unwanted Application 1. Right-click on the application you want to delete to open the context menu. 2. Select Delete. 5.20.3 Restore Toolbar 1. Right-click on any of the applications to open the context menu. 2.
| ENGLISH 5.20.5 Re-Arrange Toolbar In addition of adding and removing applications, you can also change the location and size of the toolbar. Click and drag on the grey handle to reposition the toolbar. Click on the double arrows in the grey handle to minimize the toolbar. Click on the single arrow in the grey handle to flip the orientation from vertical to horizontal or visa verse. Click and drag the triangle in the corner of the toolbar to resize it.
| ENGLISH 5.21 Wallpaper Replace the default wallpaper to add your personal touch. Select one of the stock images or load one of your own photos. To keep it fresh, select a folder where you have stored your own images and then enable the slideshow function. This will cycle through your photos and load a new image at a pre-set interval. Field Description Choose a folder Click Open and select the folder where your own images are stored or click View system wallpapers to view the stock images.
| ENGLISH Fit: Make the wallpaper fit the desktop without overflow. Slide Show Enable this option and set an interval in seconds to cycle through the images in the selected folder at a preset interval. Background Color Select a solid color for the background and then enable the No Image option to hide the wallpaper image completely and use just a single color instead. 6.
| ENGLISH 6.1 Address Book The address book helps you to manage your contacts, making it easier to quickly share your files with your friends and family. Once you have added your contacts, when it's time to send out an e-mail invitation to share a link, instead of filling out the details manually, you can simply select an address or a group from your contacts and have it automatically populate the receiver field.
| ENGLISH 6.1.1 Toolbar Button Function Description Refresh Refresh the content. Add Group Create a new group. Delete Group Delete the selected group (the group “All” cannot be deleted). The contacts in that group will not be deleted, only the group itself. You can still find the contacts in the group “All”. Edit Group Edit the selected group to rename it. Add Contact Create a new contact in the selected group. The contact is also added to the group “All”.
| ENGLISH 6.1.2.1 Add a Group 1. Click Add Group 2. Enter a name for the new group. Eminent 3. Click OK. Eminent 6.1.2.2 Edit a Group 1. Select the group that you would like to edit from the group list. 2. Click Edit Group 3. Enter a new name for the group.
| ENGLISH 4. Click OK. Eminent 6.1.2.3 Delete a Group 1. Select the group that you would like to delete from the group list. 2. Click Delete Group 3. Click OK. When a group is deleted, the contacts in that group will not be deleted, only the group itself. You can still find the contacts in the group “All”. 6.1.3 Contact List The contact list shows all the contents in the currently selected group. 6.1.3.1 Add a Contact 1. Select the group where you would like to add the new contact. 2.
| ENGLISH 3. Enter all the relevant information for the new contact in the contact information area. 4. Click Save. 6.1.3.2 Delete a Contact 1. Select the group which the contact belongs to or select the group “All”. 2. Select the contact that you would like to delete. 3. Click Delete Contact When a contact is deleted, it will be removed from all of the groups and the information of that contact will be deleted permanently.
| ENGLISH 6.1.3.3 Add a Contact to a Group 1. Open the group that contains your contacts (e.g. group “All”). 2. Select a contact, then drag and drop it into the new group. For new contacts, select the group where you would like to add the contact and then click Add Contact. 6.1.3.4 Remove a Contact from a Group 1. Select the group which the contact belongs to. 2. Select the contact that you would like to remove from that group. 3.
| ENGLISH 3. In the contact information area, click Edit. 4. Edit the contact information and then click Save. 6.1.5 Import/Export The address book uses the Google CSV format. You can import your contacts from Gmail or export your contacts from the address book. This function allows you to synchronize your contacts with other E-Mail clients that are compatible with the Google CSV format and make a backup of your contacts that you can keep for safe keeping on your computer or another hard drive.
| ENGLISH 6.1.5.1 Import Contacts from Gmail Follow these steps to import the contacts from your Gmail account to your address book. 1. Sign in to your Gmail account. 2. Under Gmail, select Contacts. 3. Click More and select Export.
| ENGLISH 4. Choose the contacts that you would like to export, select Google CSV format and click Export to save the contacts on your computer. 5. Upload the exported contacts to your network drive. 6. Open the Address Book 7.
| ENGLISH 8. Locate the file google.csv, select it and then click Open to import the contacts. 6.1.5.2 Export Contacts to Gmail Follow these steps to export the contacts from your address book and import them to your Gmail account. 1. Click Export 2. Enter a file name and click Save to store your contacts as a CSV file on the network drive.
| ENGLISH 3. Open the file explorer and locate the CSV file. and store the file on your computer. 4. Click Download 5. Sign in to your Gmail account. 6. Under Gmail, select Contacts.
| ENGLISH 7. Click More and select Import. 8. Locate the CSV file that you have stored on your computer and click Import to import the contacts.
| ENGLISH 6.2 Browser This browser can be used to access the web interface of other network devices that are connected to the same home network as the network drive. For example, you are away from home but are currently logged into your network drive. You have an IP camera that is installed somewhere in your house but the camera has not been setup for remote access, so you cannot see what is going on at home.
| ENGLISH 6.3 Disk Information Shows detailed information about all the drives that are currently connected to the system (e.g. internal SATA drives, RAID array, external USB drive). Field Detail Model The model of the disk. Path The full path of the disk in the operating system. Total Capacity The total capacity of the disk. Mount Point The path where the volume is mounted. Capacity The total capacity of the partition. Available The available storage capacity of the partition.
| ENGLISH 6.4 Downloader Downloader is a download manager that helps you to download files from a remote server via FileTP/BT/Donkey and stores them directly on your network drive. To use this application, you must first enable the downloader service. For more details, see Preferences > Downloader. Toolbar Task List Task Categories 6.4.1 Toolbar Button Function Description Add Add the URL address of a new file to download. Upload Upload a new BT torrent file.
| ENGLISH Downloaded Open the download folder in the file explorer to see the downloaded files. Seeded Open the download folder in the file explorer to see the seeded torrent files. Refresh Refresh the task list. 6.4.2 Task Categories On the left hand side in the downloader window under Transfers, you can select one of the categories in order to filter the current tasks and better manage your downloads in the task list. Category Description All Displays all tasks.
| ENGLISH 6.4.3 Task List On the right hand side in the downloader window, the task list displays the basic information and status about each task. Field Description Status Identifies the current status of the download showing either (Downloading) or (Paused) Network Identifies the current network connection. File Shows the file name. Size Shows the total file size. Progress Shows the current progress of the download. Click Refresh to update the progress.
| ENGLISH 6.4.4 Downloading Files 6.4.4.1 Add Task 1. Click Add 2. Enter the URL of the file that you would like to download and click OK. The URL can be a : • Regular HTTP address (e.g http://downloads.eminentonline.com/EM4172combi.pdf ) • FTP address (e.g. ftp://ftp.osuosl.org/pub/fedora/linux/releases/17/Fedora/x86_64/iso/Fed ora-17-x86_64-DVD.iso) • BT Torrent or a MLDonkey address (e.g. http://torrent.fedoraproject.org/torrents/Fedora-17-i686-LiveDesktop.torrent) 3.
| ENGLISH 6.4.4.2 Upload Torrent 1. Click Upload 2. Locate the torrent file (*.torrent) that you have previously downloaded to your computer and drag it on top of the upload window. 3. Click Refresh to update the status and see if your download is working. 6.4.5 Manage Tasks Select the task that you would like to manage in the task list to highlight it. To select multiple tasks, hold down the control (Ctrl) key and then select your files.
| ENGLISH 6.4.6 Download Task Info To view more detailed information about a certain task, select the task in the task list and click Info. General Field Description Network Shows the protocol that the network address belongs to. Downloaded/Size Shows how many bytes have been downloaded. Priority Shows the priority of the task. User Shows the current user of the network drive. Group Shows the name of the group. Strategy Shows the download strategy that is used.
| ENGLISH 6.4.7 Peers The following table identifies the fields shown in the Peers tab. Field Description Num Shows the number of peer host(s). Name Shows the name of the peer host. IP Address Shows the IP address of the peer host. Client Software Shows the client software. Upload Shows the amount that has been uploaded. Download Shows the amount that has been downloaded. The above table only shows FileTP relevant information.
| ENGLISH 6.4.8 View Downloaded Files 1. Click Downloaded 2. In the file explorer window, open the Files directory. 3. Click Refresh to see your downloaded files. 4. From here, you can move the files(s) to your HOME directory or download them to your computer.
| ENGLISH 6.5 Email Email is not intended as a standalone application but is a service that is called up when files and folders are shared via email. To do so, use the context menu in the file explorer or when viewing an album and share the files via email. The system then creates an email message that includes an invitation to view the files or albums with a hyperlink that the recipient can click on. Button Receiver Function Description Send Send out email message.
| ENGLISH 6.5.1 Toolbar Button Function Description Bold Convert the selected text to bold lettering. Italic Convert the selected text to italic lettering. Underline Underline the selected text. Strikethrough Strike through the selected text. Subscript Convert the selected text to subscript format. Superscript Convert the selected text to superscript format. Insert Ordered List Insert an ordered (numbered) list. Insert Unordered List Insert an unordered bullet list.
| ENGLISH Undo Undo the last action. Redo Redo the last action. Insert Image Insert an image at the cursor prompt. Insert Horizontal Rule Insert a horizontal line. Insert Hyperlink Link the select words to a certain URL. Remove Hyperlink Remove the hyperlink from the selected text. Cut Cut out the selected text to move it. Copy Copy the selected text. Paste Paste the text from clipboard. Print Print out the email. 6.
| ENGLISH Button Function Description Back Go back to previous image. Forward Go forward to the next image. Zoom In Zoom in on the image. Zoom Out Zoom out of the image. 90° CW Rotate the image 90° clockwise. 90° CCW Rotate the image 90° counterclockwise. Slide Show Start and stop the slideshow. This will display all the images in the same folder and automatically change to the next image at an interval of 6 seconds. Click Slide Show again to stop the slideshow.
| ENGLISH 6.7 My Music The My Music link in the Applications folder is a shortcut that opens the Music folder in the file explorer. This is where the private audio files of the currently logged in user are stored. For more details about the file explorer, see Applications > My Cloud. 6.8 My Photos The My Photos link in the Applications folder is a shortcut that opens the Photos folder in the file explorer. This is where the private image files of the currently logged in user are stored.
| ENGLISH 6.9 My Videos The My Videos link in the Applications folder is a shortcut that opens the Videos folder in the file explorer. This is where the private video files of the currently logged in user are stored. For more details about the file explorer, see Applications > My Cloud.
| ENGLISH 6.10 MyCloud The MyCloud file explorer can be used to manage and view the files that are stored on the network drive through the web interface. As with the file explorer on the computer, you can right-click on a file to access the context menu, you can drag and drop files to move them, you can double-click on a file to open it and you can control (Ctrl) click or shift (Shift) click to select multiple files. 6.10.1 Toolbar Button Function Description Back Go back to previous folder.
| ENGLISH Upload Upload files from your computer and store them on the network drive. If this is the first time, select one of the supported upload methods. Option 1 is for older browsers that do not support HTML5 yet. You can only upload one file at the time. Option 2 is only for browser that already have Google Gears installed. Google Gears is no longer available for download. Option 3 is the recommended method for new browsers, letting you drag and drop multiple files onto the upload window.
| ENGLISH Delete Delete the selected file(s) or folder(s) and move them to the recycle bin. If you hold down the shift (Shift) key when you click Delete, the file(s) or folder(s) are deleted permanently and are not moved to the recycle bin first. Search Enter a search term (partial or complete file name) and click the Enter key on your keyboard to show all files in the current folder that contain that search term.
| ENGLISH Only the administrator is able to view and access the DOWNLOAD and DEVICES directories. 6.10.3 Content Window Shows the content of the currently selected directory. By default, this opens in the HOME directory displaying the Documents, Music, Videos and Photos folders. 6.10.4 Status Bar Shows further details about the current folder. Icon Description Shows more information about the current folder (e.g. amount of files and storage capacity).
| ENGLISH Command Description Back Go back to previous folder. Open Open the selected file or folder. Select All Select all files in the current folder. View Select how the files are displayed. View as Thumbnail: Displays the contents with large icons and the file name below. View as Details: Displays the contents as a list along with large icons and detailed information. View as List: Displays the contents as a table along with small icons and detailed information.
| ENGLISH Image Rotate the selected image clockwise, counter-clockwise or set it as your new wallpaper. Share Share and publish the select file(s) with your friends and family. Email: Generate URLs for folders/files and email them to friends. SMS: Generate URLs for folders/files and send a SMS messsage with the URLs to friends (Taiwan only). Group: Share a folder with other users. Publish: Generate a URL for a folder/file and share it with your friends.
| ENGLISH 6.11 Password To change the password of the currently logged in user, enter the old password, enter the new password twice and then click Apply to save the changes. 6.12 Quit To log out the current user, restart the system or completely shut down the system. Field Description Shut Down Click “Shut Down” and then choose: Shut Down to completely turn off the system Restart to reboot the system. Logout Logout the current user from the web interface.
| ENGLISH 6.12.1 System Shutdown 1. Click Shut Down. 2. Click Shut Down. 3. Click OK to confirm and shut down the system. 4. The system shuts down all services and then turns off the power.
| ENGLISH 6.12.2 System Restart 1. Click Shut Down. 2. Click Restart. 3. Click OK to confirm and reboot the system. 4. The system shuts down all services and then reboots automatically. 5. The whole restart process takes about 1-2 minutes to complete. As soon as the system is ready again, you will be redirected to the login page.
| ENGLISH When you restart the system and the IP address remains the same, it will automatically open the login page as soon as the system is ready again. If not, you can click the link that is displayed in the restart screen to return to the login page. 6.13 SMS This service is available only in Taiwan.
| ENGLISH 6.14 Server Info All the important information about your network drive is displayed here. If you contact tech support, please refresh the data and include this information in your ticket or email. For more details, see Preferences > Server Info. 6.15 Show Windows Show all the windows that are currently open, both hidden and visible windows. Select any of the windows to open them.
| ENGLISH 6.16 System Appearance In this menu, you can customize your wallpaper, change the theme and select the language of the web interface. Field Description Wallpaper Customize the wallpaper of your desktop. Themes Select your preferred theme from the list of available designs. Language Select your preferred language for the web interface from the list of available languages.
| ENGLISH 6.16.1 Wallpaper Replace the default wallpaper to add your personal touch. Select one of the stock images or load one of your own photos. To keep it fresh, select a folder where you have stored your own images and then enable the slideshow function. This will cycle through your photos and load a new image at a preset interval. Field Description Choose a folder Click Open and select the folder where your own images are stored or click View system wallpapers to view the stock images.
| ENGLISH Tile: Display the wallpaper as a pattern of images. Fill: Make the wallpaper fill the desktop and cut the overflow off. Fit: Make the wallpaper fit the desktop without overflow. Slide Show Enable this option and set an interval in seconds to cycle through the images in the selected folder at a preset interval. Background Color Select a solid color for the background and then enable the No Image option to hide the wallpaper image completely and use just a single color instead.
| ENGLISH 6.16.2 Themes Click on the thumbnail in the lower window to select your preferred theme and then click Apply to save the settings. Please note that there is currently only one theme available, so there are no options to change the theme at this time.
| ENGLISH 6.16.3 Language Select your preferred language for the web interface from the list of available languages and then click Apply to save the settings.
| ENGLISH 6.17 Text Editor This simple text editor can be used to open and view documents (e.g. TXT, HTML, XML) or write some quick notes and save them as text files (*.txt) on your network drive. Button Function Description New Start again with a blank text file. Make sure to save your current work first, so you don't lose any data, before you press this button! Open Locate and open an existing text file. Save Save the current text file.
| ENGLISH 2. Edit the text. 3. Click Save As 4. Enter a file name. 5. Select the folder where you would like to save the file and click Save.
| ENGLISH 6.17.2 Open Existing Text File 1. Click Open 2. Locate and select the file you would like to open. 3. If the file extension of the file you are looking for does not end in *.txt, change the File Type to *.* in order to display all file formats.
| ENGLISH 4. Select the file and click Open to view and edit the file. 5. You can now view and edit the file. To open a *.txt file you can also double-click on the file in the file explorer and it will automatically open the file in the text editor.
| ENGLISH 7.0 System Information 7.1 Server Info All the important information about your network drive is displayed here. If you contact tech support, please refresh the data and include this information in your ticket or email. Field Description Registration Name The device name used for login via web portal. Host Name The host name of your network drive. Workgroup Name The name of the Workgroup the network drive belongs to (used for the Samba server).
| ENGLISH 7.2 Portal Server The web portal at http://isharing.eminent-online.com provides a free proxy service for your network drive. You can login through the web portal and access your device, no matter if you are at home, in the office or on-the-road. The web portal at http://dyn.com provides a similar but paid service. This is provided by a 3rd party and requires that you have an active dyn.com account. 7.2.1 isharing.eminent-online.com This service is provided for free to all Eminent users.
| ENGLISH Field Description Domain Enter a new name for your device and click Register to register a name that is easier to remember than the MAC address. All 26 English letters and dashes(-) are allowed but the name cannot begin with a dash(-). The name is not case sensitive. If the name is already taken, enter a new name and try to register it again. Connection Status Shows the current status of the network connection from the device to the web portal (e.g. Unconnected or Connected).
| ENGLISH Troubleshooting 1. If automatic port mapping fails, set up port forwarding manually. Redirect incoming traffic on port 10080 to port 80 on your network drive. 2. If remote login fails and port forwarding was not successful, on your router, add the IP address of your network drive to the DMZ zone. 3. If there is a conflict with the default port 10080 or this port is blocked on the network you are trying to connect from, change it to another port number. 4.
| ENGLISH 7.3 System Log Select the log you would like to see on the left side and the content is displayed on the right side. Field Description System Bootup Message Logs related to the startup of the system. System Log Logs and messages related to the running of the system. iTunes Service Logs related to the iTunes music server. Download Service Logs related to the download service. Media Server Service Logs related to the media server.
| ENGLISH 7.4 Firmware The firmware for your network drive can be updated automatically or manually. Under normal circumstances, we recommend using the “Auto Update” function. You only need to use the “Manual Update” when prompted by our tech support staff to upload a specific file. Please note that the web user interface is not accessible during the firmware update. If you are not able to login, the system might be in the process of updating the firmware.
| ENGLISH 7.5 System Backup The system backup function allows you to backup and restore the settings and configuration of your network drive. Field Description Backup Click Backup to save your current settings in a ZIP file that you can store on your computer. Upload Click Upload and select a previous backup file (ZIP file) in order to restore the settings to the previous state.
| ENGLISH 8.0 Services 8.1 Samba Samba provides file services for Microsoft Windows clients and can be integrated with a Windows Server domain. Enable this service so that you can manage files via Network Neighborhood on a Windows PC. Field Description Enable Samba Service Select the check-box to enable the Samba service. The current state of the service is displayed as “Service is stopped” or “Service is running”. Workgroup Name Specifies the Workgroup that the network drive belongs to.
| ENGLISH 8.2 AFP The Apple Filing Protocol (AFP) is a network protocol that offers file services for the Mac OS. Field Description Enable AFP Service Select the check-box to enable the AFP service. The current state of the service is displayed as “Service is stopped” or “Service is running”. Apply Click Apply to save the changes.
| ENGLISH 8.3 NFS Network File System (NFS) is a network file system protocol allowing a user on a client computer to access files over a network in a manner similar to how local storage is accessed. NFS, like many other protocols, builds on the Open Network Computing Remote Procedure Call (ONCRPC) system. Field Description Enable NFS Service Select the check-box to enable the NFS service. The current state of the service is displayed as “Service is stopped” or “Service is running”.
| ENGLISH 8.4 FTP File Transfer Protocol (FTP) is a standard network protocol used to transfer files from one host to another host over a TCP-based network, such as the Internet. FTP is built on a client-server architecture and utilizes separate control and data connections between the client and server. Field Description Enable FTP Service Select the check-box to enable the FTP service. The current state of the service is displayed as “Service is stopped” or “Service is running”.
| ENGLISH 8.5 Media Server The media server streams your digital media files that are stored on the network drive to other UPnP-AV and DLNA compliant clients (e.g. PS3 and Xbox360) on the home network. Field Description Enable Media Server Service Select the check-box to enable the media server. The current state of the service is displayed as “Service is stopped” or “Service is running”. Service Name The name under which your media server is recognized in the home network.
| ENGLISH To find DLNA compliant media devices that can play your media files on the network drive, look for the “DLNA Certified” logo. To see which media formats your UPnP or DLNA client supports, please check the user manual of the respective device. Even though the media server can stream a certain format, it does NOT mean the client is also able to access and play the file. 8.5.
| ENGLISH 8.6 iTunes The iTunes service streams music files that are located on the NAS to iTunes users on the local network. Simply install iTunes on your PC or Mac and use it to playback the music files on your NAS. Field Description Enable iTunes Service Select the check-box to enable the iTunes service. The current state of the service is displayed as “Service is stopped” or “Service is running”. Server Name Specifies the name of the iTunes server.
| ENGLISH 8.7 Email To send e-mail invitations and receive system notifications in your mailbox, set up a SMTP server. If you are using a free e-mail account, check if it supports POP/SMTP to receive and send your mails. If not, ask your internet provider for an account that you can use to send mails via their mail server.
| ENGLISH Field Description SMTP Server Enter the IP address or domain name of your SMTP mail server (e.g. smtp.gmail.com). Port By default, the SMTP server uses port 25. When SSL is enabled, the default port is 465. Change the port number accordingly if your mail server is using a different port. Username Enter the username of your email account. Password Enter the password to your email account. SSL Select the checkbox to enable a secure SSL connection.
| ENGLISH 8.8 Downloader Dowloader is an application based on MLDonkey. MLDonkey is an open source, multiprotocol, peer-to-peer file sharing application that runs as a back-end server application on many platforms.
| ENGLISH Field Description Enable Download Service Select the check-box to enable the download service. The current state of the service is displayed as “Service is stopped” or “Service is running”. Max hard upload rate The maximum upload rate you can tolerate on your link in kB/s (0 = no limit). The limit applies to all your connections (clients and servers) and both control and data messages.
| ENGLISH 9.0 System 9.1 Accounts As system administrator, you can create additional user accounts for your family and your friends. Each user account gets its own HOME directory for private files and has access to the PUBLIC directory to share files among the different users. Field Description Username The name of the user account. All 26 English letters in lower case (a-z), numbers(0-9), dash(-) and underscore(_) can be used. The username cannot begin with a number.
| ENGLISH 9.1.1 Create a user account 1. Click New. 2. Enter a username. 3. Enter a password and confirm it. 4. Click Save to create the new account. 9.1.2 Delete a user account 1. Select the user that you want to delete from the user list. 2. Click Delete. The administrator account (admin) cannot be deleted. 9.1.3 Change the password 1. Select the user that you want to edit from the user list. 2. Enter the old password. 3. Enter the new password and confirm it. 4. Click Save to update the password.
| ENGLISH 9.2.2 Network Field Description Automatic (DHCP) Automatically obtain an IP address for your network drive from the local DHCP server or network router. Manual Configure the settings manually. If you are not sure what to fill out, enable Automatic(DHCP) or ask your system admnistrator. IP Address The local IP address of your network drive. Subnet Mask The subnet mask of your local network. Usually, the subnet mask is set to 255.255.255.0.
| ENGLISH Changing the network settings can affect the running network services and the users that are currently connected to the device. Also, if you change the IP address, remember to adjust your other settings like port forwarding on your network router or any mapped folders that are still using the old IP address. 9.2.3 Test These tools can be used to troubleshoot network problems.
| ENGLISH 9.3 Remote Assistance By default, the remote assistance service is enabled, allowing tech support to help you troubleshoot system problems remotely. For security reasons, you can disable this service and it will not affect any other services on your network drive but if you contact support for help, please temporarily enable this service again.
| ENGLISH 9.4 Date & Time Configure the system date and time of your network drive. Changing the date and the time may interrupt some of the services that rely on date & time. If possible, finish all file transfers and downloads before you change these settings. 9.4.1 Date & Time Field Description Date Set the server date by selecting the date in the calendar. Time Enter the system time in hours:minutes:seconds (e.g. 13:15:07). Apply Apply and save the changes. 9.4.
| ENGLISH 9.4.3 Internet Time Select one of the time servers from the list and then click Apply to synchronize the time over the internet.
| ENGLISH 9.5 Power Management Set a time in minutes to put the hard drives into standby mode when the system is idle to reduce the power consumption. Field Description Disk Standby Time Select a time from the drop-down menu (e.g. 10) to put the drive(s) into standby mode when the system is idle longer than the specified time. Apply Apply and save the changes. Select 0 to disable the standby mode. There could be several reasons why a disk does not spin down even when you have set a time.
| ENGLISH 9.6 Shut Down Shut down or reboot the system through the web interface. Field Description Shutdown Shutdown turns off the system completely. To turn it back on, you will have to press the power button on the device itself. Restart Reboot the system.
| ENGLISH 9.6.1 Shutdown 1. Click Shutdown. 2. Click OK to confirm that you really want to turn off the system. 3. The system turns off all services and completely shuts down after about 20 seconds. 4. Close the tab in your web browser.
| ENGLISH 9.6.2 Restart 1. Click Restart. 2. Click OK to confirm that you really want to restart the system. 3. The system shuts down all services and reboots. This takes about 1-2 minutes. 4. Once the system is running again and ready, it automatically returns to the login page.
| ENGLISH When you restart the system and the IP address remains the same, it will automatically open the login page as soon as the system is ready again. If not, you can click the link that is displayed to return to the login page.
| ENGLISH 10.0 Disk Manager 10.1 Overview The Disk Manager is a simple but powerful tool that helps you manage disks and partition your NAS. Only the admin user can access this application. Some services depend on the drives. You may need to re-login after the disk settings have been changed. In most conditions, users should not configure the disks manually. The Installation Wizard will create partitions, RAIDs and mount devices automatically. The user only needs to plug in the disks.
| ENGLISH 10.2 Auto Create a Data Disk If the user is not familiar with disk and partition operations, the Disk Manager provides an automatic tool to help set up the disks and partitions. 1. Click the Installation Wizard tab. 2. Click the Auto button. The wizard will automatically do the tasks below: • Deactivate all internal disks. • Automatically create RAID set if two or more internal disks are available. • Partition and format disks. • Automatically mount partitions as home directory.
| ENGLISH 10.3 Disk Information Select a disk from the device list, the basic information and the partitions map will be displayed in the information area, and the partitions map. The following table identifies the fields and buttons shown on the disk information page.
| ENGLISH 10.4 SMART Information S.M.A.R.T. (Self-Monitoring, Analysis, and Reporting Technology; also written as SMART) is a monitoring system for computer hard disks to detect and report on various indicators of reliability. If the disk supports SMART, then the SMART Info button can be used. Select the disk and click the button, the information will pop up in a new window. The information displayed may differ with different disk models and manufacturers.
| ENGLISH 10.5 Partition Information Select a partition in the device list or partition map, the basic information of the partition will be displayed in the information area. The following table identifies the fields and buttons shown in the partition information page.
| ENGLISH 10.7 Creating a Partition When a disk is blank or has free space to use, new partitions can be created on the disk. 1. Select the partition in the device list or the blank space in the partition map. 2. Choose the partition type and set the sector number of the partition. 3. Then click the Create button. The following table describes the fields and buttons shown in the creating a new partition page. Field Detail Partition Type The type of the object partition.
| ENGLISH 10.9 Formatting a Partition Newly created partition cannot be used before being formatted to a certain file system. To format a partition, you can: 1. select a partition in the device list or partition map 2. Click the Format Partition button on the toolbar. 3. Set the label and choose a file system. 4. Click Format button and the selected partition will be formatted. You need to refresh the page manually to check if the formatting operation was successful.
| ENGLISH 10.10 Mount a Partition Partitions cannot be read or written before the operating system has access to them. Thus partitions should be mounted to the operating system. 1. Select a partition in the device list or partition map 2. Click the Mount Partition button on the toolbar 3. Set the mount point (Check Mount as HOME if you want to mount partition to home directory) 4. Click the Mount button. 10.11 Unmount a Partition To unmount a partition: 1.
| ENGLISH 10.12 Setup a RAID Array To build a RAID array, follow the steps below: 1. Click the RAID tab. 2. Drag the partitions or disks from the device list to the RAID table. If you want to remove items in the RAID list, click the delete button in front of the item or click the Clear button to remove all items. 3. Select a RAID type in the combo box. 4. Click Create to build up the RAID. The RAID Info Panel below the RAID List shows the RAID information of the disk.
| ENGLISH 10.13 Destroy a RAID Array To destroy a RAID array follow the steps bellow: 1. Select the RAID device from the device list 2. Click the RAID tab. 3. Click the Destroy button. 10.14 USB Drives Whereas for the system drive the file system has to be XFS, for additional storage on an external USB drive, most of the common file systems are supported. However, depending on how the drive has been formatted, there are some limitations.
| ENGLISH USB drive has been formatted on the computer File System Connected to the NAS Connected to the Computer FAT32 Read & Write Read & Write NTFS Read & Write Make sure to follow the safe removal procedure when ejecting the drive on the computer. Otherwise, new files will not be recognized on the NAS and will be lost once the drive is reattached to the computer.
| ENGLISH 11.0 File Management 11.1 Create a folder Follow these steps to create a new folder. 1. Click the quick access New Folder button on the toolbar. 2. 3. Input the folder name and then click OK. 11.2 Upload Files As a web-based file manager, myiSharing allows you to upload files to the NAS. There are three available methods to upload files: • Traditional form upload: This works in all browsers but you can only upload one file at the time.
| ENGLISH 3. 4. If this is the first time you are uploading files, select one of the available upload methods. For new browsers that support it, we recommend using “HTML5”. This will allow you to drag and drop files as well as upload multiple files at the same time. If in doubt, use the default “Traditional form upload”. 5. For the traditional form upload, select your file and click Upload. For Google Gears and HTML5, drag and drop your files onto the upload window. 6.
| ENGLISH The following table identifies the fields shown in the upload dialog. Field Description Operation Performs operations on the uploading file. In Google Gears, it allows the user to delete, stop, and resume the upload. File Name Displays the name of the file. Progress Displays the progress of the upload. File Size Displays the total size of the file. Uploaded Displays the file size that has been uploaded already. Target Displays the destination directory to be uploaded into.
| ENGLISH 11.5 Rename an item To rename an item, you can: 1. Click the file or folder you wish to rename. 2. Click the Rename button or right click on the item and select Rename from the context menu. 3. input a new name for the item in the pop-up dialog and click OK. 11.6 Batch Rename To rename multiple files in a batch, use the Batch Rename command. 1. Select the files you would like to rename.
| ENGLISH 2. Right-click to open the context menu and select Batch Rename. 3. Enter a name followed by a dash or underscore (the dash or underscore is not a requirement, only a suggestion). 4. Click OK to rename the files. 5. The selected files will be renamed automatically with the new name plus a number attached at the end (e.g. images_01, images_02, etc.).
| ENGLISH Remember that if you have previously added these files to an album, renaming them will remove the files from the album, so you will have to add them again after the renaming process is completed. 11.7 Delete Items To delete an item, you can click the Delete button on the toolbar or right click on the item and select Delete from the context menu. 11.8 Share Please follow these steps to share a folder with other users. 1. Select a folder. 2. Click the Share button on the toolbar.
| ENGLISH 4. Input the share name. 5. Select at least one user and corresponding access limit. 6. Click Apply. A sharing icon (extended hand) will be added below the folder icon, which indicates that the folder has been shared with other users.
| ENGLISH 12.0 Album maker 12.1 Overview 12.1.1 Overview Album is an application that enables NAS users to make their own albums using the pictures and media stored on the NAS and share the albums with other NAS users or publish them to a website. The Album window layout is quite similar to My Server. Most of the features of the My Server window can be applied to the Album Maker. 12.1.2 Album list After opening the Album window. You will see the album list on the left side.
| ENGLISH 12.1.3 Selecting items To select multiple items in the content pane, you can: • • • Ctrl-Click: Press and hold the Ctrl key and click the items you want to select. Shift-Click: If the items are in a sequence, press and hold the Shift key, click the first item and then the last item. Select All: If you want to select all of the items, right click on an item and click Select All from the context menu. 12.1.
| ENGLISH Cut Click this button to cut items Paste Click this button to paste files into the current album Rename Click this button to rename an item Delete Click this button to delete the selected items Play Click this button to open Album Show 12.1.5 Context menu The context menu pops up when the user right-clicks on an album or item. Here is an example: The following table describes all the commands contained in the context menu.
| ENGLISH Open Opens an item Download The same function as the quick acess Download button on the toolbar. Select All Selects all items in the current window Sort by name/ size/ type/ creation date/ modification date Arranges items in different order. Copy The same function as the quick access Copy button on the toolbar. Cut Cuts an item from the selected list to moves it to another location. The same function as the quick access Cut button on the toolbar.
| ENGLISH 12.1.6 Change View At the bottom right of the status bar (bottom bar), click either of the Toggle View buttons to change the view of the content window. Six views are available when viewing the content of an album: view as thumbnail, view as details, view as list, view as slide show, view as cover flow and view as 3D wall. Only three views are available when viewing album list: view as thumbnail, view as details and view as list.
| ENGLISH
| ENGLISH More information is described below: View Description Thumbnail Displays the content as large icons and file name. Detail Displays the content as a list along with large icons and detailed information List Displays the content as a table along with small icons and detailed information Slide show Displays the content as a slide show switching from one item to the next in a show type format. Cover flow Displays the content as cover flow similar to the Mac OS style.
| ENGLISH 12.1.7 Sort items To set items in a specific sequence, Album allows you to sort items in four different ways. To sort items, right-click on the items in the content window, and select the sorting method that you prefer. The sorting methods are described in the table below: Method Description Sort by name Arranges the items according to their names.
| ENGLISH 1. Click ALBUM in the album list tree. 2. Click New Album, a dialog will pop up. 3. Input the name of the new album and click OK, the new album is created and can be seen in the album list tree and the window content. 12.2.2 Add Items There are two methods to add items to an album. Method 1 - To add items from dialog: 1. 2. 3. 4. Select an album in the album list tree. Click the Add Items Button, a dialog box pops up. Select one or more items in the dialog box.
| ENGLISH 12.2.3 Copy items To copy an item or items, you can: 1. Select one or more items you wish to copy. 2. Click the Copy button or right click on the items and select Copy on the context menu. 3. Go to the album you want to copy items to. 4. Click Paste button or right click on the items and select Paste on the context menu. 12.2.4 Cut items To cut an item, you can: 1. 2. 3. 4. Select one or more items you wish to cut.
| ENGLISH 12.3.1 Share an album to other users Sharing an album to other NAS user means the shared album can be accessed by other selected NAS users when they log in. Sharing an album is very easy. Follow the steps blow: 1. Select the album you wish to share with other users 2. Click the Share button on the toolbar or select Share in the context menu. A dialog box will pop up. 3. Choose Share this album to other NAS user, and choose the users you want to share the album to. 4. Click Apply. 12.
| ENGLISH 12.4.2 Get Access There are two methods to access published albums on the NAS. Method 1 For NAS users who log into myiSharing, click the Play button on the toolbar of the Album Application, Album Show will open in a new window or tab. Method 2 For common users, launch the web browser and input the URL http://registrationname.myisharing.com/album.html. In the URL, the registrationname should be changed to the MAC address or registered name of the object NAS.
| ENGLISH Click SHARED, the albums shared to logged-in users by other NAS users will be displayed. Common visitors can only visit the albums published on the NAS. 12.4.4 Toolbar The tool bar at the top of the window provides one-click access to key commands. There are 4 quick access buttons. Some of them are invalid under certain conditions. The functions of the buttons on the toolbar are shown in the table below.
| ENGLISH The following table gives all the commands contained in the context menu. Command Description Open Opens an item Download Downloads selected items Link Shows the URL link and embedded html code of the selected item Select All Selects all items in the current window Sort by name/ size/ type/ creation date Arranges items in different orders. Set as Background Sets the selected picture as the background image. Refresh Refreshes the window.
| ENGLISH 12.4.6 Change the View At the bottom right of the status bar (bottom bar), click any of the Toggle View buttons to change the view of the content window. Six views are available: view as thumbnail, view as details, view as list, view as slide show, view as cover flow and view as 3D wall. *NOTE: You may need to maximize the window to view the Toggle View buttons. More information is described below: View Description Thumbnail Displays the content as large icons and file name.
| ENGLISH 13.0 Media Player 13.1 Overview The Media Player application allows NAS users to play digital audio or video files that are located on your NAS. The figure below gives a brief overview of the Media Player application. 13.2 Playlists The PLAYLISTS panel is located on the left side of the main Media Player window. this panel shows all of the playlists created by the user and a Recent playlist, showing items that were recently played with the Media Player.
| ENGLISH 13.3 Select items To select multiple items from the content pane, you can: • Ctrl-Click: Press and hold the Ctrl button and click the items that you want to select. • Shift-Click: If the items are in a sequence, press and hold the Shift button, click the first item and then the last item. • Select All: If you want to select all of the items, right click on an item and click Select All from the context menu. 13.
| ENGLISH Previous Go to previous item Play Plays the selected item in the playlist Next Go to the next item Add list Adds a new playlist Rename list Renames a playlist Delete list Deletes a playlist Add items Adds items to a playlist Copy Copies the selected items Cut Moves an item to another playlist Paste Pastes copied or cut items to the selected playlist Delete Deletes the selected items
| ENGLISH 13.5 Tracks List The tracks list displays all of the media files in the playlist. The tracks list presents basic information about each item. Double click on any item to play it in the Media Player application. The following table describes all of the fields shown on the tracks list.
| ENGLISH 13.6 Context menu The context menu pops up when the user right-clicks on an item. Here is an example: The following table describes all of the commands contained in the context menu.
| ENGLISH 13.7 Managing Media Files 13.7.1 Add a playlist To create a playlist, please follow these steps: 1. Click the Add List button on the toolbar. 2. Input a name for the new list. 3. Click OK. It will appear in the PLAYLISTS section. 13.7.2 Rename a playlist To rename a playlist, please follow these steps: 1. Select the playlist you wish to rename from the PLAYLISTS. 2. Click the quick access Rename List button on the toolbar. 3. Type in the new name. 4. Click OK.
| ENGLISH 13.7.3 Delete a playlist To delete a playlist, please follow these steps: 1. Select the playlist you wish to delete. 2. Click the quick access Delete List button on the toolbar. 3. Click OK. 13.7.4 Add media files To add media files to a playlist, please follow these steps: 1. Click the quick access Add Items button on the toolbar and a new window will appear. 2. Select the items that you wish to add to the playlist. 3. Click Open. The files will be displayed in the playlist.
| ENGLISH 13.7.5 Copy items To copy an item or items, you can: 1. Select an item (or items) you wish to copy. 2. Click the quick access Copy button or right click and select Copy from the context menu. 3. Go to the playlist you want to copy items to. 4. Click the quick access Paste button or right click and select Paste from the context menu. You can also copy an item (or items) to another playlist by dragging and dropping . 13.7.6 Cut items To cut an item, you can: 1.
| ENGLISH 14.0 Share to Social Networking Sites The Social Network application provides online access to social networking sites such as; Facebook, Google Picasa, Flickr, YouTube, etc. The application allows you to share your albums or other files with the social network community. Currently, only Facebook can be used. 14.1 Share on Social Networking Sites To share image files on Facebook, please follow these steps. • Click the Facebook icon on the social network panel.
| ENGLISH After you log in, the Facebook window will be automatically closed. The interactivesharing Facebook window will automatically get your albums and pictures from Facebook.
| ENGLISH • • • • Select an album from the album list, or click the plus button on the bottom left to create a new album. If you are using Microsoft Internet Explorer, an alert message will appear above the page when you try to create a new album. Right click the message and choose “Temporarily Allow Scripted Windows”, the message will disappear. Click the plus button under the content panel (right side of window), the “open” window will appear. Select the images that you wish to upload.
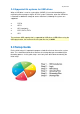
| ENGLISH 15.0 Network services 15.1 File Management Overview There are several ways you can upload, download and manage your files on the network drive. Which method to choose depends on how and where you would like to access the files as well as your personal preferences. 15.1.1 Benchmark Following benchmarks show how long it takes to transfer certain media files using the different methods as mentioned above. Test Environment Test Files: • 500 MP3 files, 50 folders, 1.
| ENGLISH Upload - Mac >> NAS Download - NAS >> Mac For the web interface, it's not possible to download more than one file at the time. Because of that, for the download test, the files were added to a ZIP archive. The resulting transfer rate is therefore faster in comparison to the upload, where the files were not combined in a single ZIP archive.
| ENGLISH Upload - PC >> NAS The photos and music results for the WebDAV upload were out of range for this benchmark. For music, the transfer completed after 9:54 m:ss and for photos, it completed after 10:29 m:ss. Download - NAS >> PC For the web interface, it's not possible to download more than one file at the time. Because of that, for the download test, the files were added to a ZIP archive.
| ENGLISH 15.1.2 Conclusion Following recommendations are not based solely on the best transfer rates but on the best overall user experience. Who/Where/When What Why Beginners Anywhere Web interface No explanations or software installation needed and it works with all browsers. Home network Large file backup Samba Ease of use once the network drive is mounted and fast transfer rates.
| ENGLISH 15.2.1 Login 1. Open your web browser (e.g. IE, Firefox, Safari, Chrome). 2. Go to http://isharing.eminent-online.com. 3. Your default home server name is the MAC address of your network drive. You can find this number on a sticker either on the retail packaging or the device itself. If you have previously registered a new name for your device (Preferences > Portal Server), you can also use the name instead of the MAC address. 11:22:33:44:55:66 4.
| ENGLISH 5. Login to your account. The default username and password for the administrator is admin. 15.2.2 File Upload 1. Open the MyCloud file explorer.
| ENGLISH 2. Open the folder where you would like to store the file(s). 3. Click Upload. 4. If this is the first time you are uploading files, you are presented with 3 options. Select your preferred upload method and click OK. • Option 1 is for older browsers that do not support HTML5 yet. You can only upload one file at the time. • Option 2 is only for browser that already have Google Gears installed. Google Gears is no longer available for download.
| ENGLISH 5. Option 3 is the recommended method for new browsers, letting you drag and drop multiple files onto the upload window. 6. If you have previously used the upload function and enabled “Don't remind me again!”, you can upload the files immediately. If you would like to change the upload method, click Options to go back to the selection window. 7. In this example, the HTML5 method is used. Simply drag and drop the file(s) onto the upload window. 8.
| ENGLISH 9. When the upload is completed, click Refresh and you can view the files in the file explorer. For Internet Explorer, the HTML5 upload method requires IE 10 or above. When using the HTML5 upload method, you can drag and drop multiple files at once but only on Chrome can you also drag and drop whole folders including sub-folders. 15.2.3 File Download Single Files 1. Open the MyCloud file explorer.
| ENGLISH 2. Open the folder where the media files are stored. 3. Select a file and click Download. 4. Save the file on your computer.
| ENGLISH Multiple Files 1. Open the MyCloud file explorer. 2. Open the folder where the media files are stored.
| ENGLISH 3. Control (Ctrl) or shift (Shift) click the files you would like to download. 4. Right-click to open the context menu and select Add to Zip.
| ENGLISH 5. Enter a file name for the ZIP archive and click Apply. 6. The completed ZIP archive is stored in the HOME directory and as soon as it's ready, a download link appears. Click Download to save the file on your computer.
| ENGLISH 7. If you don't want to immediately download the ZIP archive, you can always locate it in the HOME directory and download it from there later.
| ENGLISH 15.2.4 Batch Rename To rename multiple files in a batch once they are uploaded to the network drive, use the Batch Rename command. 1. Select the files you would like to rename. 2. Right-click to open the context menu and select Batch Rename. 3. Enter a name followed by a dash or underscore (the dash or underscore is not a requirement, only a suggestion). 4. Click OK to rename the files.
| ENGLISH 5. The selected files will be renamed automatically with the new name plus a number attached at the end (e.g. images_01, images_02, etc.). Remember that if you have previously added these files to an album, renaming them will remove the files from the album, so you will have to add them again after the renaming process is completed. 15.3 Media Server The media server streams your digital media files that are stored on the network drive to other UPnP and DLNA compliant media players (e.g.
| ENGLISH 15.3.1 Setup Media Server 1. Login to your network drive as administrator. 2. Go to Preferences > Media Server. 3. Make sure the media server service is up and running. 4. Click Add and select the folder where the media files that you would like to stream on the home network are stored.
| ENGLISH 15.3.2 Windows Media Player 1. Start Windows Media Player. 2. Select your network drive under “Other Libraries”. The name under which the device is listed is the service name you have entered in the media server preferences. 3. The media files are sorted automatically by formats (e.g. Music, Videos, Pictures). Select the file type you would like to view.
| ENGLISH 4. Depending on the file format, the files can be sorted according to different criteria but you can also simply display all the available files (e.g. “All Music”) or view the files in folder view (e.g. “Folder”) just like the files are stored on your network drive. 5. To start playback, locate the file that you would like to access and double-click on it. 15.3.3 Playstation 3 1.
| ENGLISH 2. When you turn on the game console, the available media servers on the home network are automatically detected and a link to it is listed in each category for Photo, Music and Video. Eminent iSharing 3. Select your device and then select the type of files that are stored in the selected category (e.g. Pictures for Photo, Music for Music, Videos for Video).
| ENGLISH 4. Depending on the file format, the files can be sorted according to different criteria but you can also simply display all the available files (e.g. “All Music”) or view the files in folder view (e.g. “Folders”) just like the files are stored on your network drive. 5. To start playback, locate the file that you would like to access and press the circle button.
| ENGLISH 15.3.4 Xbox360 1. On your game console, go to apps and select My Apps. 2. Depending on the file type you would like to view, select the corresponding media player (e.g. Picture Viewer for images, System Music Player for music, System Video Player for videos).
| ENGLISH 3. Select your network drive from the list of available source. Eminent iSharing 4. Locate the file that you would like to access and start playback.
| ENGLISH 15.4 iTunes The iTunes service can be used to stream your music files that are stored on the network drive to other computers on the same home network that have iTunes installed. The music will automatically appear in the iTunes player under “SHARED” sources. The iTunes music server supports following file formats: *.mp3, *.m4a, *.m4p, *.ogg, *.flac. 15.4.1 Setup iTunes Server 1. Login to your network drive as administrator. 2. Go to Preferences > iTunes. 3.
| ENGLISH 4. You can now play back your music files directly in iTunes.
| ENGLISH 15.5 Windows PC users 15.5.1 Samba on a PC Samba is the recommended method to upload and manage a large amount of files, including directories and sub-folders or very large files. Once the network drive is mounted, you can manage the files just like you would do with any other drive on the computer. To change the host name of your network drive, go to Preferences > Network. You can only use Samba when both your network drive and the computer are connected to the same local network.
| ENGLISH 15.5.3 Network Neighborhood If your computer and the network drive both belong to the same workgroup, a shortcut to the network drive appears automatically. To access it, simply double-click on the shortcut. 1. On your computer, open the file explorer and go to Network. 2. Select and double-click on the shortcut for your network drive.
| ENGLISH 3. When prompted for the login credentials, enter the username and password of your user account on the network drive and click OK. As an example, the administrator would enter admin for both username and password. 4. You can now access your files on the network drive. 15.5.4 File Explorer If you cannot find the network drive in your network neighborhood, you can access it by entering the path to the drive into the address field. 1. On your computer, open the file explorer.
| ENGLISH 2. Enter two backslashes followed by either the host name (e.g. \\isharing) or the IP address (e.g. \\192.168.1.30) of your network drive into the address field and then click Enter on your keyboard or click on the Go to arrow in the file explorer. 3. When prompted for the login credentials, enter the username and password of your user account on the network drive and click OK. As an example, the administrator would enter admin for both username and password. 4.
| ENGLISH 15.5.5 Map Network Drive To create a permanent link to your network drive that stays even after a system reboot, map the network drive to your system and enable the “reconnect at logon” option. If you create a permanent link using the IP address, it's best to change the network settings of your network drive from “Automatic” to “Manual”. This way, the IP address will always stay the same. For more details, see Preferences > Network. 1. On your computer, open the file explorer. 2.
| ENGLISH 3. If you don't see the shortcut, go to Tools in the menu bar and there you can select Map network drive…. 4. Enter two backslashes followed by either the host name (e.g. \\isharing) or the IP address (e.g. \\192.168.1.30) plus a folder (e.g. \\isharing\public). 5.
| ENGLISH 6. To create a permanent link that also stays after a system reboot, select Reconnect at logon and then click Finish to complete the setup wizard. 7. When prompted for the login credentials, enter the username and password of your user account on the network drive and click OK. As an example, the administrator would enter admin for both username and password. 8. You now have a permanent link on your computer and can access the files just like you would do with any other drive.
| ENGLISH 15.5.6 WebDAV on a PC WebDAV is used for the web interface, when uploading or downloading files through the web browser. It can also be used to mount the drive remotely, in comparison to Samba, which can only be used on the local network. However, the transfer rate is much slower and there are other limitations (e.g. file size) as well. Whenever possible, we recommend using either Samba for the local network or FTP for remote access, rather than using WebDAV.
| ENGLISH 2. Select Map network drive. 3. If you don't see the shortcut, go to Tools in the menu bar and there you can select Map network drive 4. Enter the IP address (e.g. http://192.168.1.10) plus the webdav folder (e.g. http://192.168.1.10/webdav). 5. To create a permanent link that also stays after a system reboot, select Reconnect at logon and then click Finish to complete the setup wizard. 6.
| ENGLISH administrator would enter admin for both username and password. 7. You now have a permanent link on your computer and can access the files just like you would do with any other drive. 15.5.7 FTP on a PC FTP has fast transfer rates and can be used both on the home network (LAN) and remotely (WAN). However, the files have to be transferred to the computer first, before you can open and view them.
| ENGLISH 15.5.7.1 Setup FTP Service 1. Login to your network drive as administrator. 2. Go to Preferences > FTP. 3. Make sure the FTP service is up and running. 4. If you plan on using an SSL encrypted FTP connection, enable the option Enforce SSL. 15.5.7.2 File Explorer You can use the file explorer to open an FTP folder but in general, we recommend using a 3rd party FTP client. 1. On your computer, open the file explorer.
| ENGLISH 2. In the address field, enter ftp:// followed by the IP address of your network drive and click Enter on your keyboard or click on the Go to arrow in the file explorer. 3. When prompted for the login credentials, enter the username and password of your user account on the network drive and click Log On. As an example, the administrator would enter admin for both username and password.
| ENGLISH 4. You can now manage your files on the network drive. If you prefer, you can also add the username and password to the URL, in order to reduce the steps it takes to login and remove the additional password prompt. The correct syntax for the URL is ftp://username:password@192.168.33.30 15.5.7.3 FTP Client A FTP client makes it easier to manage multiple accounts and it is also more convenient to transfer the files.
| ENGLISH 2. Open the Site Manager. 3. Click New Site and create a new account for your network drive.
| ENGLISH 4. For the host, enter the IP address of your network drive. On your home network, use the local IP address. For remote access, use the external IP address. 5. For the protocol, select FTP - File Transfer Protocol.
| ENGLISH 6. For the encryption, select Use plain FTP. If you have setup the FTP server to use SSL encryption, select Require explicit FTP over TLS instead. 7. For the logon type, select Normal and then enter the username and password of your user account on the network drive. As an example, the administrator would enter admin for both username and password.
| ENGLISH 8. Under normal circumstances, these are all the settings you have to configure and the rest can be left at default. However, if you have changed the port number for the FTP server and it's not using the default port 21, remember to enter the correct port number in the FTP client at this point.
| ENGLISH 9. Double check all your settings and then click Connect. If you are using SSL encryption, you will be prompted to accept the certificate at this point. 10. You can now manage your files on the network drive.
| ENGLISH If there is an option to set the charset that is used to encode the file names, set it to UTF-8. If you would like to login remotely using FTP, set up port forwarding on your network router first. Redirect the incoming FTP traffic on port 21 to the IP address of your network drive. Otherwise, you can only use FTP when both your computer and the network drive are connected to the same local network.
| ENGLISH 4. Choose a folder from the list and click OK. 5. The mounted drive will be listed in your Finder under Shared devices. When no longer needed, click on the eject button to disconnect the drive.
| ENGLISH What is Samba or SMB? Read more about it on Wikipedia. 15.6.2 WebDAV If you want to access the NAS on local network,follow these steps below to map a network drive. 1. Click on Go and select Connect to Server. 2. Type http://ipaddress/webdav/ and click Connect. 3. Enter your user name and password. Then click Connect.
| ENGLISH 4. The mounted drive will be listed in your Finder under Shared devices. When no longer needed, click on the eject button to disconnect the drive. What is WebDAV? Read more about it on Wikipedia.
| ENGLISH 15.6.3 FTP File Transfer Protocol (FTP) is a standard network protocol used to transfer files from one host to another host over a TCP-based network, such as the Internet. FTP is built on a client-server architecture and utilizes separate control and data connections between the client and server. To use FTP, you must have a FTP client software installed on your computer.
| ENGLISH Make sure to set the encoding of your FTP client to UTF-8. To connect to your NAS from outside the home network, make sure to setup port forwarding on your network router first. Redirect the FTP traffic (e.g. port 21) to your NAS.
| ENGLISH 15.7 USB Copy USB Copy allows you to quickly back up data from an external USB storage device such as a USB hard drive, USB flash drive or USB card reader. When a USB drive is connected to your NAS via USB, all files on the USB drive can be copied to the internal hard drive of the network drive with a push on a single button. Follow the steps below to complete USB Copy: 1. Connect the USB drive to the front port of your network drive. We recommend using self-powered USB devices. 2.
| ENGLISH 16.0 USB Printer Server The printer server is built-in and enabled by default. There are no options or preferences in the web interface to modify. Simply connect a USB printer to the network drive and install it on your computer to start using it. Not all USB printers are supported, e.g. multi-function all-in-one printers and GDI/hostbased printers, therefore, your printer may not be compatible and printing might fail. 16.
| ENGLISH 6. Select Create a new port, choose Standard TCP/IP Port from the list and then click Next. 7. Make sure the network drive and printer are both turned on and connected to the same local network as your computer, then click Next.
| ENGLISH 8. Enter the IP address of your network drive (the port name will be filled out automatically) and then click Next. 9. Select Custom and click Settings to modify the configuration.
| ENGLISH 10. Select Raw, use the default port number 9100 and then click OK to confirm it. 11. Click Finish to complete the TCP/IP Wizard and close the dialog box. 12. After clicking Next, a pop-up window will appear asking for a driver. Select your printer model from the list or browse for the corresponding driver on your local drive.
| ENGLISH 13. In the next few steps, you will be able to give the printer a name, set it as default printer, add a description and print a test page. It is not necessary to share the printer with other network users, because it can be installed on other computers in the same way as here. 14. Once you have completed the set-up wizard your printer is ready.
| ENGLISH 16.2 Installation on a Mac Printing via the shared network printer will be slower than when the printer is connected directly to the USB port on the computer. After you press the Print button, please wait for the printer to receive the data. 1. Go to System Preferences and click Print & Fax. 2. Click on the icon 3. Select the IP tab. For the Protocol, select HP Jetdirect – Socket and for the to add a new printer. Address enter the IP address of your network drive.
| ENGLISH 17.0 Usage with mobile devices 17.1 Apple iOS (iPhone/iPad) App 17.1.1 Login with iPhone/iPad We provide the free software for the iSharing NAS on iPhone/iPad – MyiSharing iSharing, you can access your network drive anytime and anywhere with iPhone/iPad. Go to the Apple App Store and search for “isharing”, and download the app on your Iphone or Ipad.
| ENGLISH After login, you can see the main page, there are four tabs on the bottom: Applications, My Server, My Download and Preferences.
| ENGLISH
| ENGLISH 17.1.2 Take a picture and upload it to the myiSharing NAS 1. Go to Applications. Click Camera. 2. Take a picture as usual.
| ENGLISH 3. Like it? Just click Use to upload it to your NAS. 4. The picture will be on your NAS in the Photos folder.
| ENGLISH
| ENGLISH 17.1.3 Upload photos or Videos from your camera roll 1. Go to Applications, Click Upload Photos or Upload Videos. 2. Go to Camera Roll. 3. Choose the photos or videos you want to upload, by selecting them.
| ENGLISH 4. Once you have selected the photos or videos, press done. 5. The photos or videos will be uploaded to your NAS by the Upload Manager. 6. The photos or videos will be on your NAS in the Photos or Videos folder.
| ENGLISH 7. The function to upload photos or videos from your mobile device (e.g. iPhone or iPad) to the network drive works only if the App has location access. On your mobile device, go to Settings, select Location Services and enable it.
| ENGLISH 17.1.4 Record a voice memo 1. Go to Applications. Click Voice Memo. 2. 3. 4. 5. Press the record button and speak into the microphone of your Iphone or Ipad. Once you are ready, press Stop and Cancel. The recorded voice will automatically be transferred to your NAS. The recorded message will be on your NAS in the Music folder.
| ENGLISH
| ENGLISH 17.1.5 Check your upload progress 6. Go to Applications. Click Upload Manager. 7. Check your upload progress here.
| ENGLISH 17.1.6 Read your file and Stream your media on the go Go to My Server on the bottom tab. You'll see at least 5 folder in the list. Field Detail home Your personal file location public The folder shared with all the user on the MyCloud. share Files that shared to you by other user. device External device will be shown here. downloads BT download path.
| ENGLISH If you want to keep the files on the device for offline reading, just click the icon (cloud) on the right of the file. Then it will be downloaded to your mobile device. When the download progress is complete, you'll see the icon turns to green. Go to My Download, you can see the file you have downloaded.
| ENGLISH You can also go to the My Download files from login screen of the iSharing app :
| ENGLISH
| ENGLISH 17.1.7 Preferences Field Detail Capture Choose different quality of the photo when you take a picture. Play Each Slide For When Viewing your photo on slide show mode, you can choose the halt time for each photo. Upload Location Choose your upload locations for Image, Video and Audio. Logout Click it when you want to logout and login to other device.
| ENGLISH 17.2 Android App 17.2.1 Login with Android mobile device We provide the free software for the iSharing NAS on Android – MyiSharing iSharing, you can access your network drive anytime and anywhere with your Android device. Go to Google Play and search for “isharing”, and download the app on your Android device. • • • My device: The device name you registered, the default is the Mac Address of the device. User Name: The user name of the device. Password: The password of the user.
| ENGLISH
| ENGLISH 17.2.2 Take a picture and upload it to the myiSharing NAS 1. Go to Applications. Click Camera. 2. Take a picture as usual and press Save. 3. The photo will be saved to your iSharing NAS automatically. 4. The picture will be on your NAS in the Photos folder.
| ENGLISH 17.2.3 Record a movie and upload it to the NAS 1. Go to Applications. Click Video Recorder. 2. Make a movie as usual and press Save. 3. The movie will be saved to your iSharing NAS automatically. 4. The movie will be on your NAS in the Videos folder.
| ENGLISH 17.2.4 Upload photos or Videos to your NAS 1. Go to Applications. Click Photos or Videos. 2. 3. 4. 5. Select the photos or videos you want to upload.. Once you are ready, press Select. The photos or videos will be uploaded to your NAS. The photos or videos will be on your NAS in the Photos or Videos folder.
| ENGLISH
| ENGLISH 17.2.5 Check your upload progress 1. Go to Applications. Click Upload Manager. 2. Check your upload progress here. 17.2.6 Read your file and Stream your media on the go Go to My Server on the top tab. You'll see at least 5 folder in the list. Field Detail home Your personal file location public The folder shared with all the user on the MyCloud. share Files that shared to you by other user. device External device will be shown here. downloads BT download path.
| ENGLISH If you want to keep the files on the device for offline reading, just click the icon (cloud) on the right of the file. Then it will be downloaded to your mobile device. When the download progress is complete, you'll see the icon turns to green.
| ENGLISH Go to My Download, you can see the file you have downloaded.
| ENGLISH You can also go to the My Download files from login screen of the iSharing app :
| ENGLISH
| ENGLISH 18.0 Frequently Asked Questions and other related information The latest Frequently asked questions for your product can be found on the support page of your product. Eminent will update these pages frequently to assure you have the most recent information. Visit www.eminent-online.com for more information about your product. 19.0 Service and support This users manual has been carefully written by Eminent’s technical experts.
| ENGLISH 20.0 Warning and points of attention Due to laws, directives and regulations set out by the European parliament, some (wireless) devices could be subject to limitations concerning its use in certain European member states. In certain European member states the use of such devices could be prohibited. Contact your (local) government for more information about this limitations. Always follow up the instructions in the manual*, especially where it concerns devices which need to be assembled.
| ENGLISH 22.0 Declaration of Conformity To ensure your safety and compliance of the product with the directives and laws created by the European Commission you can obtain a copy of the Declaration of Conformity concerning your product by sending an e-mail message to: info@eminentonline.com.