
Installation Guide

Recessed Shower Cube Installation Instructions
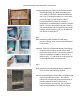
Step 1
Place Recessed Shower Cube level at desired location
with flange facing out. When positioning the
unit, make sure Shower Cube located between
the 2” by 4” framing members. For some cases,
customer need to install Shower Cube in
horizontal position, please do necessary
modification if needed before install the cement
board. Trace the perimeter of Shower Cube on
the cement board and then place the unit aside.
Enlarge marked layout by 1/2” on all sides and
cut out the cement board.
Step 2
Add a continuous bead of adhesive caulk along
mounting flange, then secure Recessed Shower
Cube to wall
Important: Thickness of Recessed Shower Cube flange
should be minimized to provide a flush wall
surface for the finish tile. Use bonding material
(thin-set to feather the edge of the unit for a
distance of 4” ` 6” and allow to set firm prior to
continuing with finish tile placement.
Step 3
Finish as desired using bonding products suitable for
finish surface material being applied.
Note: All Recessed Shower Cube have a predetermined
slope for the bottom surface. This may be
reduced or enhanced by using a thicker bed of
bonding material at the front or rear of
horizontal plane as necessary. Do not adjust
slope to angle backward toward rear of unit.