
Home Theater System User Manual


Page 42
Page 43
Operation of the DMC-1 using the Remote
Turning on the MAIN Zone
1) Press the remote’s MAIN button to make sure the display
is on the main display menu.
2) Press the EMO device button to set the remote to operate
the DMC-1. The display changes to show the DMC-1 input
selections.
3) Press PAGE to reach page 2, which shows the PRO LOGIC-
II, PARTY, STEREO, and the trims for center, surrounds, and
sub. On the right is ‘+’ (increase level) and on the left is ‘-’
(decrease level).
4) The following buttons with xed labels are also programmed:
Power, Volume Up, Volume Down, and Mute. The number pad
accesses the tuner presets directly, and CH+/- steps through
them. DIS is the +10 function, and ENT is station enter. The
MODE buttons either side of the Joystick, allow you to select
the dierent surround modes.
Turning on ZONE 2
1) Press the remote’s MAIN button to make sure the display
is on the main display menu.
2) Press the ZONE 2 device button to set the remote to
operate the Zone 2 of the DMC-1. The display changes to
show the PAGE 1 of the ZONE 2 input selections.
3) The hard buttons operate Zone 2 controls such as Power,
Volume, Mute, Tuner Controls, and Presets.
4) Press PAGE to reach page 2, which shows Zone 2 on/o,
Zone 1 on/o, and balance left/ right
Note: Zone 2 must rst be enabled using the OSD (see page
55), or these controls will have no eect. Zone 2 is disabled by
default as it is shipped from the factory. When enabled, Zone
2 can be turned on even if the Main Zone is o. See page 55
for more Zone 2 details.
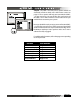
After pressing EMO, you will enter PAGE
1 and PAGE 2 screens for commanding
the DMC-1 by remote. These functions
allow source selection and individual level
control of specic speakers as labeled
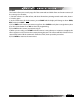
After pressing ZONE2, you will enter
PAGE 1 and PAGE 2 screens for
commanding Zone 2 of the DMC-1 by
remote. These functions allow source
selection as well as control of turning
on/off of both zones 1 & 2